Documentation
Phoscon Home
Phoscon Home is a powerful tool for configuring and controlling small and large smart home automation installations. Specializing in the popular Zigbee wireless standard, Phoscon Home supports a constantly growing number of lights, sensors, and switches from various well-known manufacturers.
Phoscon Home is available starting with Phoscon App Version 2.0.8.
The smartphone app for Phoscon Home is available in the Google Play
Store and the Apple App Store and continues to operate under the name
Phoscon App.

![]()
Phoscon Home can be used without restrictions with the dresden elektronik products RaspBee, RaspBee II, Phoscon Gateway, as well as ConBee and ConBee II.
Getting started
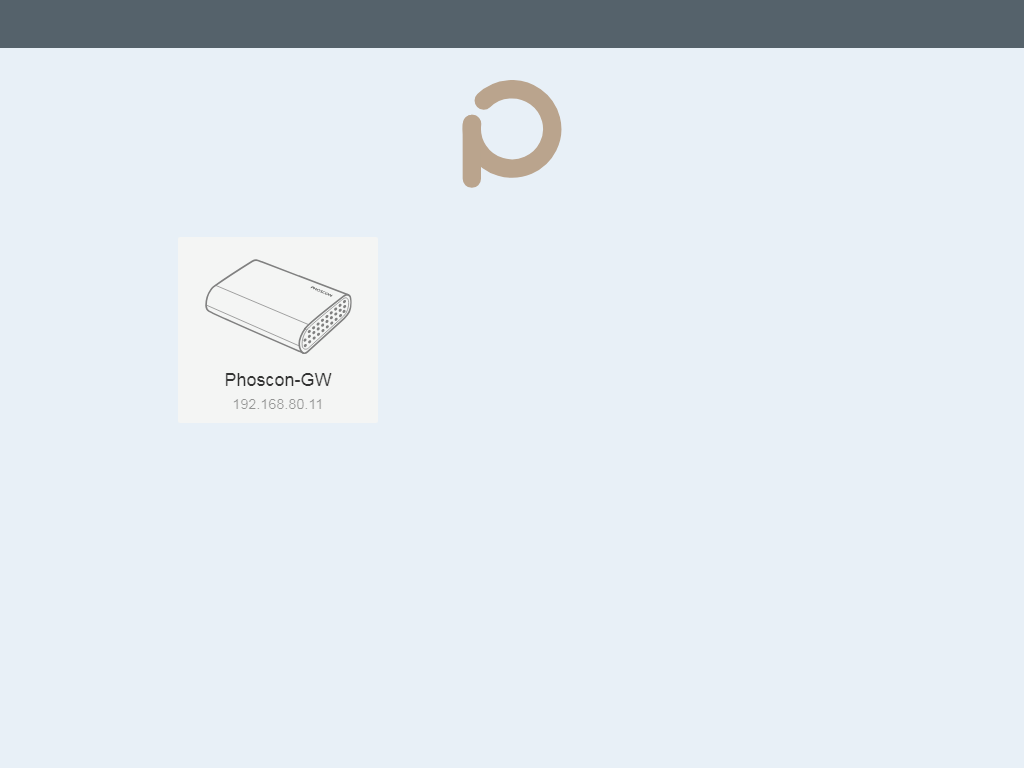
Access Phoscon Home on your smartphone or via http://phoscon.de/app in a
browser. The gateway will be displayed with the name Phoscon-GW
and its current IP address. If not, you can restart the search for the
gateway in the smartphone app by selecting
.
Alternatively, you can link the gateway to the app by entering the
IP address and Port.
Furthermore Phoscon Home can be opened by entering the IP address in a browser or via Windows Explorer → Networks.
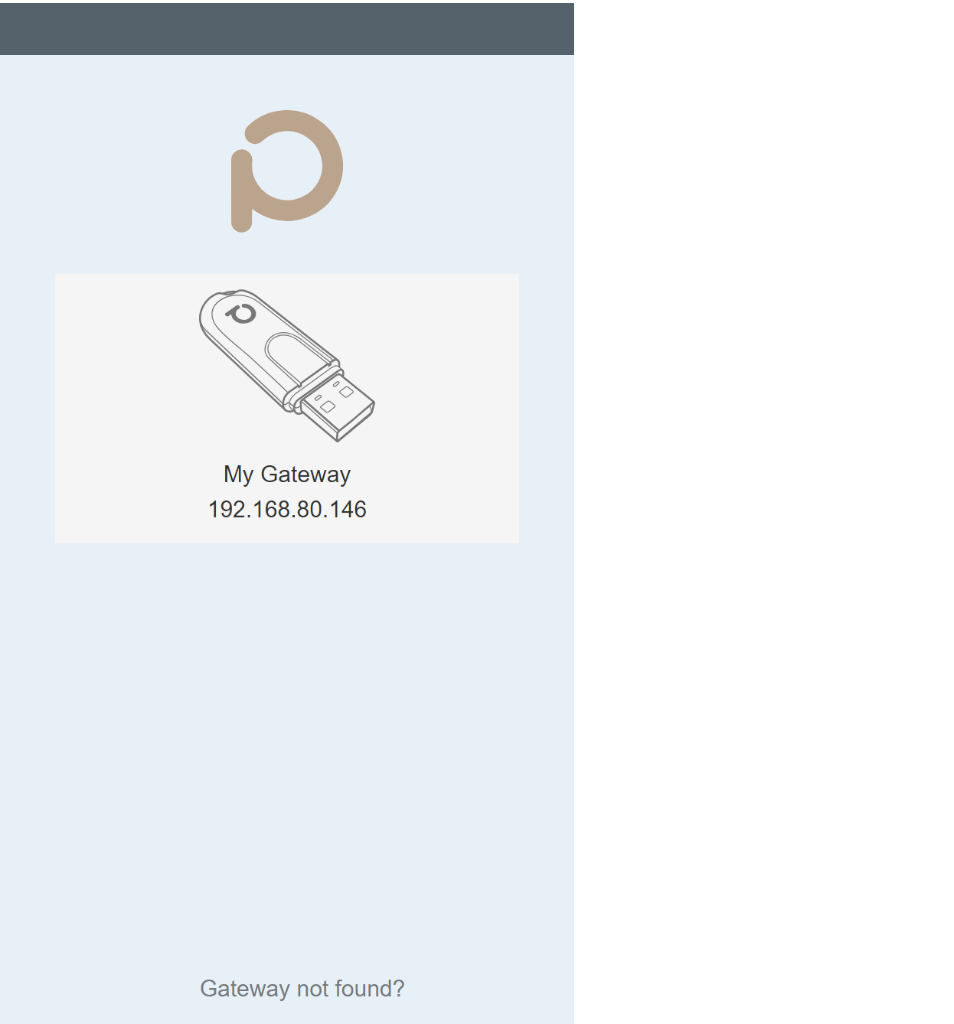
Select the gateway and specify a name and login password.
Note: The IP address is typically assigned by the Ethernet or Wi-Fi router. If no specific port has been specified, Port 80 can be used.
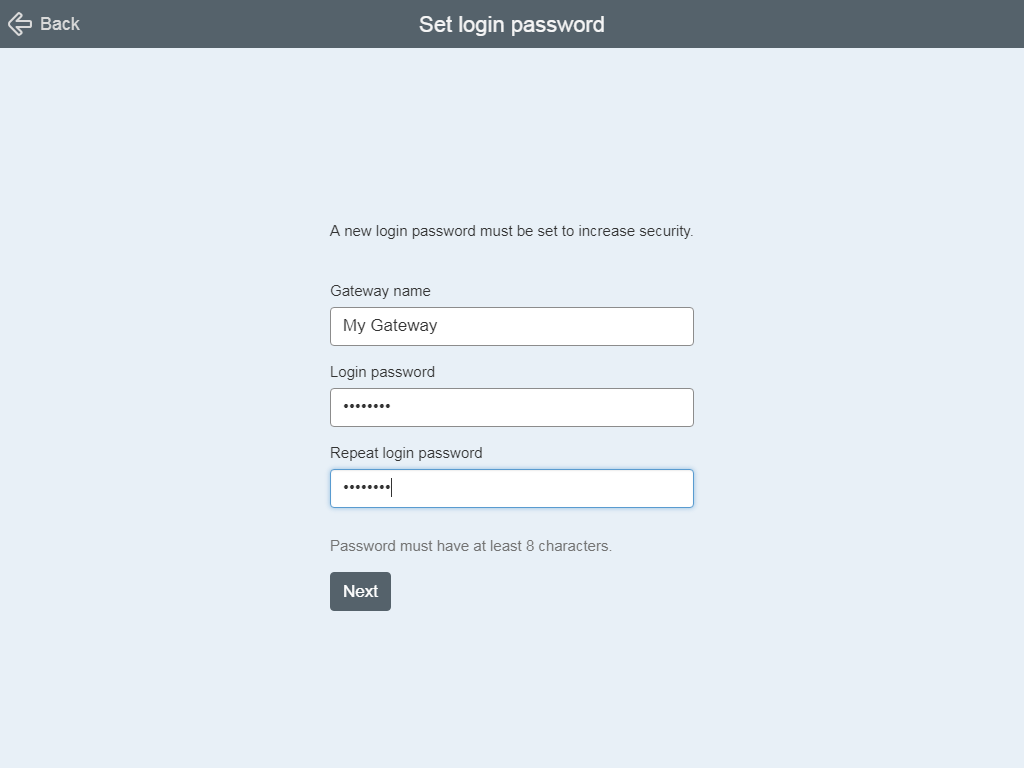
Set login password
The login password secures the access of the gateway in the local network. It can be changed later within the gateway settings.
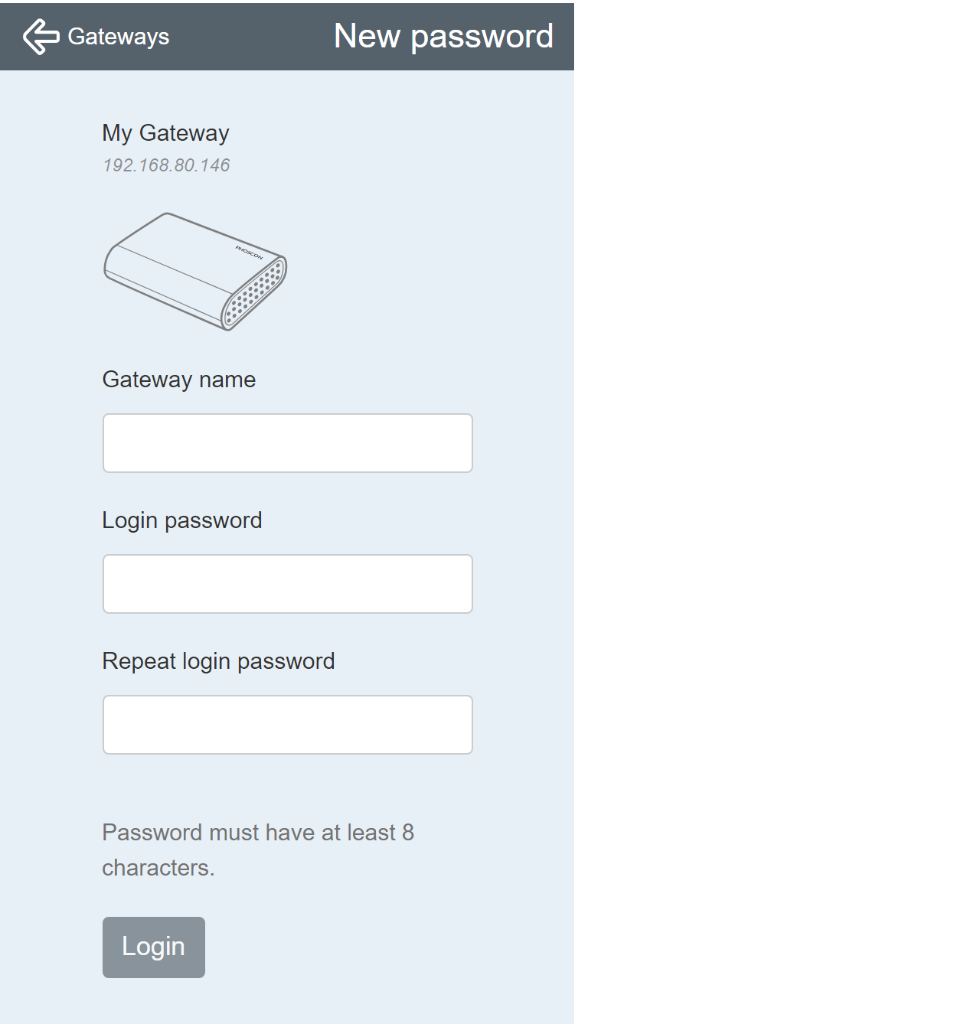
Reset login password
The login password can only be reset within the first 10 minutes after restarting or commissioning the gateway.
Create first room
For further commissioning, it is necessary to create the first room. Lights, switches, sensors, and other devices can then be added to it.
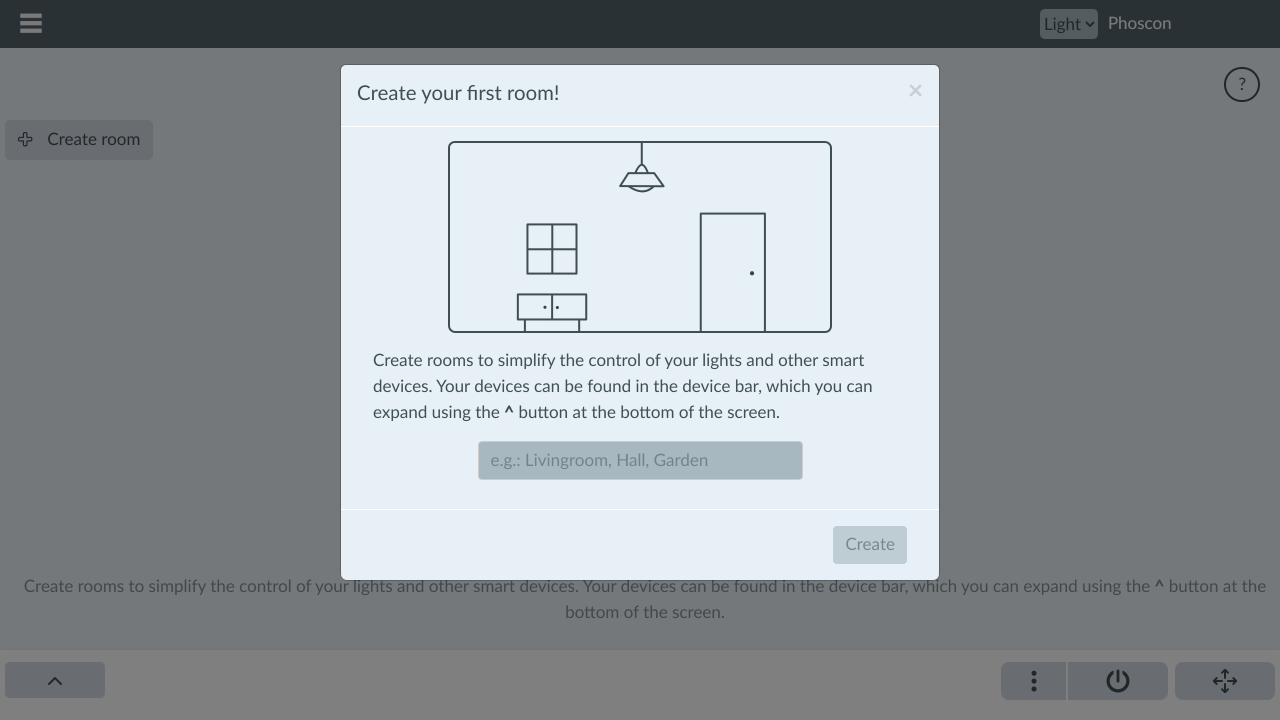
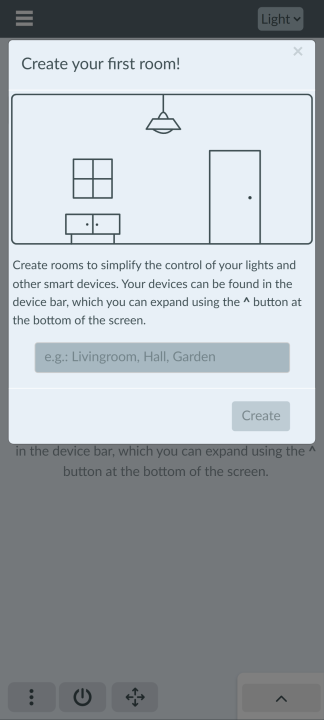
Rooms can, in turn, be divided into groups. For example, a room like the living room can be divided into groups such as the dining area and the seating area.
Migration Assistant
If an older version of the Phoscon app is already installed and configured on the gateway, the group settings can be imported into the new dashboard view. The Migration Assistant can be used for this purpose.
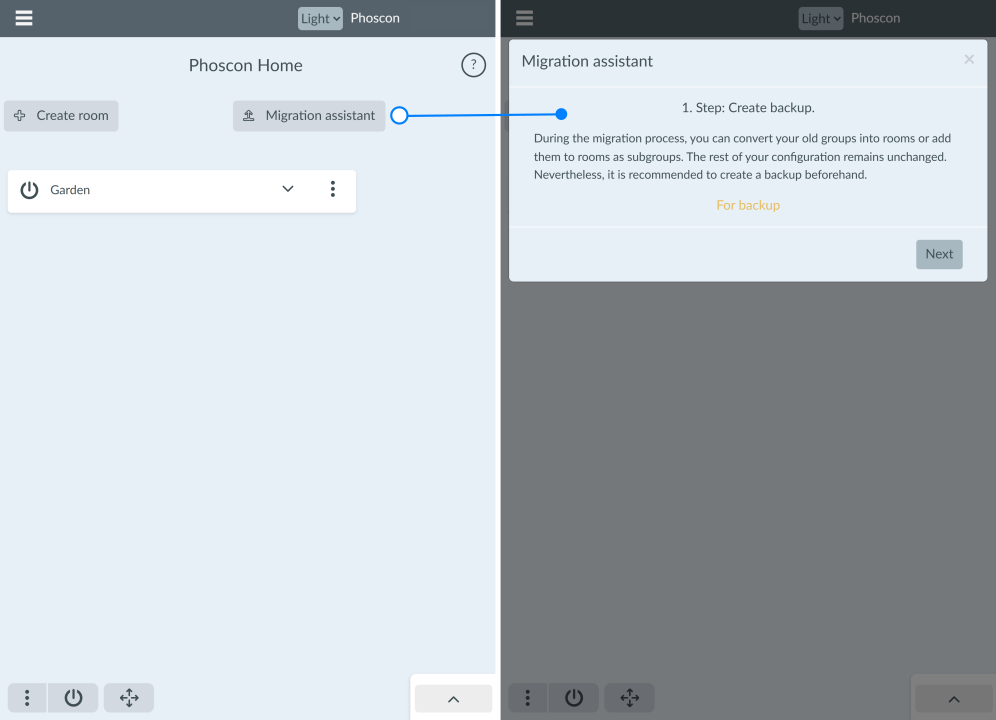
A backup must be created before importing to ensure that you can return to the latest version of the Phoscon app configuration at any time.
Room
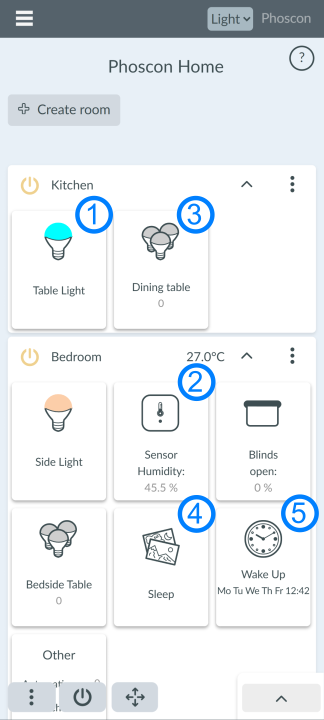
The dashboard displays created rooms and the devices they contain.
The following applies:
- One device can only be part of one room.
- One room can contain multiple subgroups.
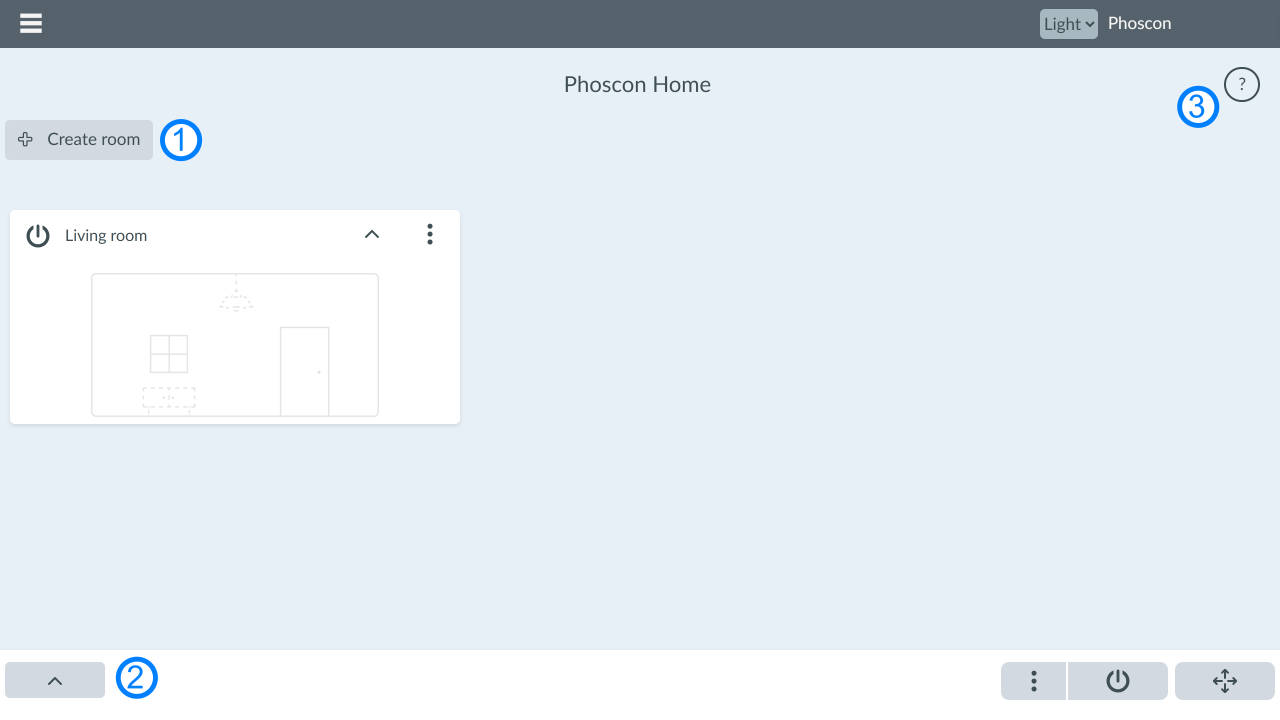
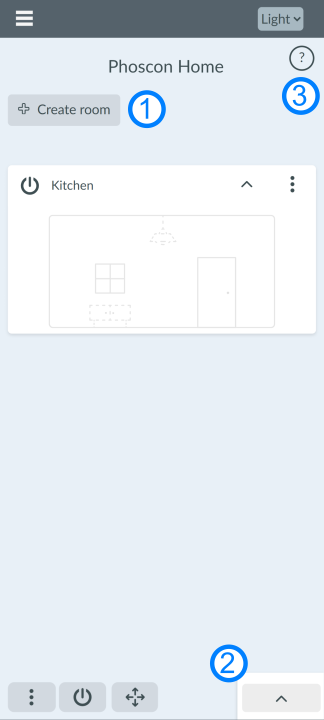
Overview
- Create a new room and assign a name.
- Open the device bar: sensors, lights and sockets, blinds, thermostats.
- Open the help menu.
Example video: Create a room, open a network, and assign a light to
the room
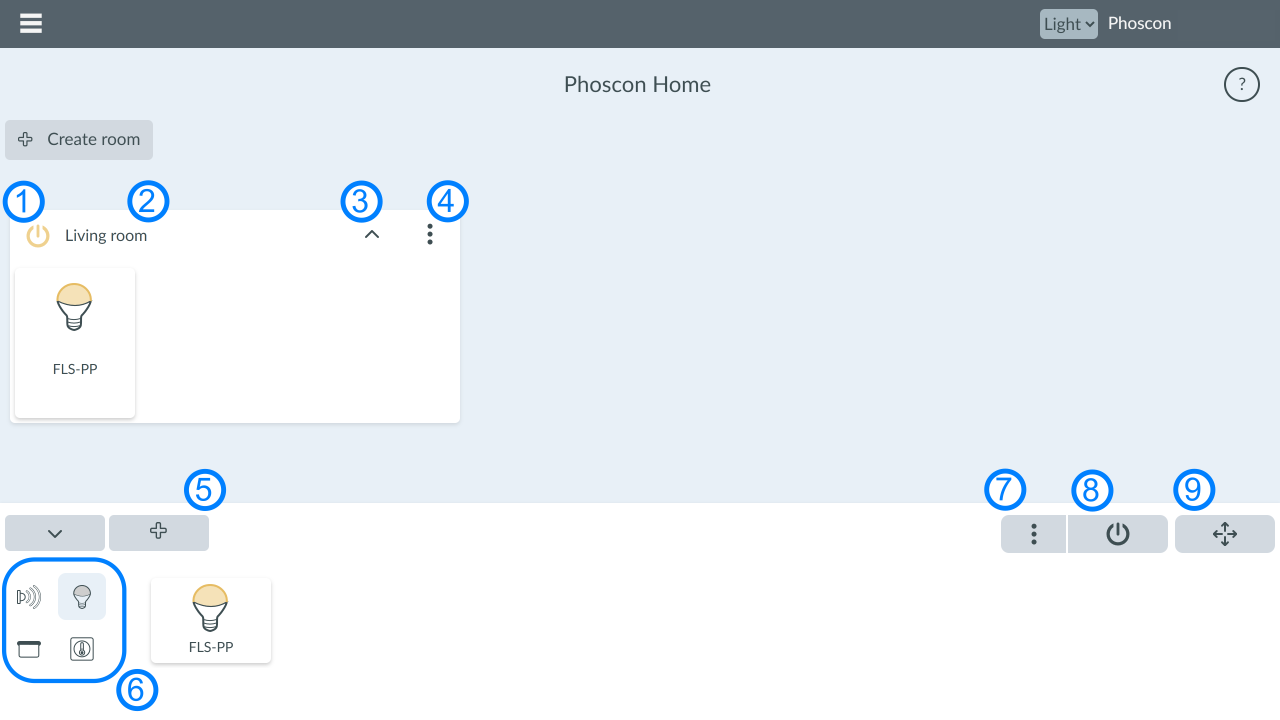
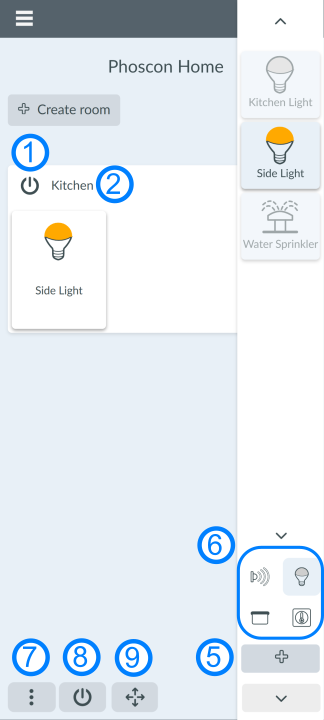
Functions
- Turn all lights in the room on and off
- Click on the room name: Open the details page of the selected room
- Zoom in on the room: Expand and collapse
- Open room settings
- Search for new devices (the Zigbee network will be opened to new participants)
- Filter device categories: Sensors, lights and sockets, blinds, thermostats
- General dashboard and device settings
- Turn all lights off
- Rearrange devices and rooms
Example video: Configuring a room’s on/off switch
Example video: Configuring a global on/off switch
Example video: Filtering the device list and detailed view
Example video: Moving devices within rooms
Example video: Moving rooms in the dashboard
Settings
- Rename room
- Select sensor value(s) to display in the header
- Additional room settings
- Link lamps and sockets to the on/off switch of the selected room
- Delete room

Example video: Show sensor value as favorite
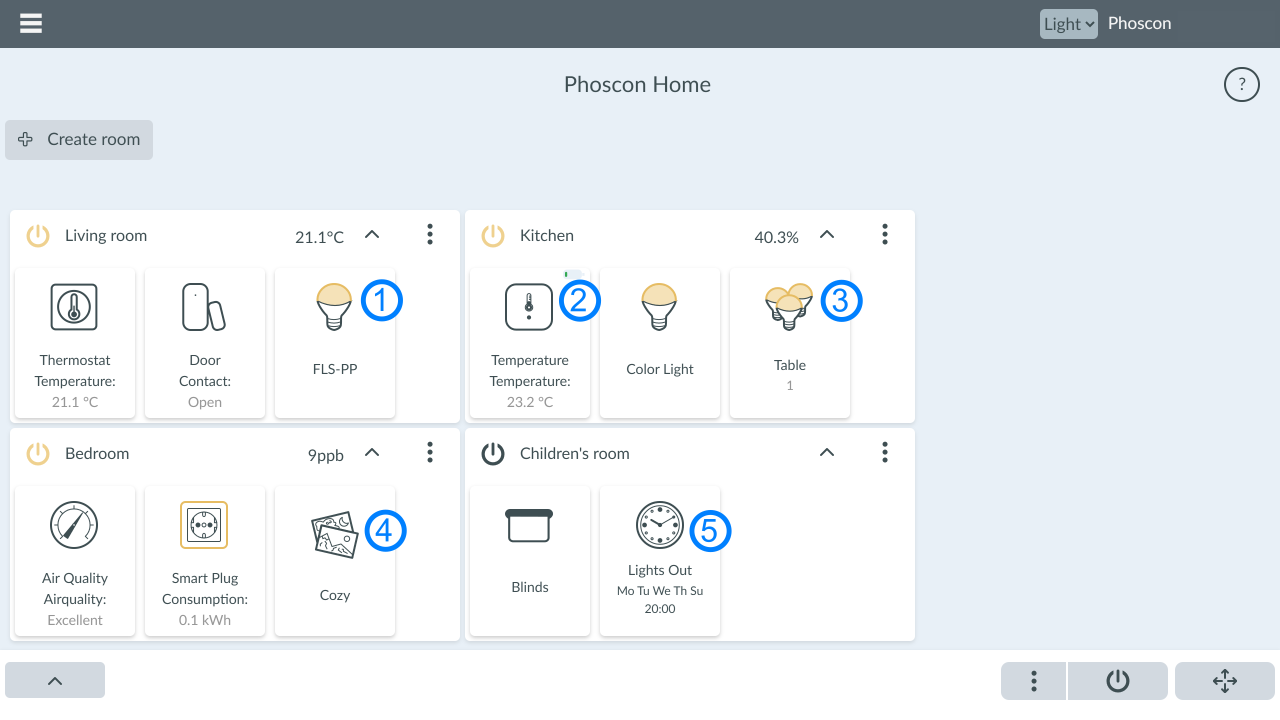
Control
The following interactions are possible for the various devices in the dashboard:
- Controllable devices: lamps, sockets, thermostats, and blinds
- Lamps:
- Click on icon: Turn on and off
- Hold icon: Opens the slider for brightness, color, and saturation
- Click on device name: Show details
- Sockets:
- Click on the icon: Turn on and off
- Click on the device name: Details. For sockets with consumption measurement, individual values can be clicked, which are then displayed in the device tile.
- Thermostats and blinds:
- Click on the icon: Opens the control panel (temperature setting or dimming)
- Click on the device name: Details
- Lamps:
- Sensors:
- Click on the icon: Opens the detailed view. Here, you can click on values that will then be displayed on the sensor tile.
- Subgroups:
- Click on the icon: Turns all lights in the group on and off.
- Hold the icon: Opens the slider for brightness, color, and saturation.
- Click on the name: Displays details.
- Scenes:
- Click on the icon: Calls up the scene.
- Click on the name: Go to the scene editor.
- Schedules:
- Click on the icon: Turns the schedule on and off.
- Click on the name: Go to the schedule editor.
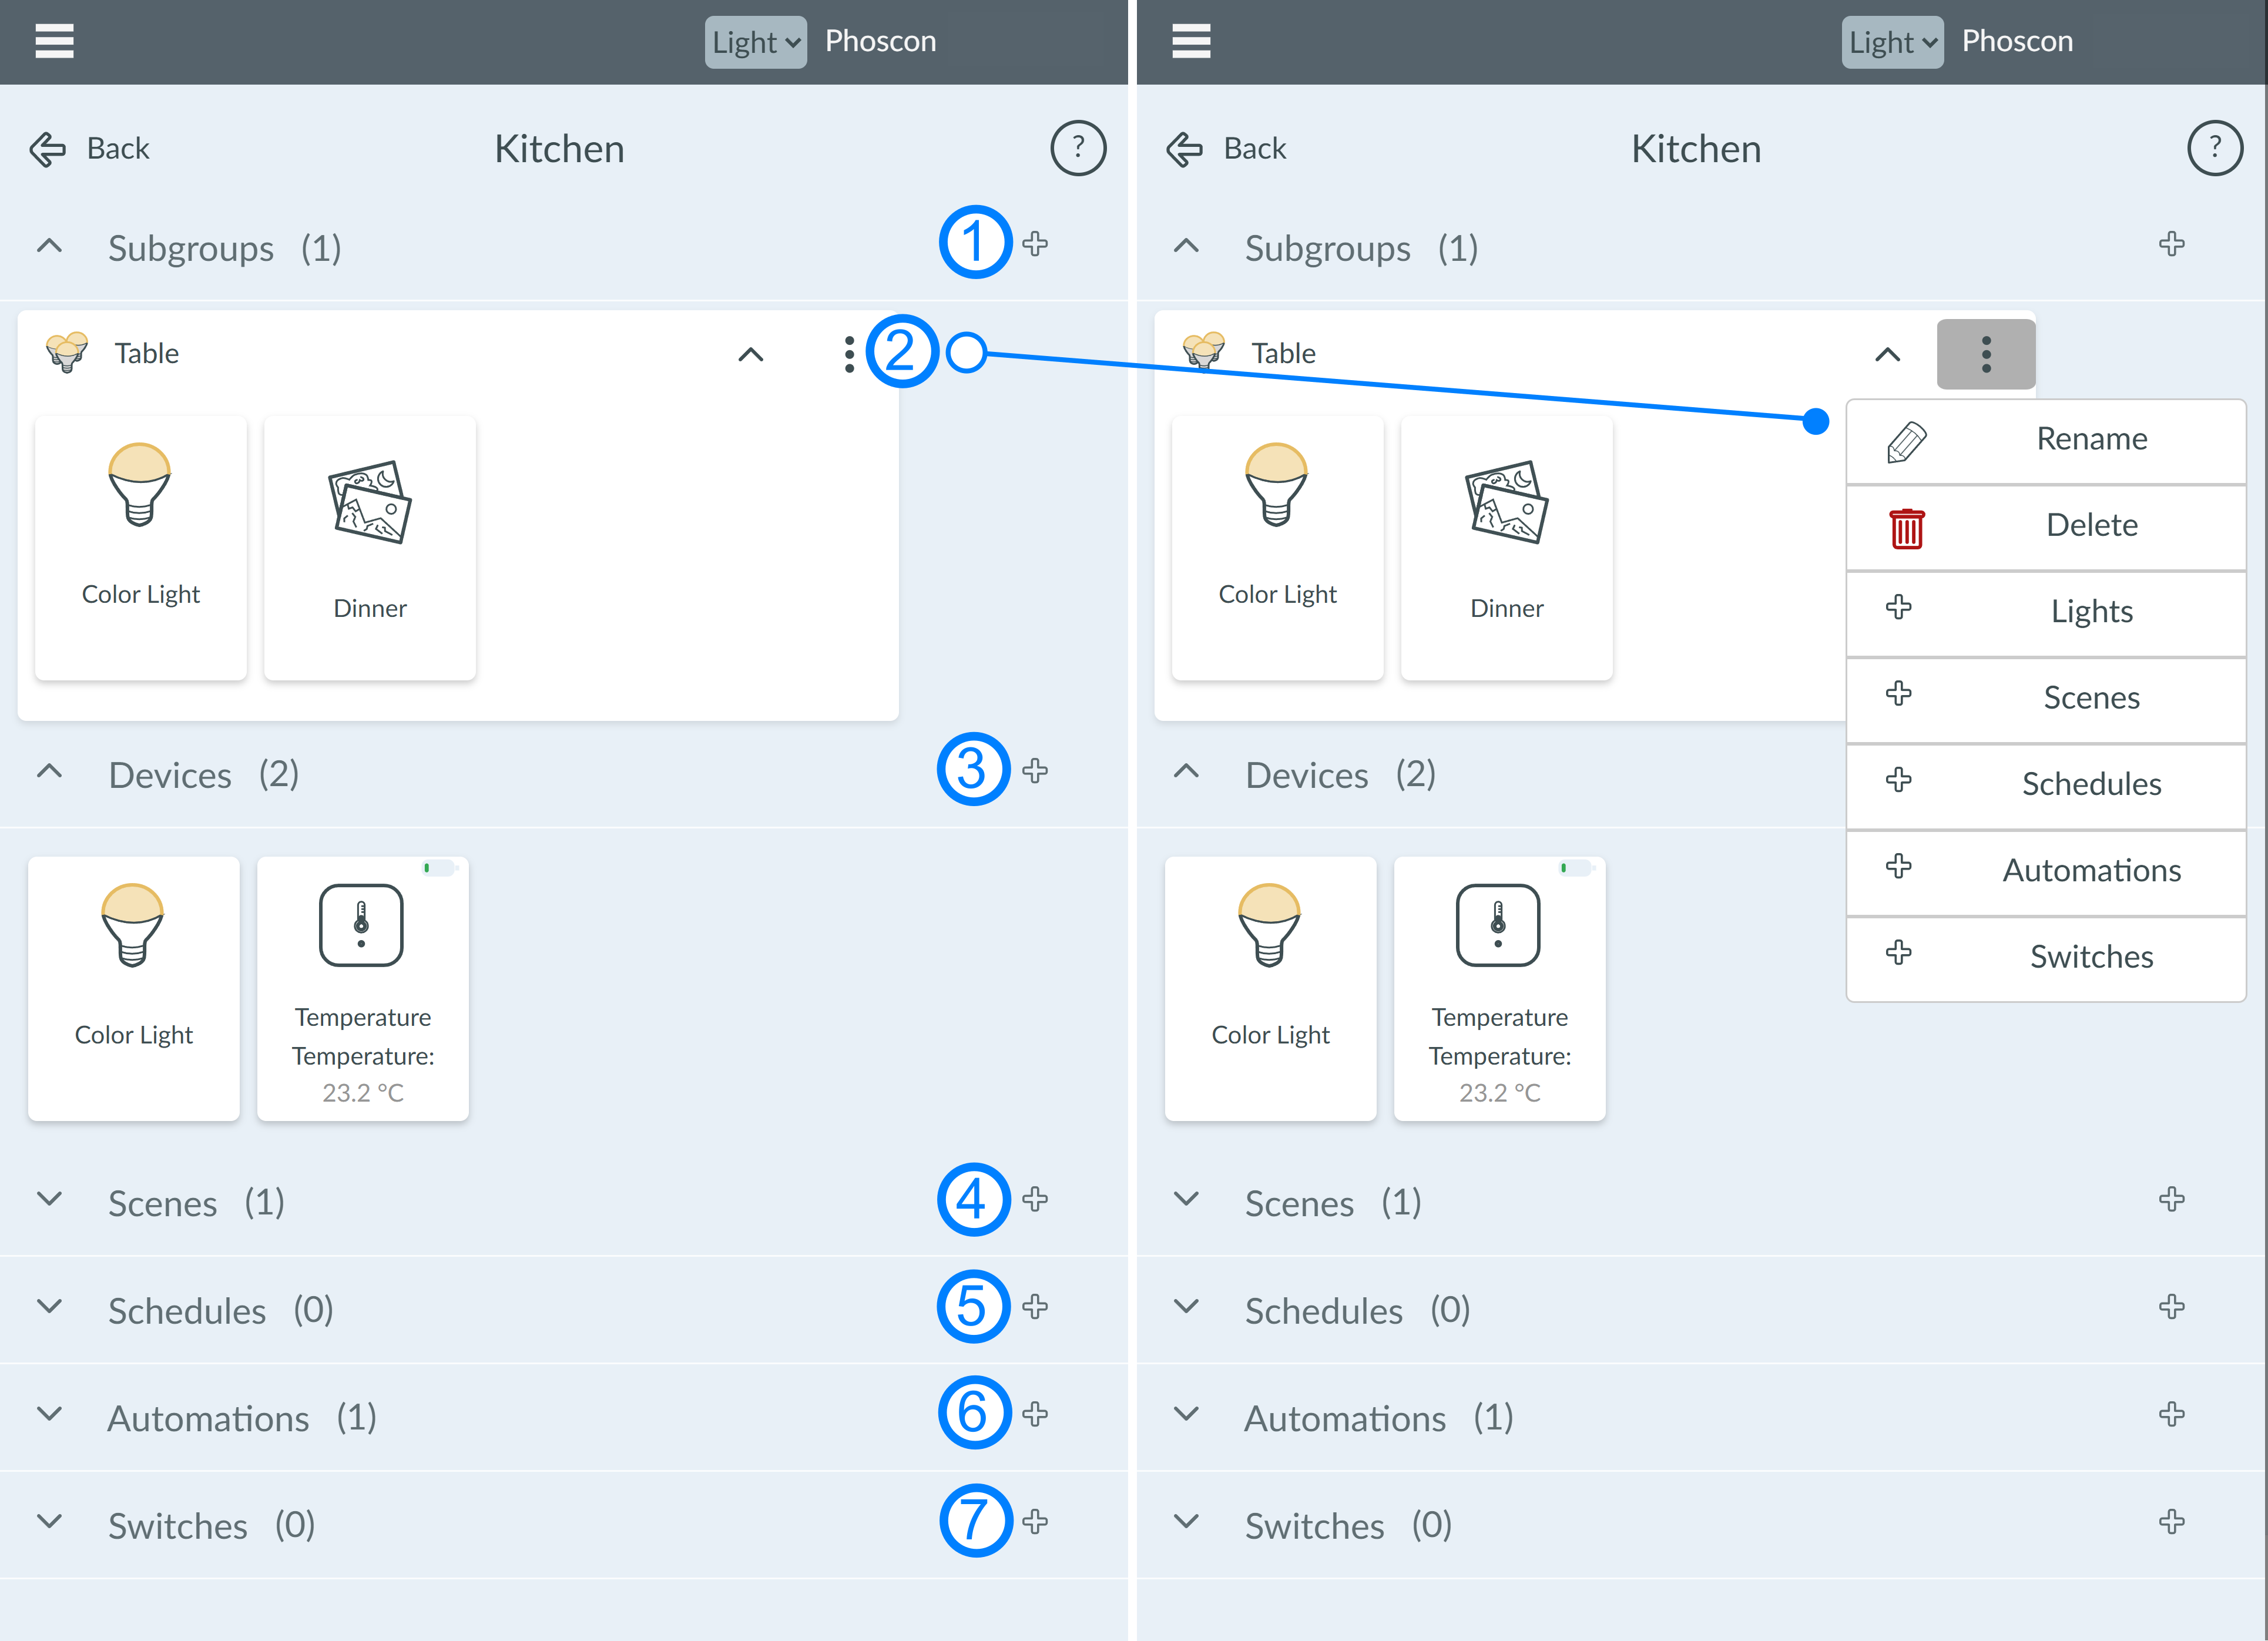
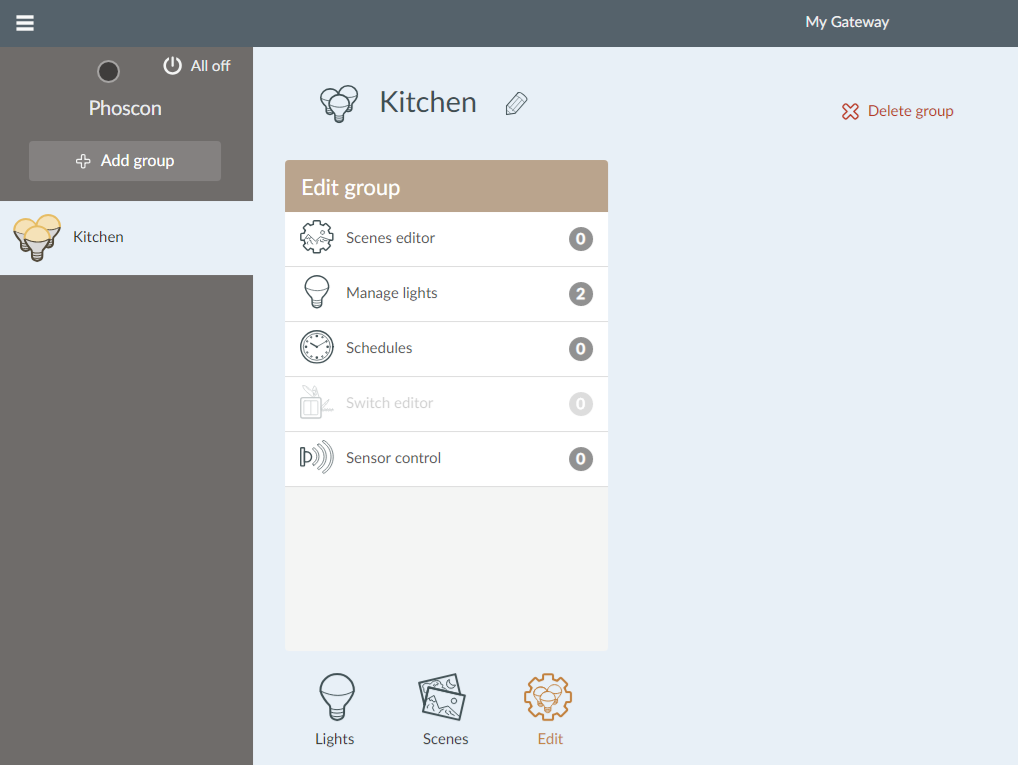
Details
The detailed view of a room can be opened by clicking on the room name.
- Subgroups: Multiple subgroups can be created for each room. The devices in the room can belong to multiple subgroups.
- Subgroup menu: Rename, delete, add devices, and other elements.
- Add or remove devices
- Add, edit, or remove scenes
- Add, edit, or remove timers
- Add, edit, or remove automations
- Add, edit, or remove switches
Example video: Remove device
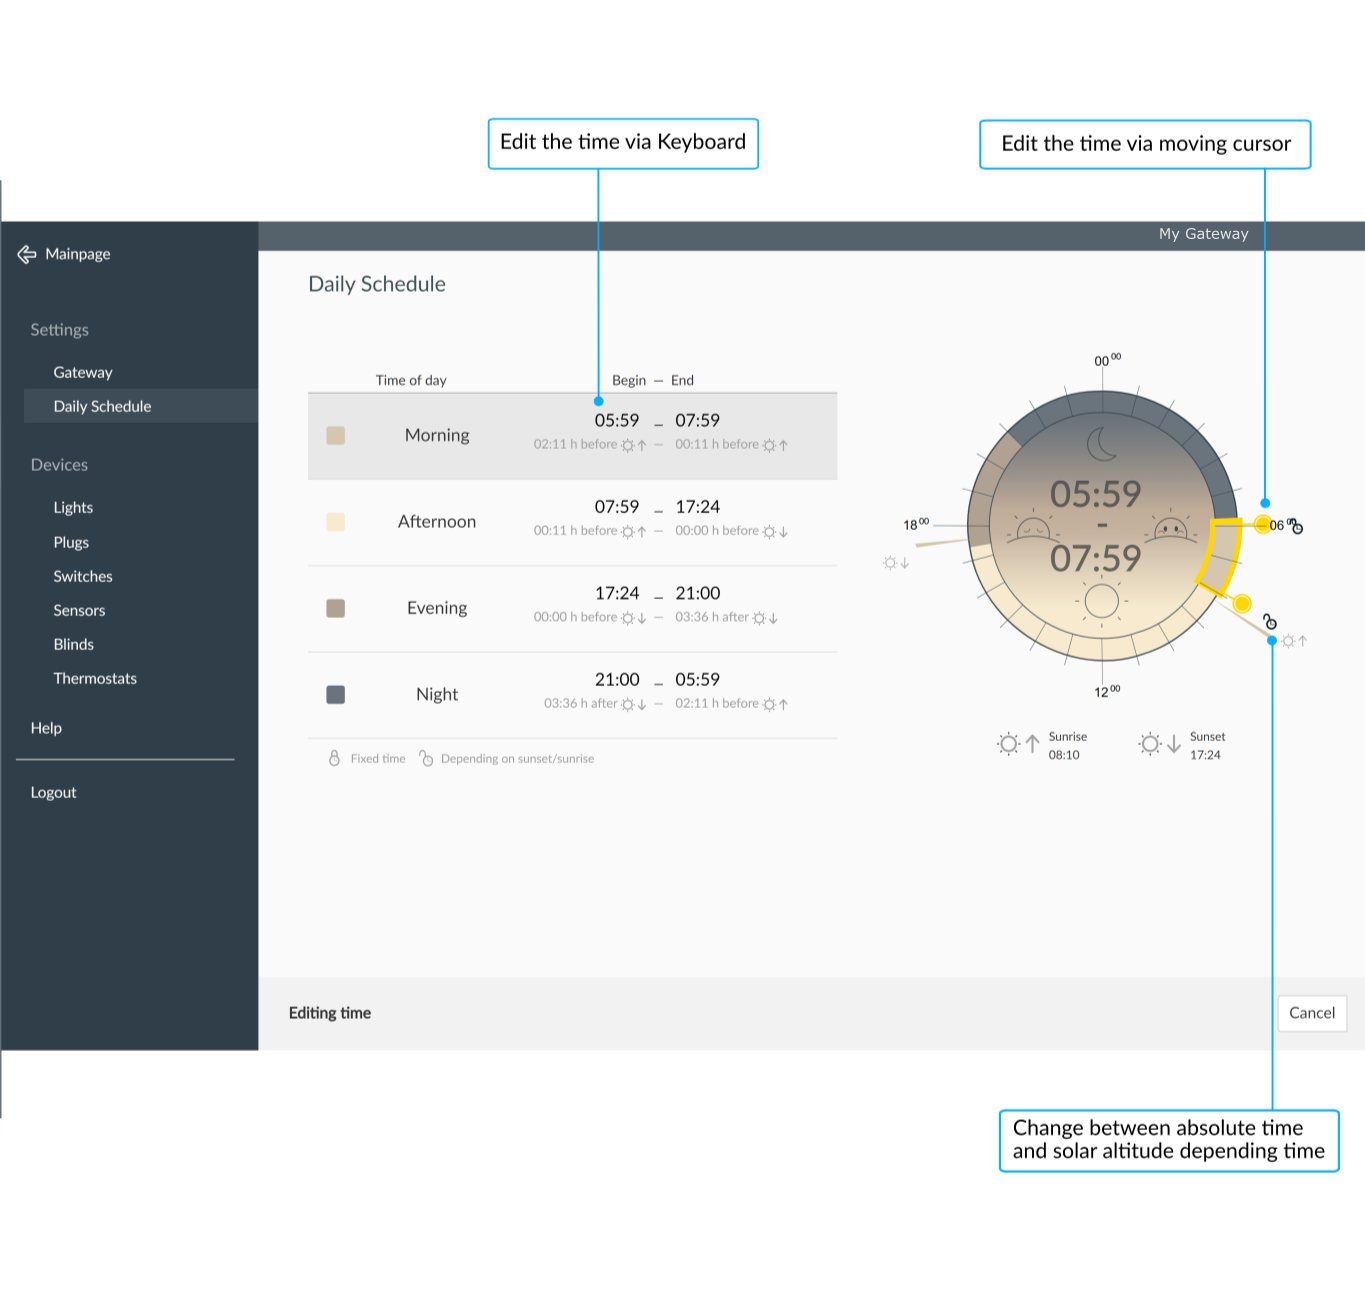
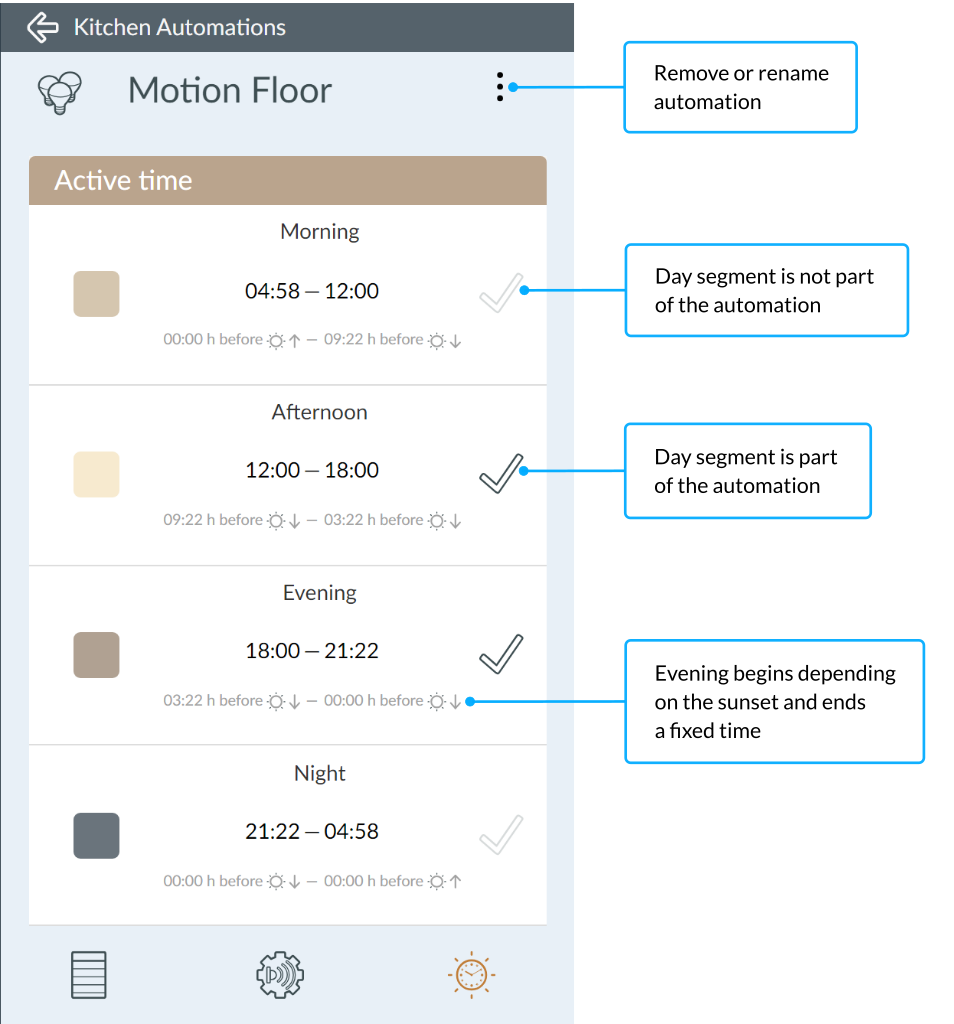
Daily Schedule
Menu > Daily ScheduleThe prerequisite for creating an automation is the setting of the four specified schedules of day:
- Morning
- Day
- Evening
- Night
The times of day can follow the daily course of the sun or can be set permanently. The course of the sun, i.e. sunrise and sunset, are determined via the system time in the gateway.
If this cannot be done automatically, the system time must be set manually in the gateway settings.
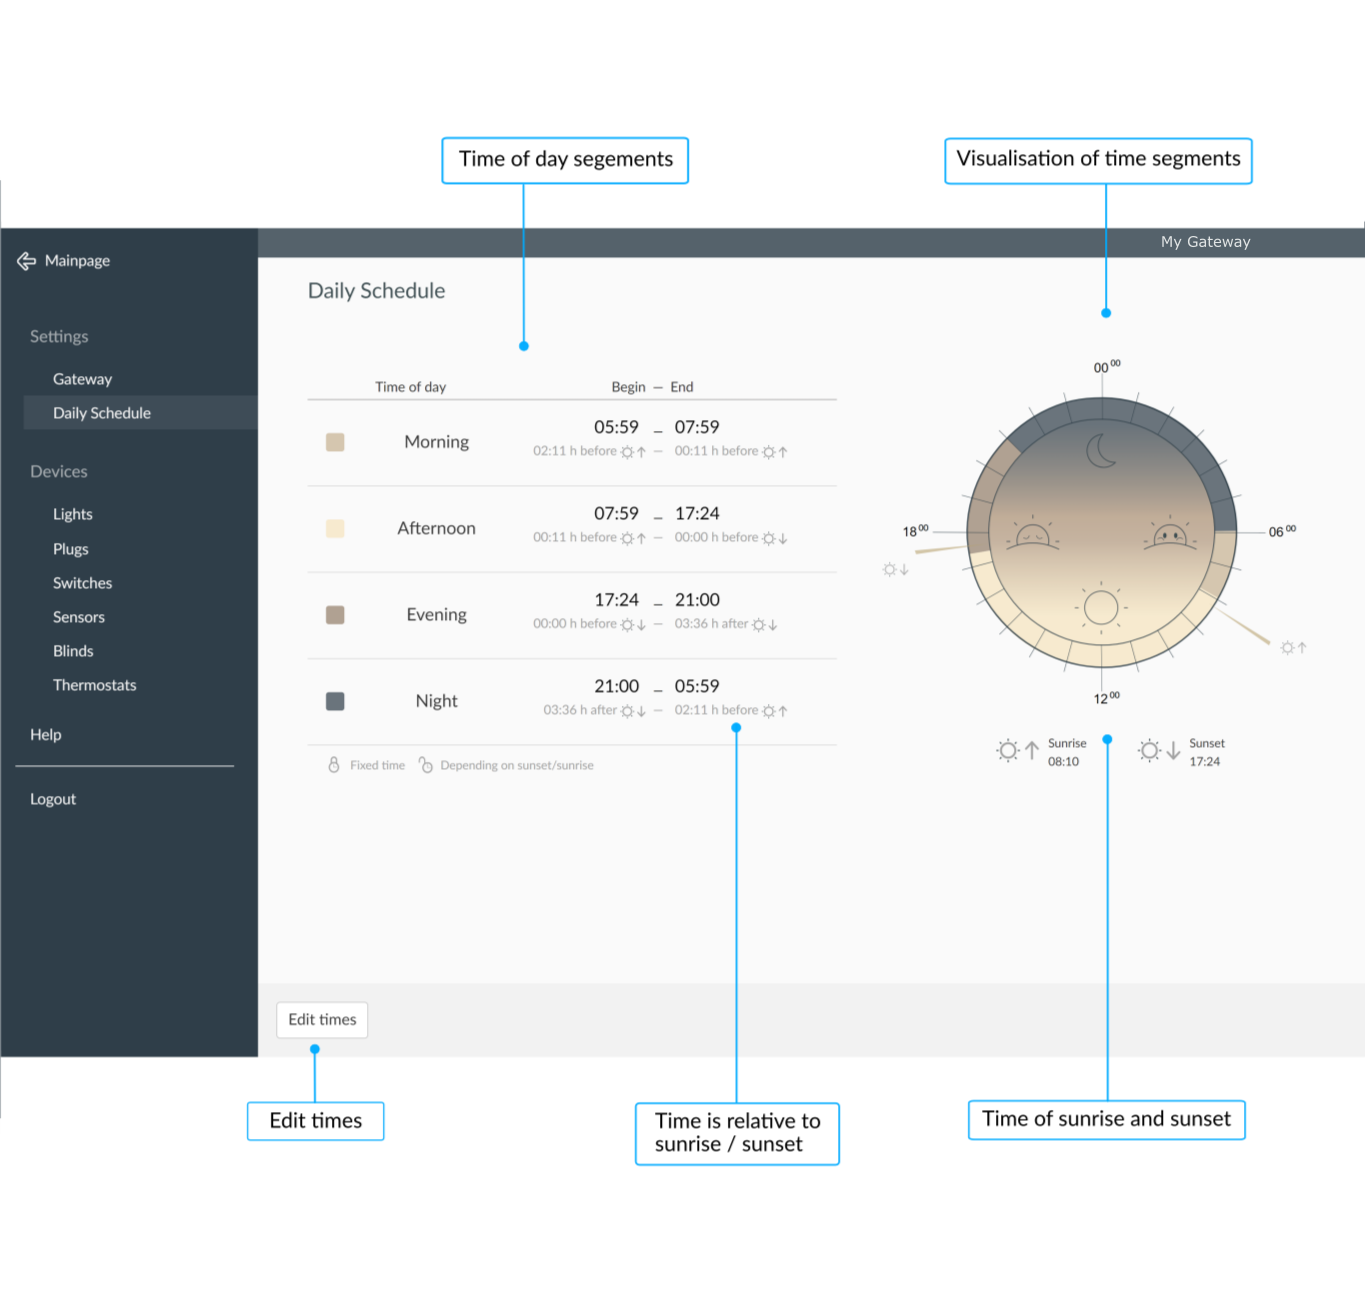
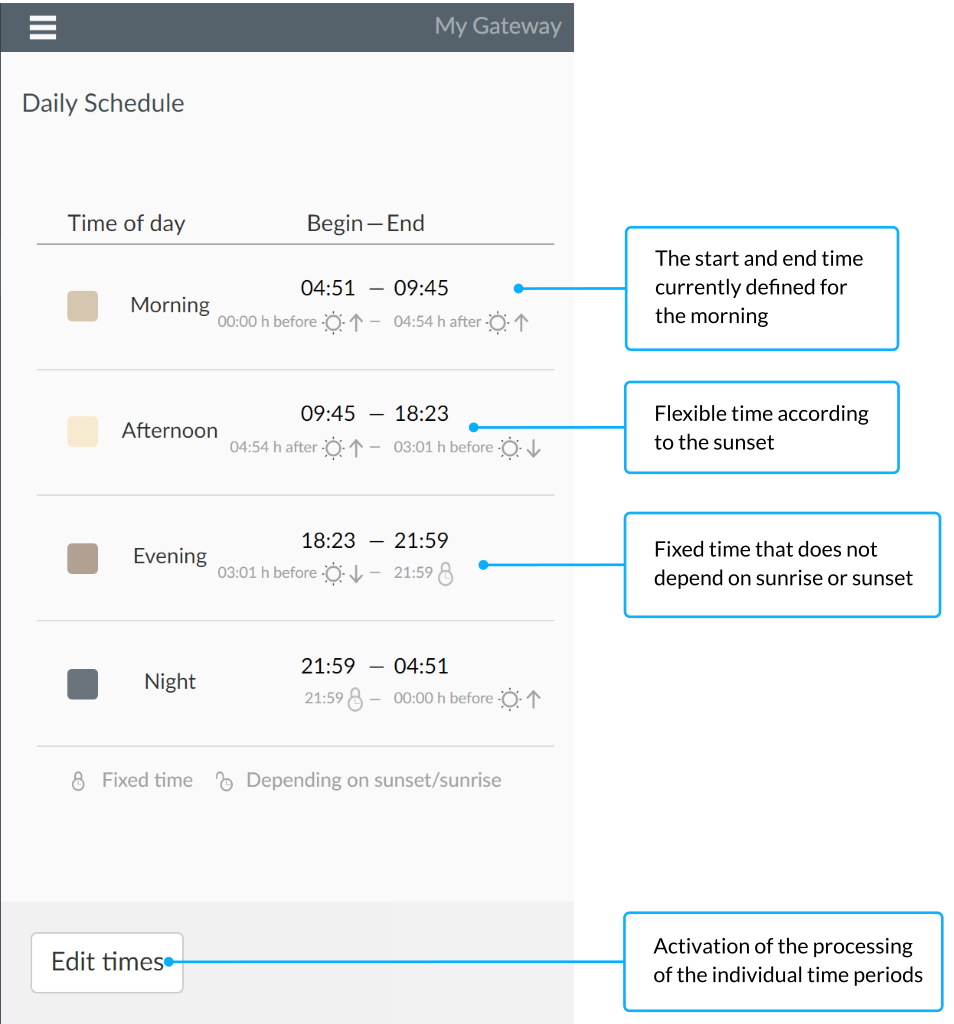
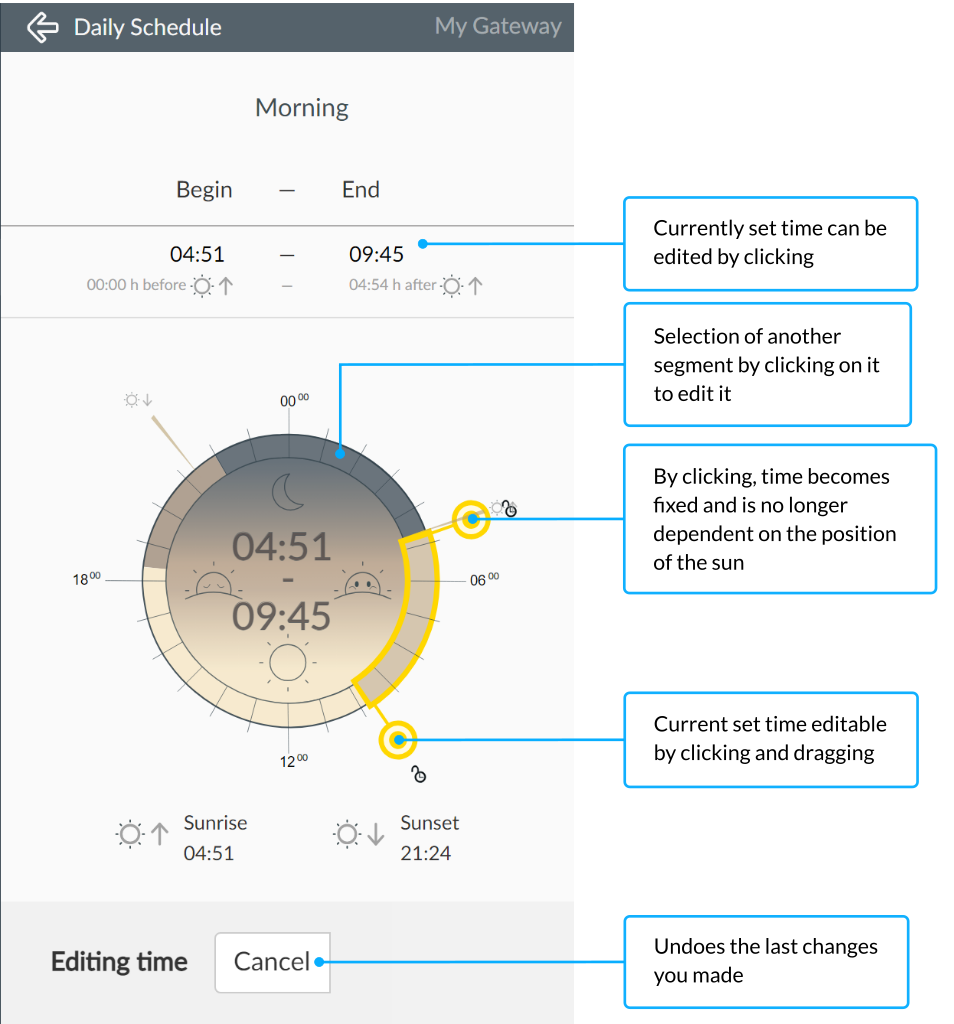
Define daily schedule
Each schedule of day can be edited by
individually. In
order to follow the changing position of the sun throughout the year,
each beginning and end of a time of day can be defined as
moving
.
To do this, the point
on the slider must be pressed.
- Lock symbol open: the set time moves according to the sun’s course of the year.
- Lock symbol closed: the set time is fixed.
Lights
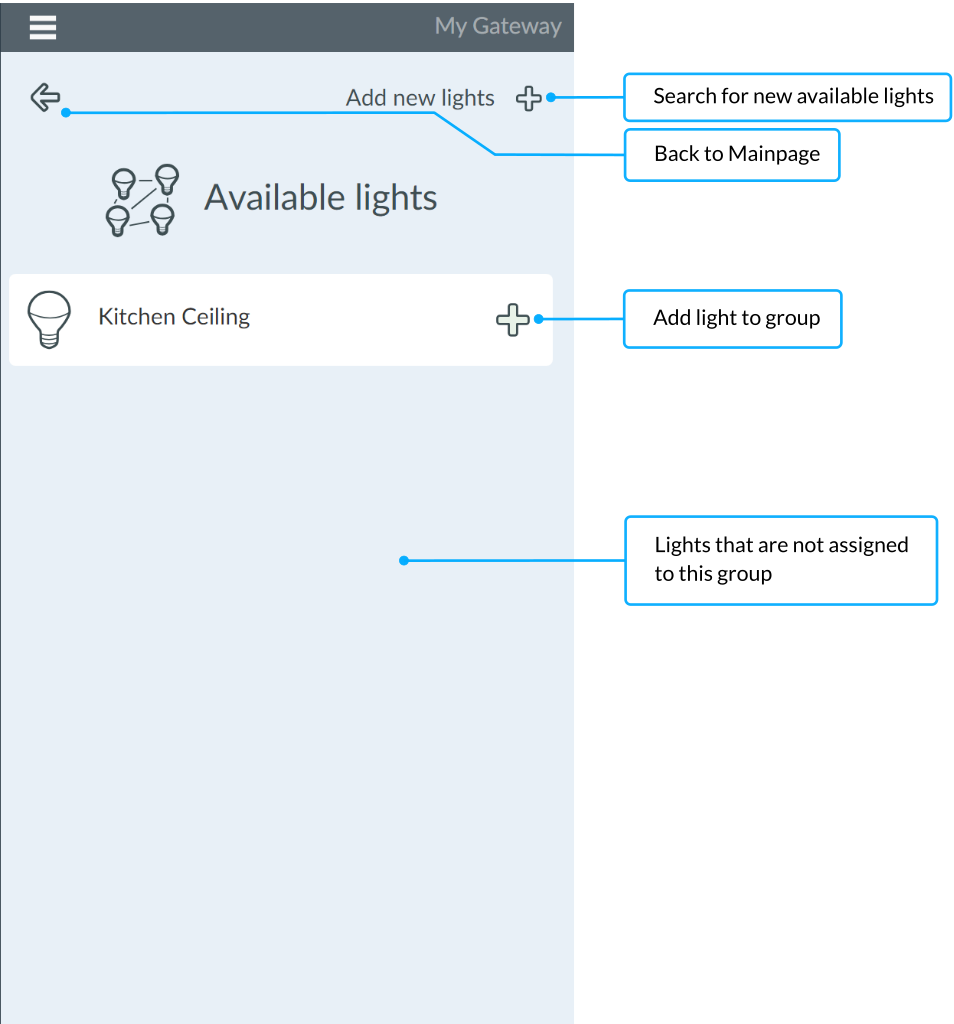
Assign lights to a room
Dashbaord > Room Details > DevicesTo control a light, it must be assigned to a room. Only lights belonging to a room are displayed on the dashboard.
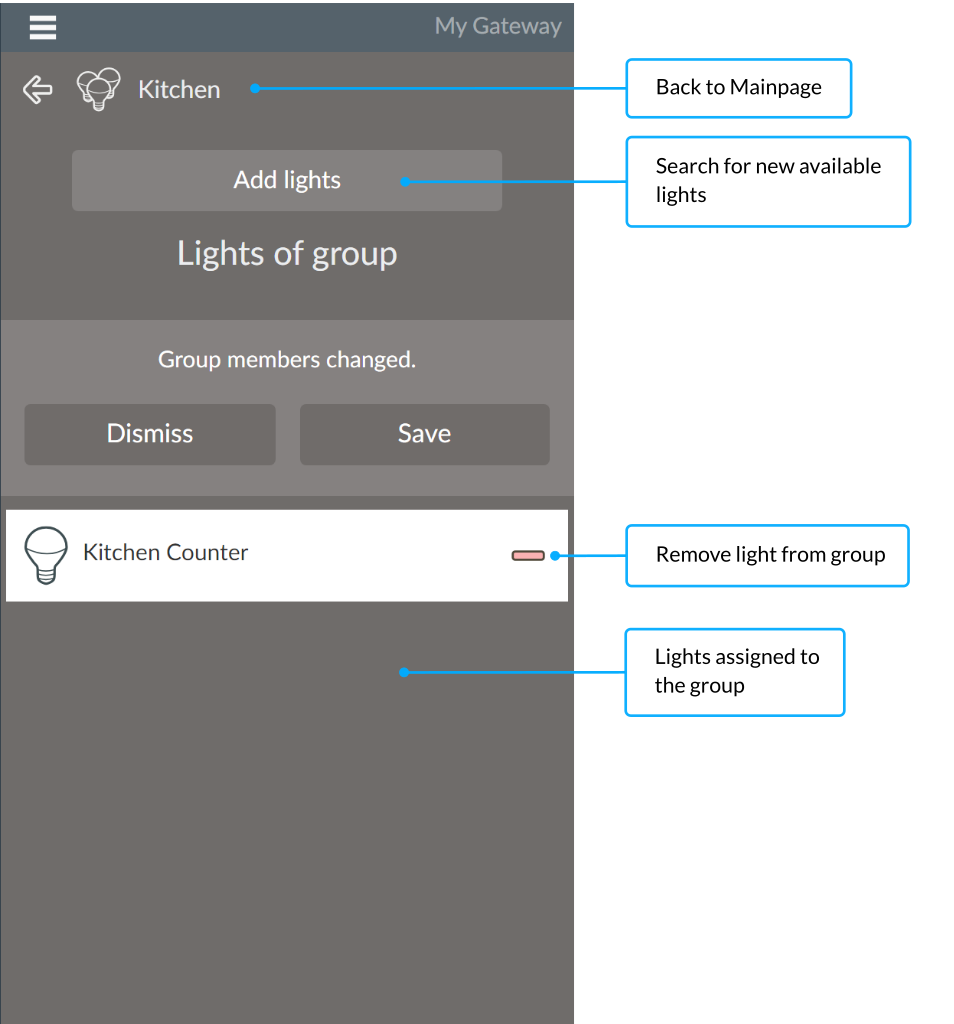
Lights can be added or removed from the selected room. Use to assign lights to the room. Use to remove lights from the room.
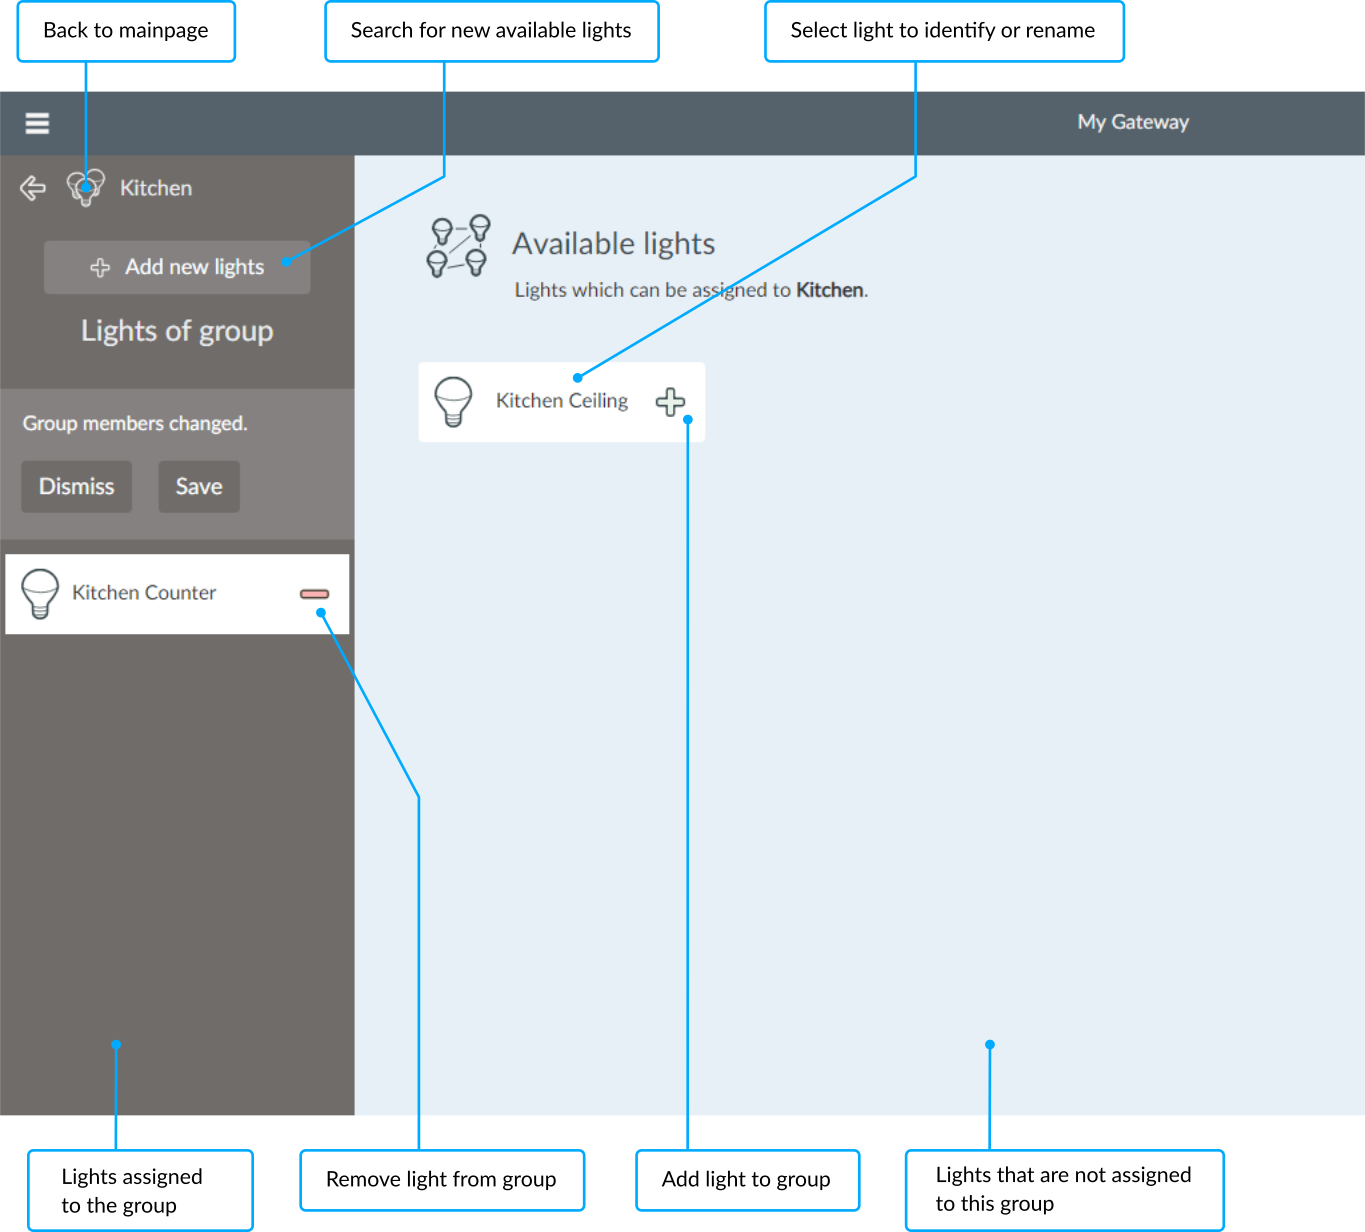
If a light is selected, it will start flashing and can be identified. Furthermore it can be renamed in the appearing dialog.
Add more lights
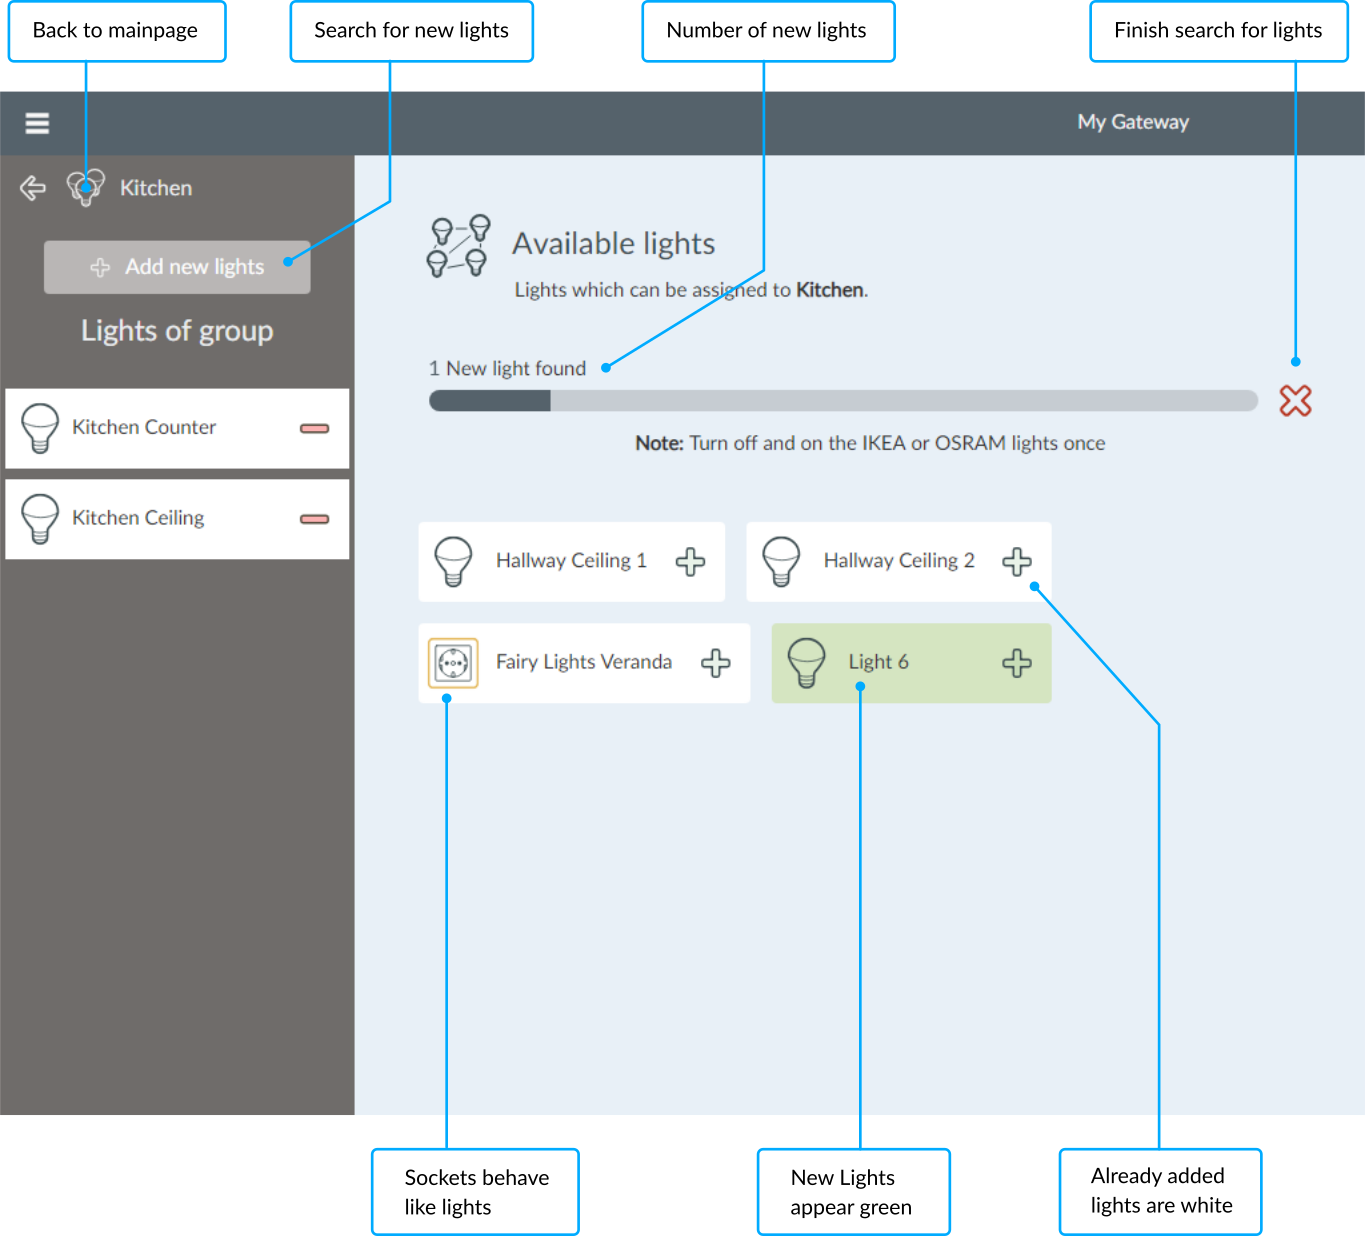
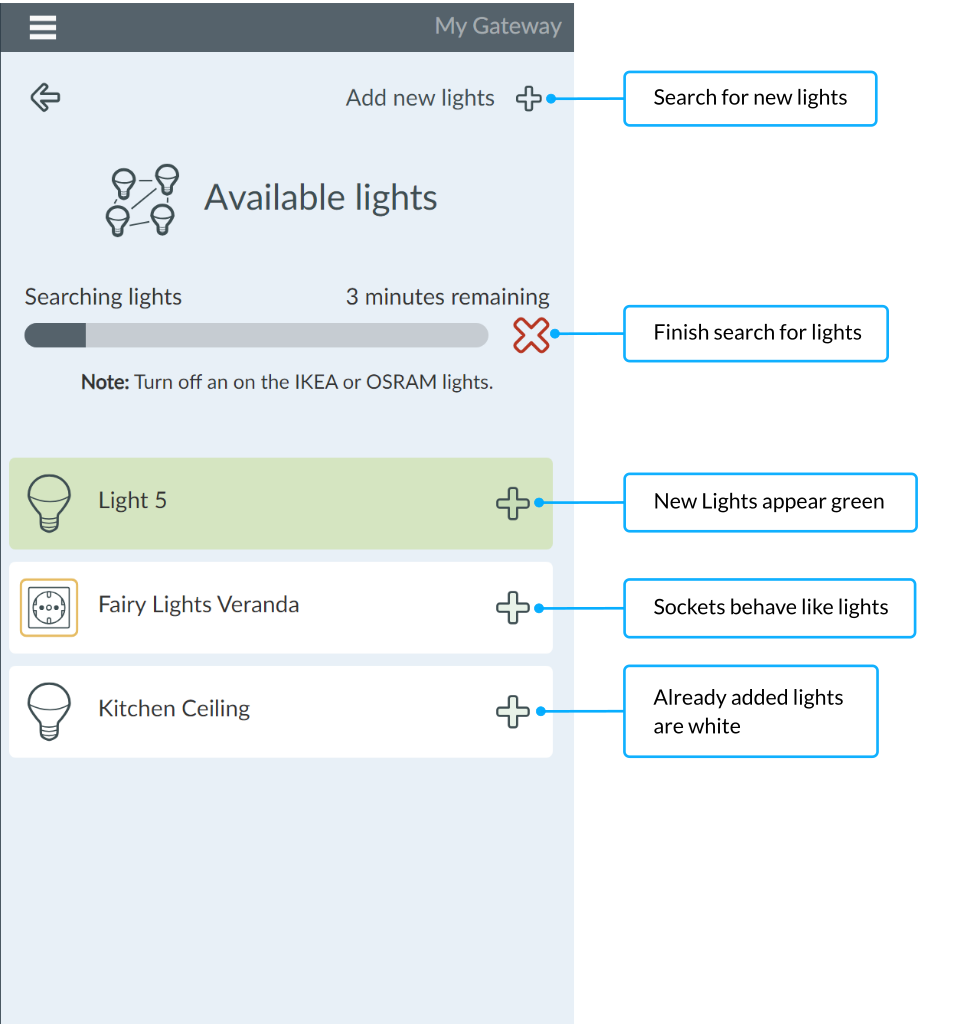
Using , lights that are in their factory default state can be paired with the gateway within the next 3 minutes. These appear next to the already available lights with a green background. The pairing of the first lights begins.
The duration of the light search can be adjusted in the Gateway Settings.
If no lights are found, this can have various causes. After a failed light search, a dialog appears with illustrated instructions for resetting lights to factory settings. Further information on pairing problems can be found in the Troubleshooting section.
Control lights
Dashboard > RoomThe lights in a room can be controlled on the dashboard. You can adjust the entire room, created subgroups, or individual lights.

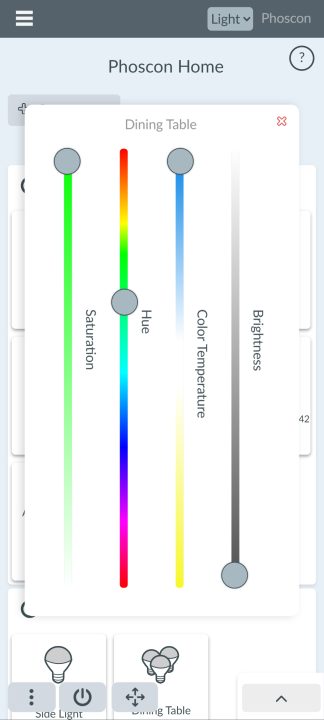
The room and light icons indicate their current status. They also serve to turn them on and off.
The color and brightness can be changed. Depending on the light type, different control options are displayed. These are automatically detected by the gateway.
- RGBW light: Colors across the entire color space can be controlled.
- Warm white/cool white light: You can continuously switch between cool white and warm white.
- Single-color light: Only the brightness can be changed.
Scenes
Lighting moods can be saved as scenes and recalled via Phoscon Home, a timer, or a switch. Scenes can be customized for different situations.
Create scenes
Dashboard > Room Details > Scenes > Scene EditorScenes are set up using the Scene Editor
(4).
Lights can be set here, just like with the Dashboard controls, for the entire room or individually. Once the desired scene has been created, it can be saved and recalled at any time from the Dashboard, a timer, or via a switch.
Edit Scenes
Dashboard > Room Details > Scenes > Scene EditorThe individual settings of a scene can be adjusted and saved at any time. Please note that the lights used in the scene must be turned on for the changes to take effect.
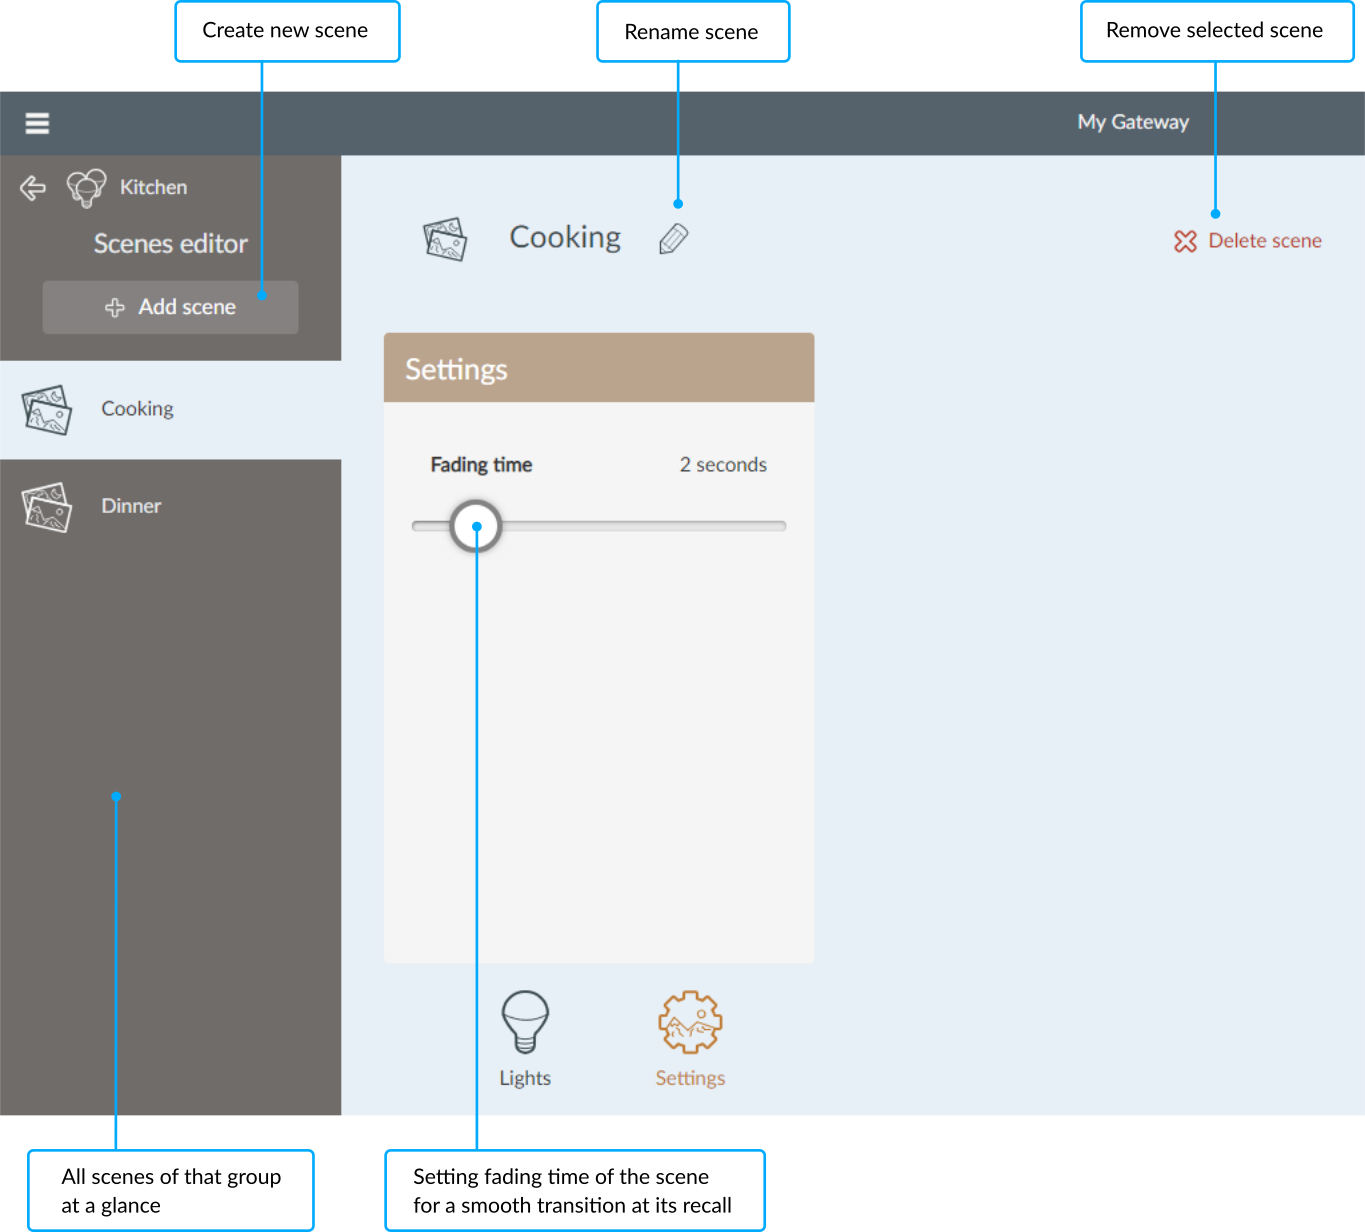

Under the Settings
item, you can set a fade time.
This ensures a natural and smooth transition when calling up the
scene.
Recall scenes
Dashboard > RoomScenes created for a room appear on the dashboard as a scene icon (4) and can be easily accessed by selecting them.
Desired changes to a scene are made using the Scene Editor.
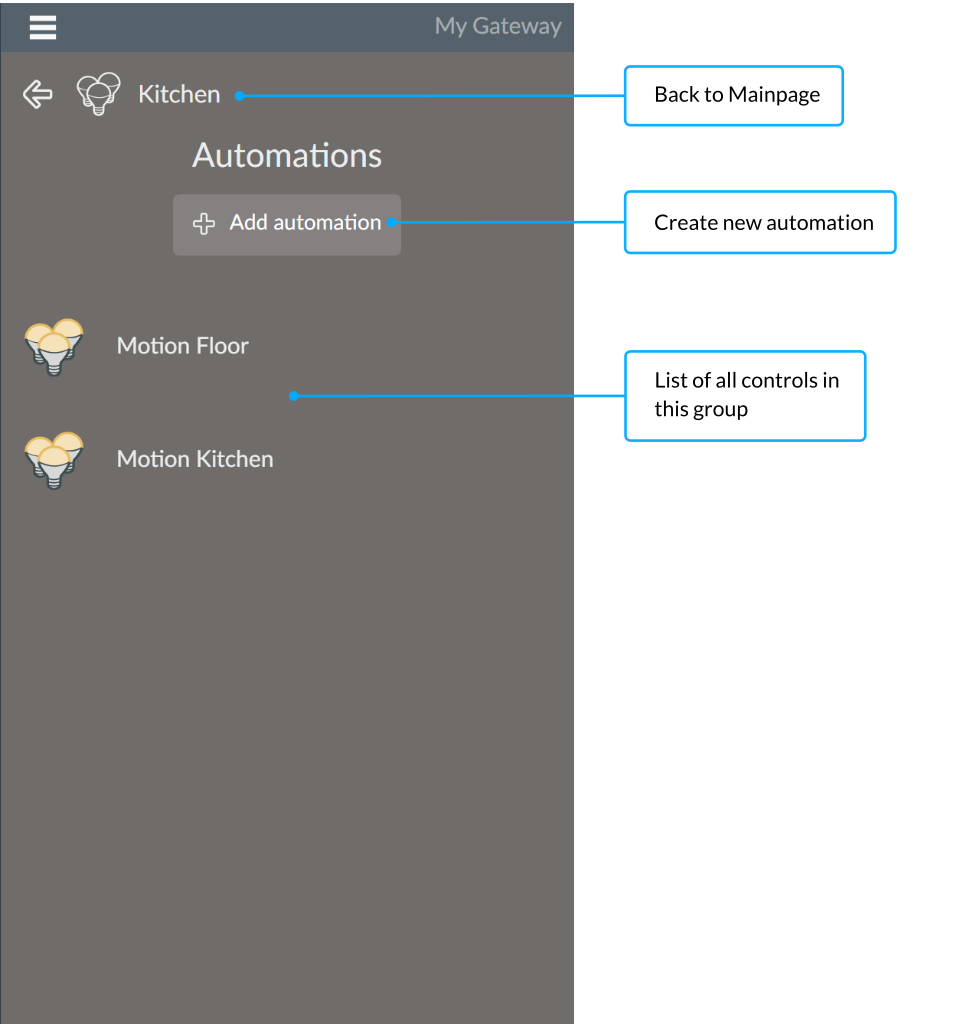
Automations
The automation of devices allows sensor- and daytime-controlled events to be triggered.
Add automation
Dashboard > Room Details > AutomationsOne or more automations can be created by for each group.
Edit automation
The automation created always consists of two actions that take place:
- Action 1: when the automation is triggered
- Action 2: when the follow-up time has expired.
The follow-up time begins after the automation has been triggered and can be set using a slider. Values between 10 seconds and 60 minutes are possible.
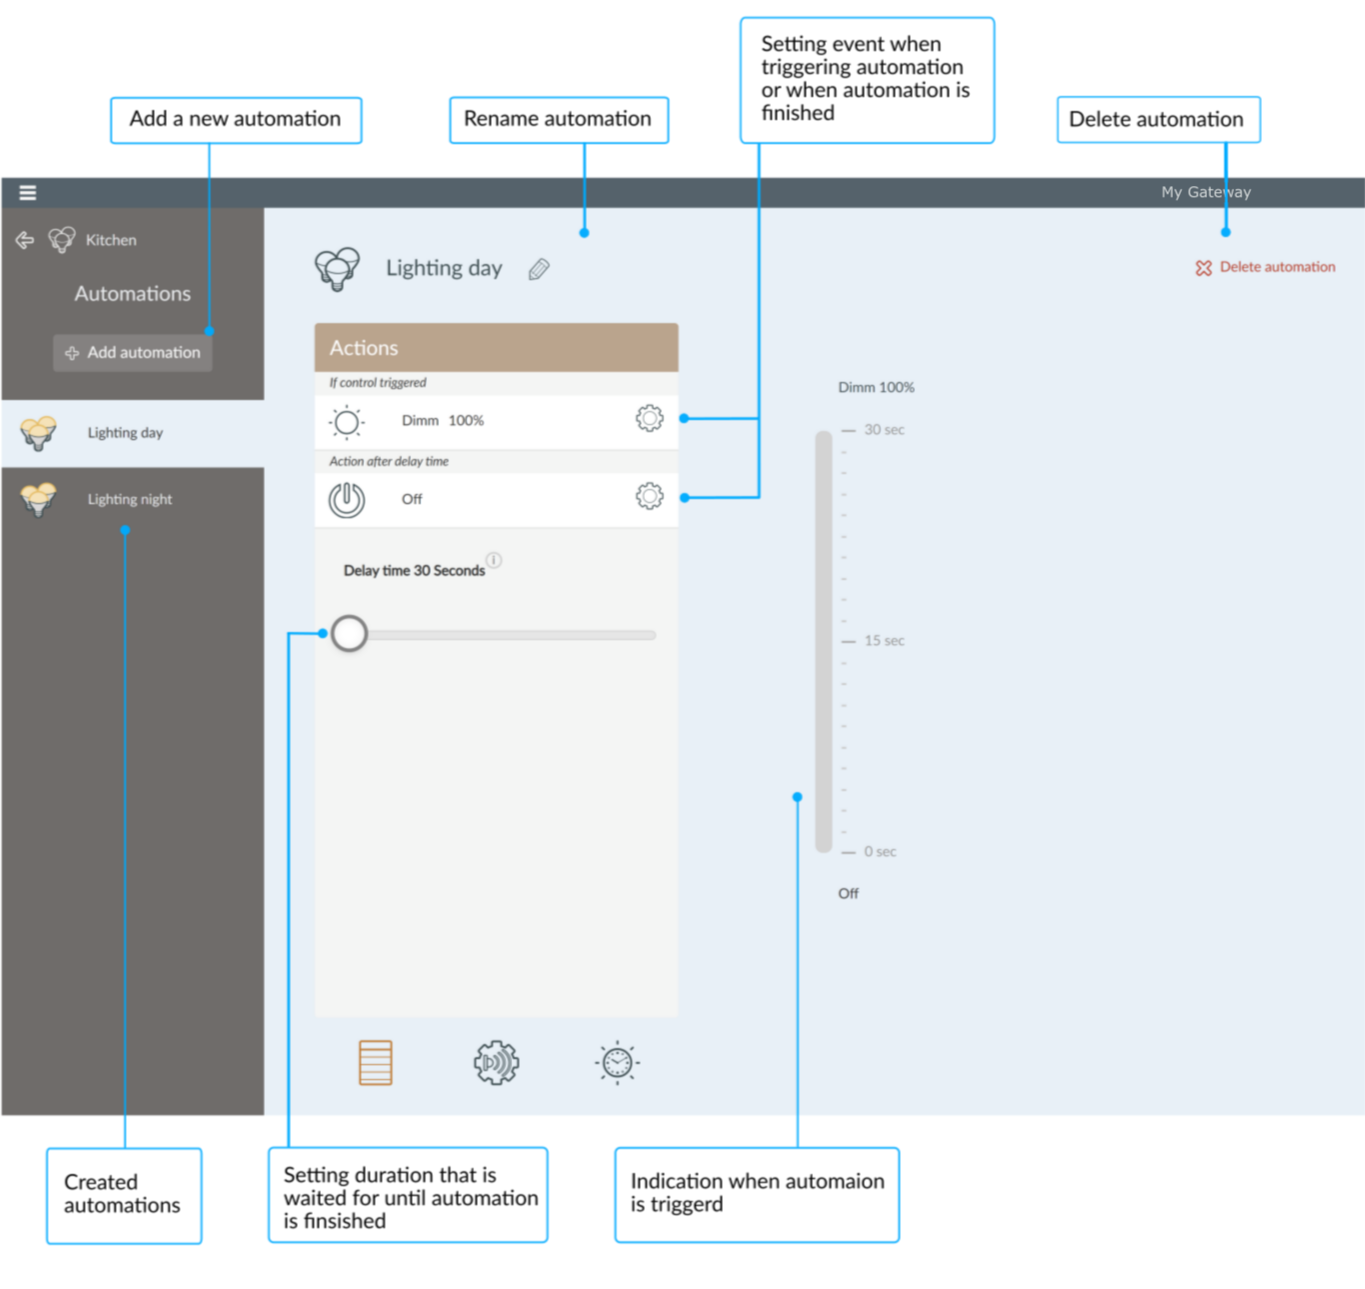
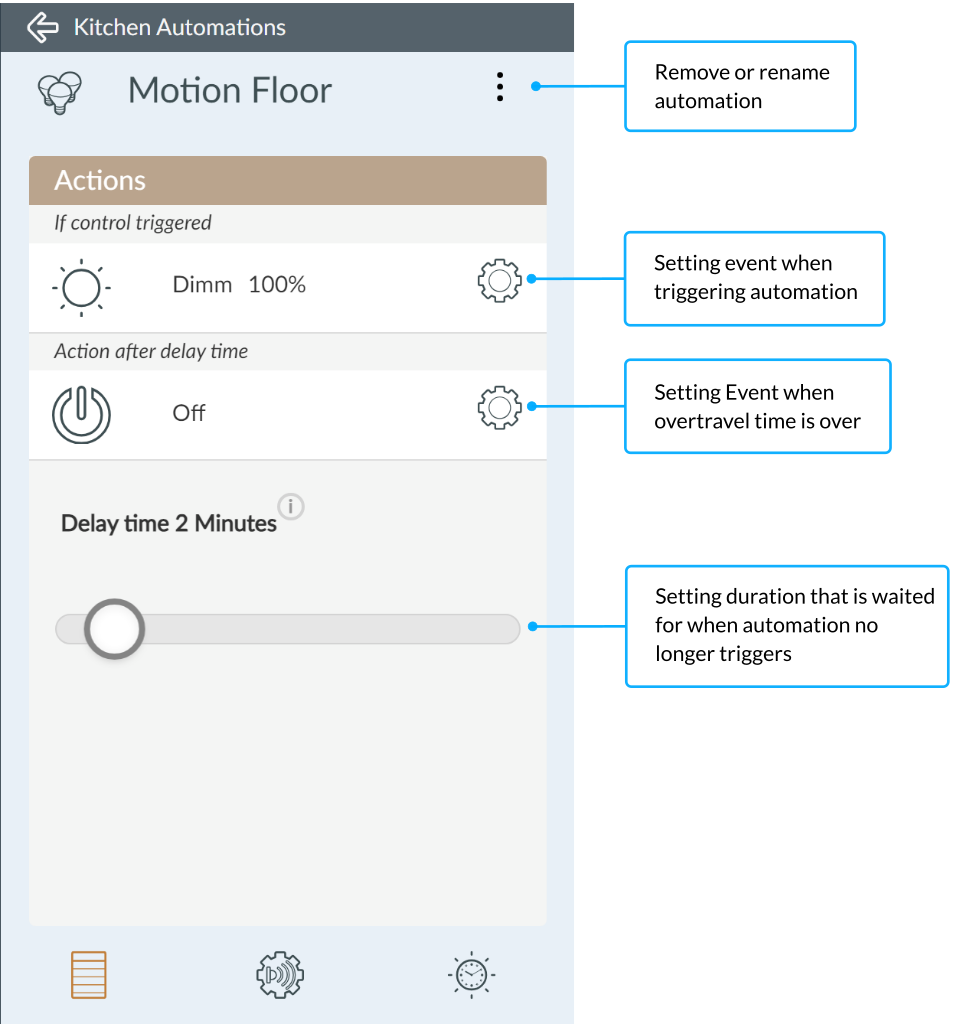
Set event
Events can be assigned to each action:
- Switch on/off
- Call up scene
- Change brightness
- Do not perform any action
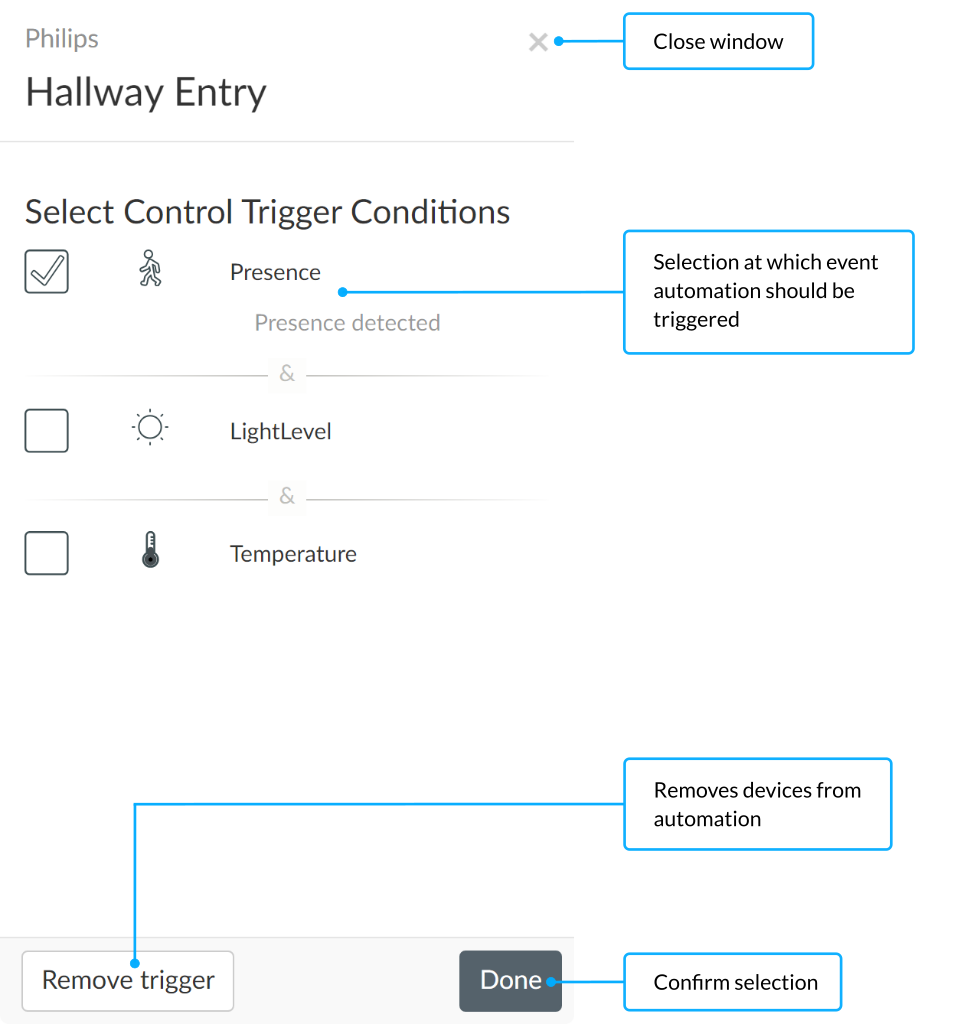
Select trigger
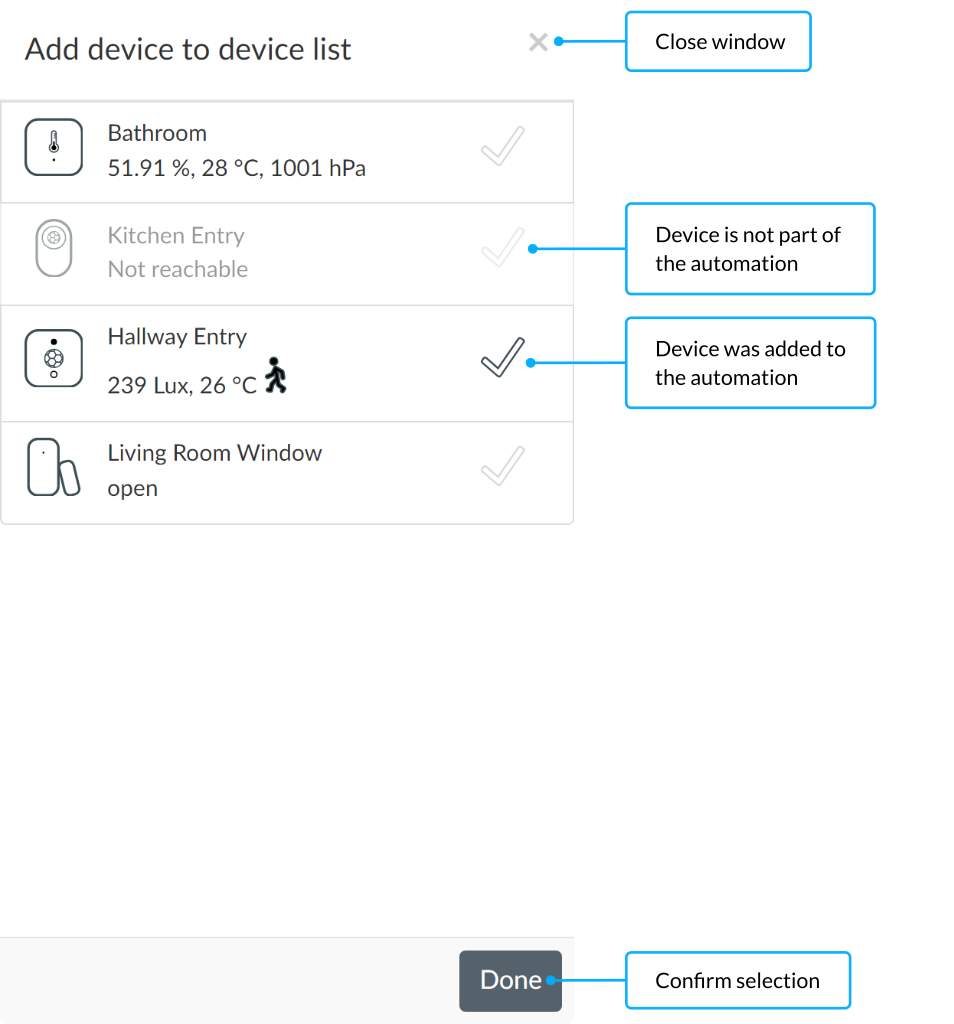
The automation can be triggered by one or more devices. All sensors trained in the system are available as selectable triggers.
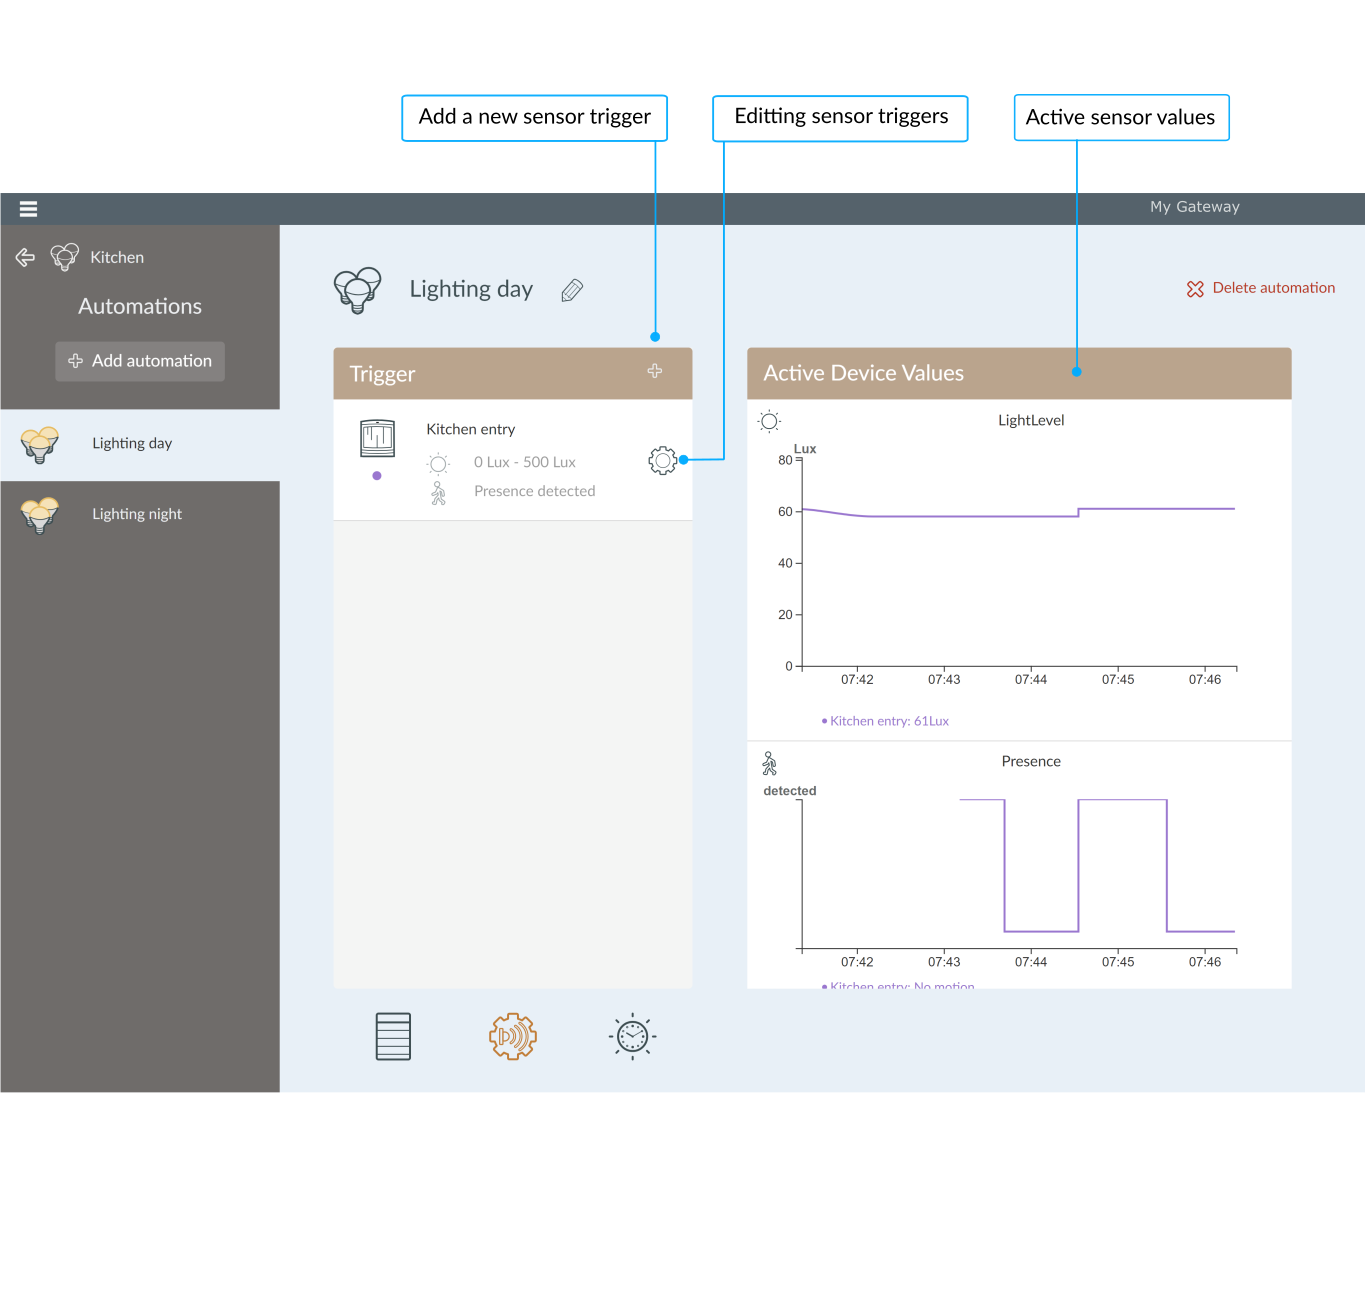
The trigger can be selected individually.
- Check mark: Automation is triggered by this device.
- Check mark not set: Device is not part of the selected automation.
Triggers that are grayed out are not available for selection because, for example, they are no longer accessible.
A trigger can have one or more events assigned to it that trigger automation:
- Check mark: Event triggers the automation.
- Check mark not set: Event does not trigger the automation.
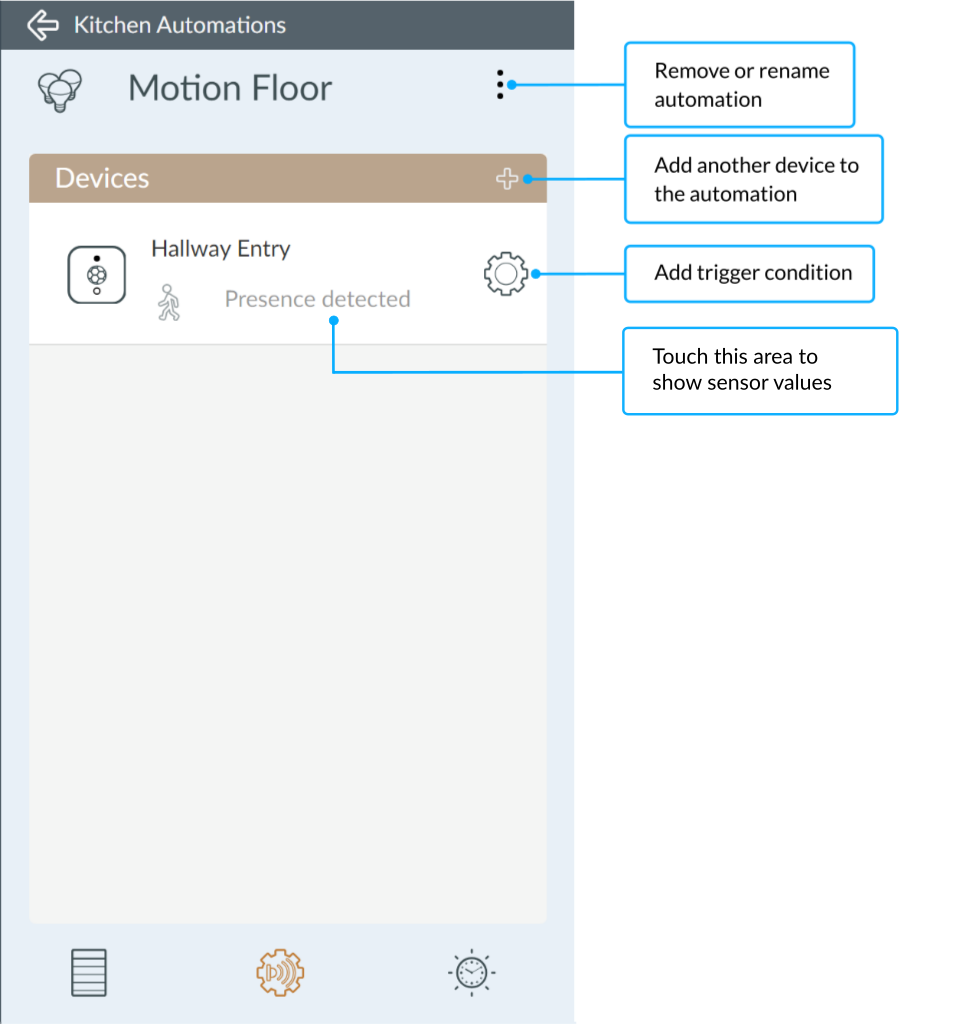
Some examples of events can be:
- Detection of
movement
on a motion detector triggers the light to turn on. - A thermostat controls whether a
temperature
andhumidity
are exceeded or fallen below a temperature and humidity sensor. - Changing the
brightness
of a brightness sensor controls the dimming level of a light.
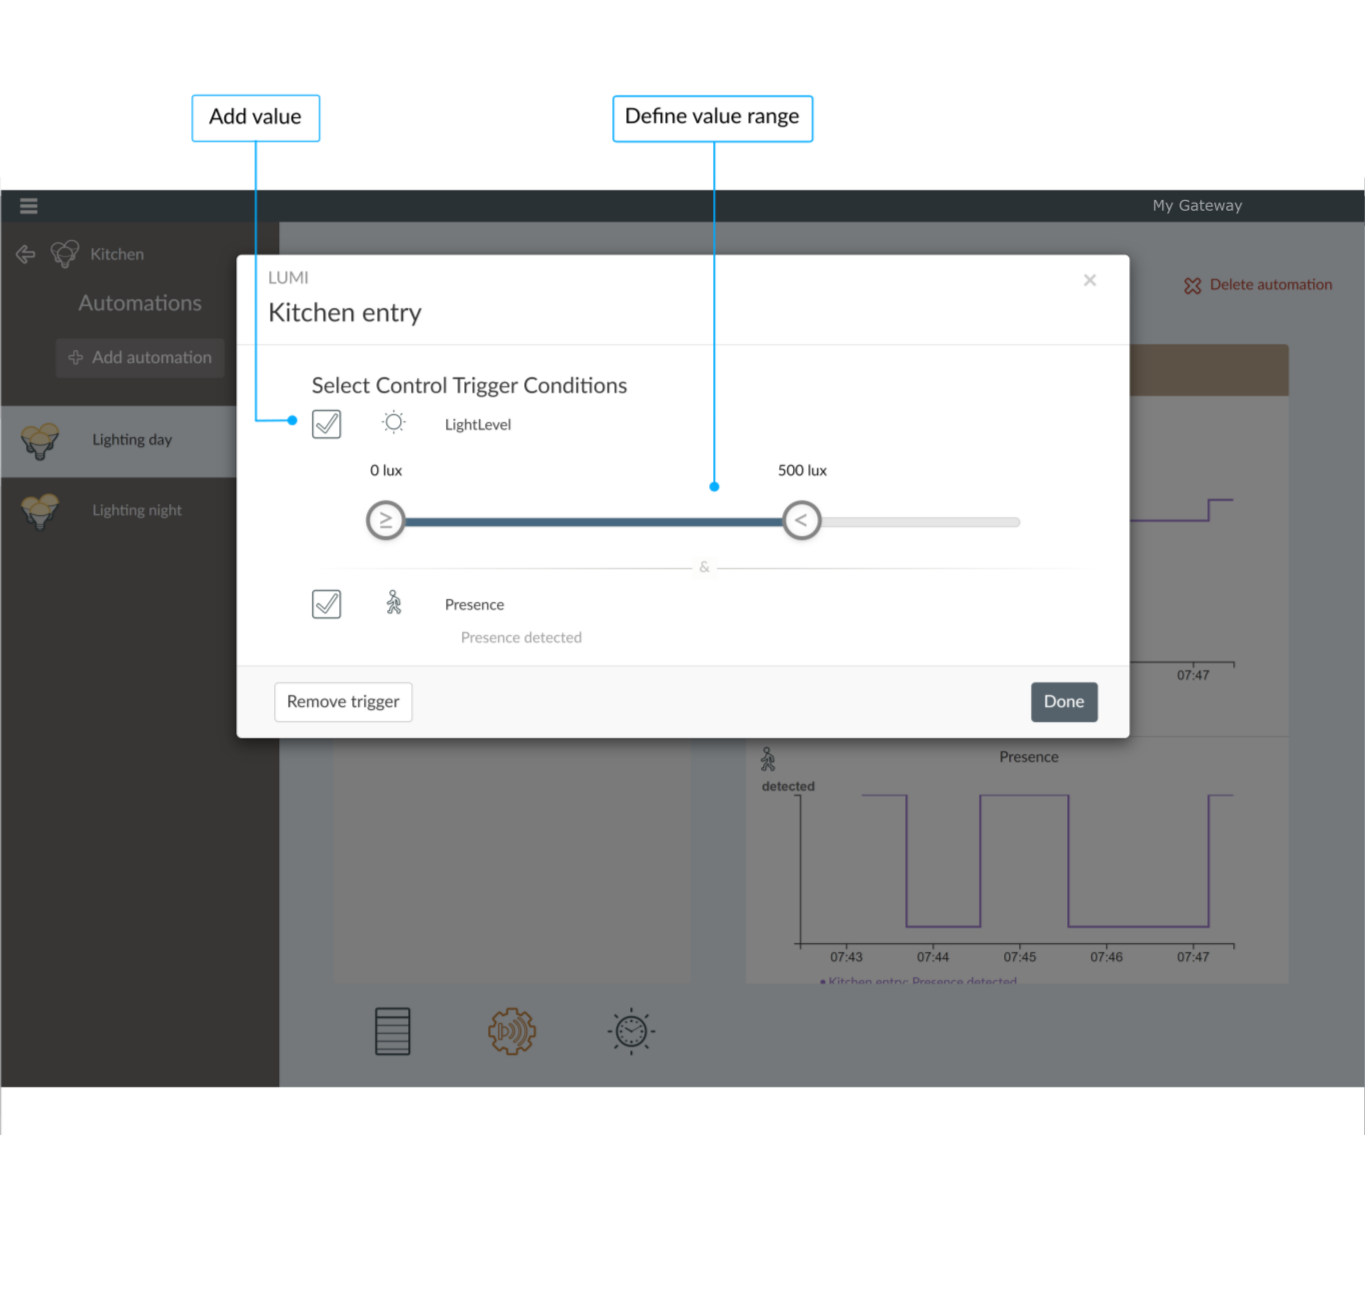
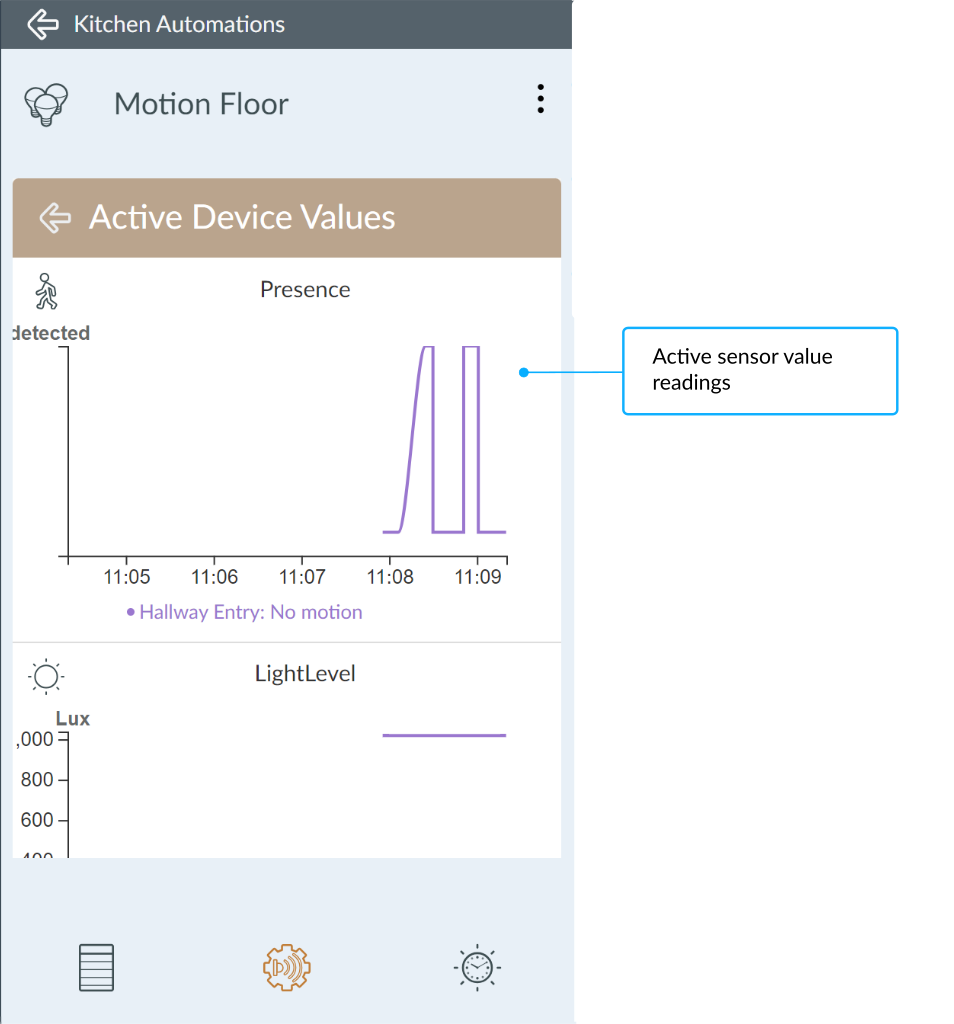
The current sensor values of the trigger are displayed in a continuous graph. Depending on the refresh rate of the selected trigger, it may take several minutes for a change to become visible.
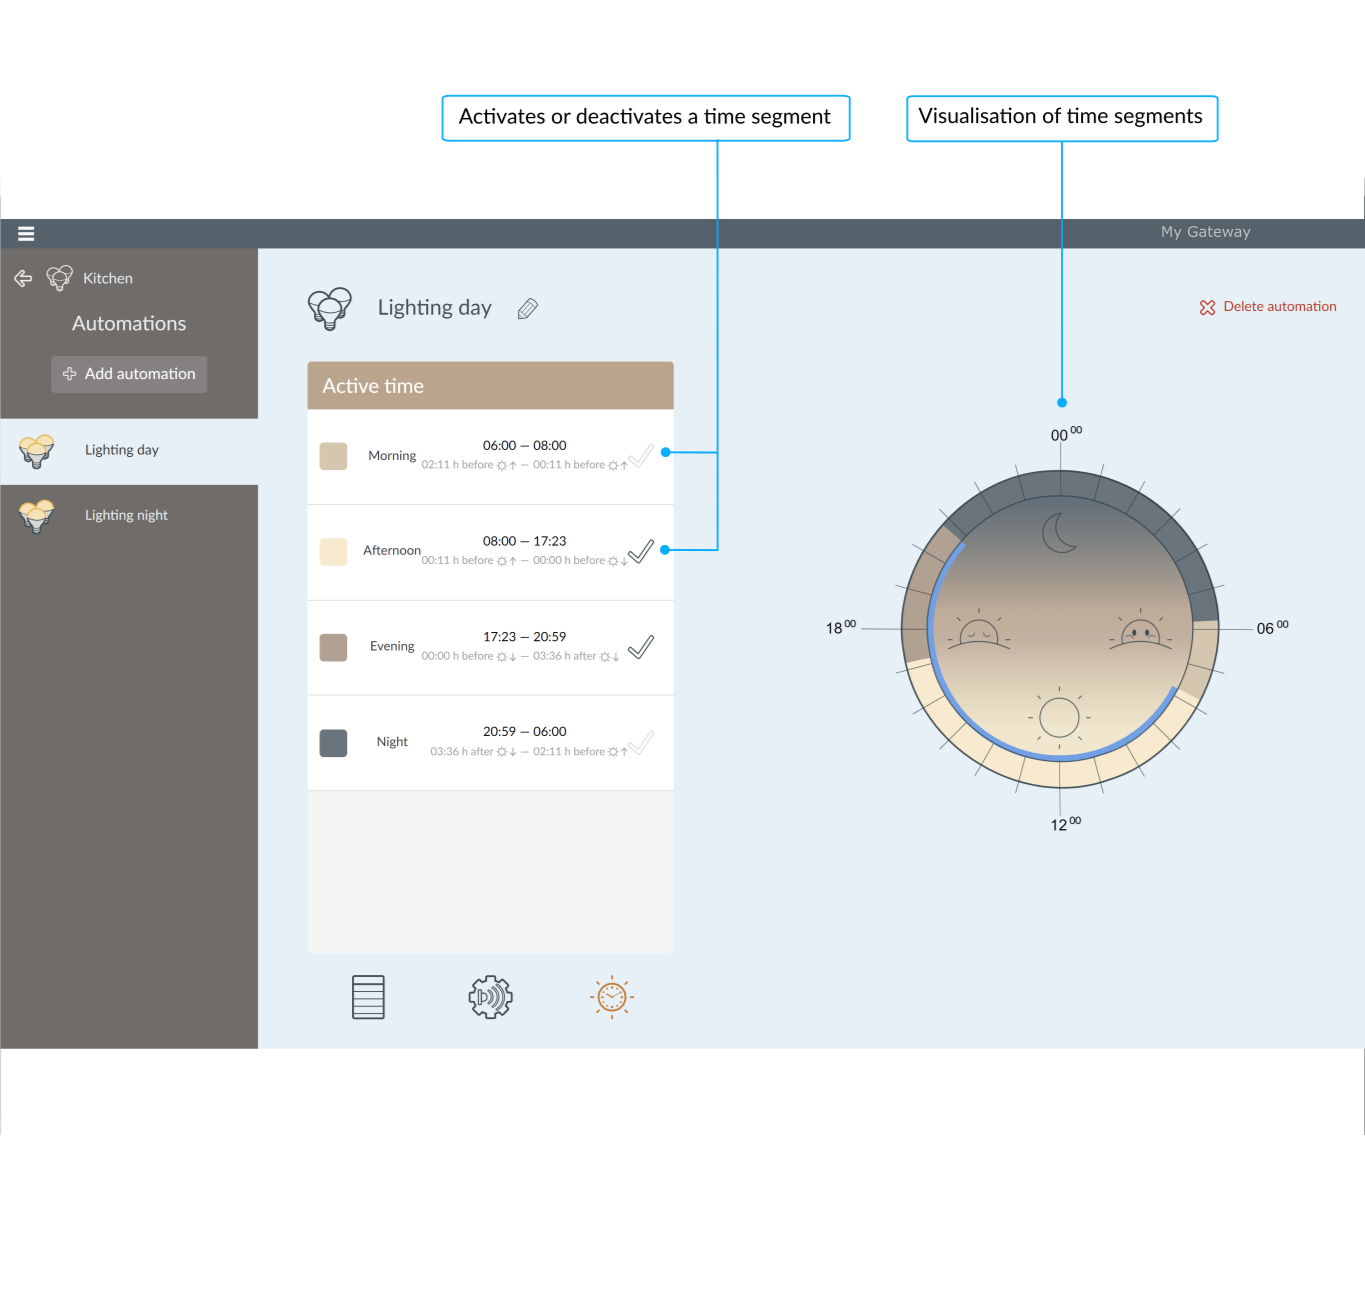
Define daily schedule
Automation can be activated or deactivated for any of the four available times of day.
- Check mark: Automation is active at the selected time of day.
- Check mark not set: Automation is not active at the selected time of day.
Manage lights
This page provides an overview of all lights which are connected to the gateway.
Menu > Devices > LightsLights overview
On this page, all connected lights and sockets are listed with name and manufacturer. Here you can see the current status of each individual device. It shows whether the light is currently switched on, switched off or possibly not accessible (for example if it is not connected to the power supply).
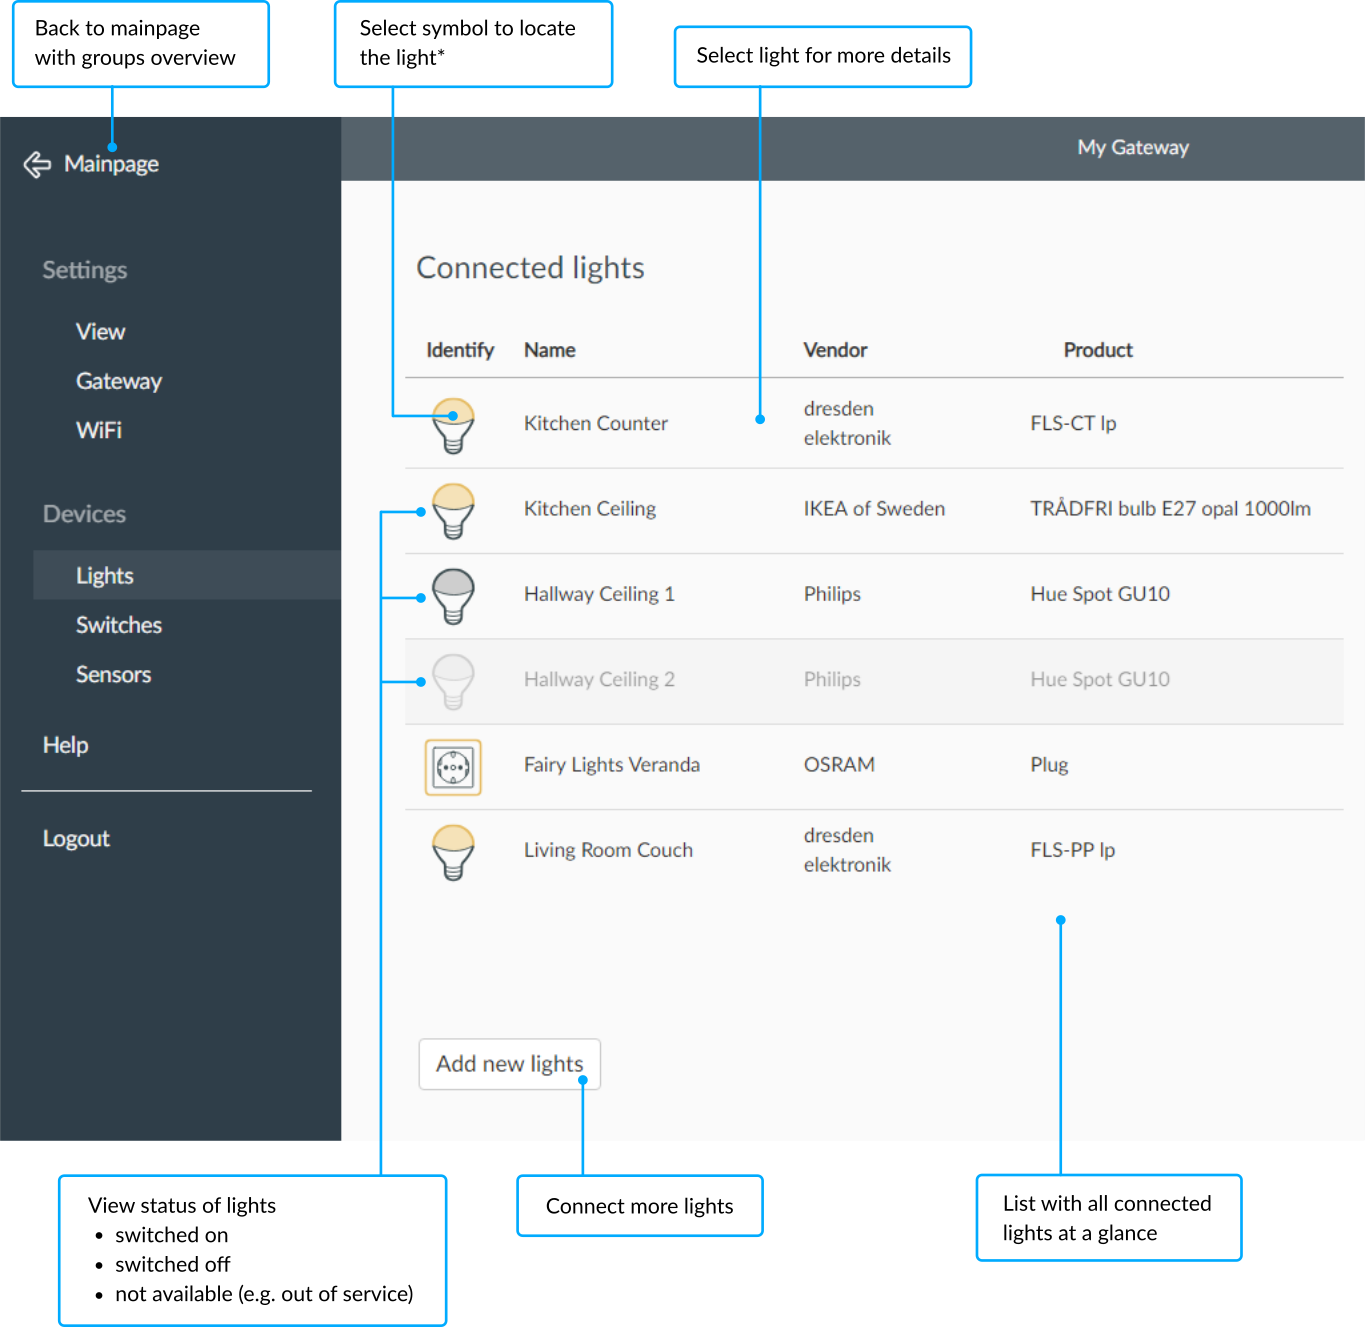
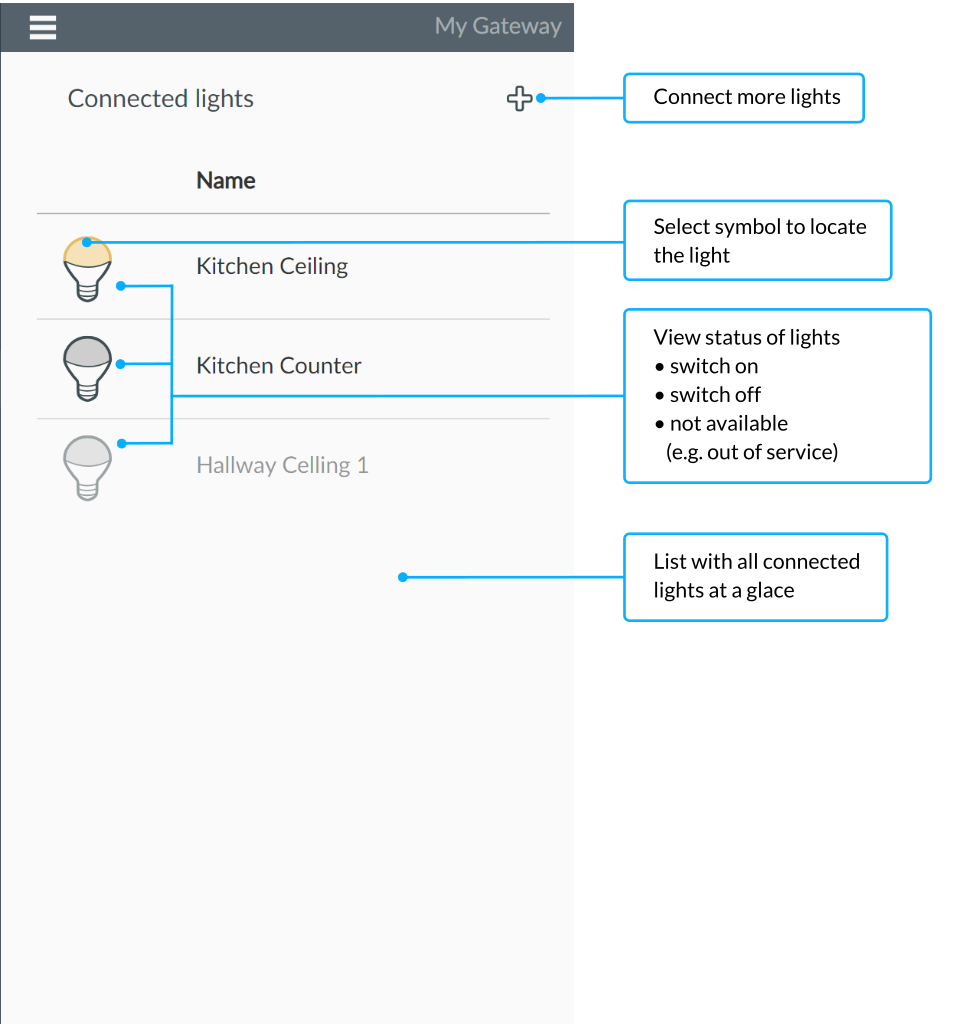
*By selecting the light symbol, the light will flash for 30 seconds.
Connect new lights
Via further lights can be connected to the gateway.
Especially for larger installations, it is recommended during light search to supply the lights with power one after the other and to wait until the light is shown in the list. If problems occur during the search process please refer to section Troubleshooting.
Light details
By selecting a certain light via its name in the list, you get to its detailed view.
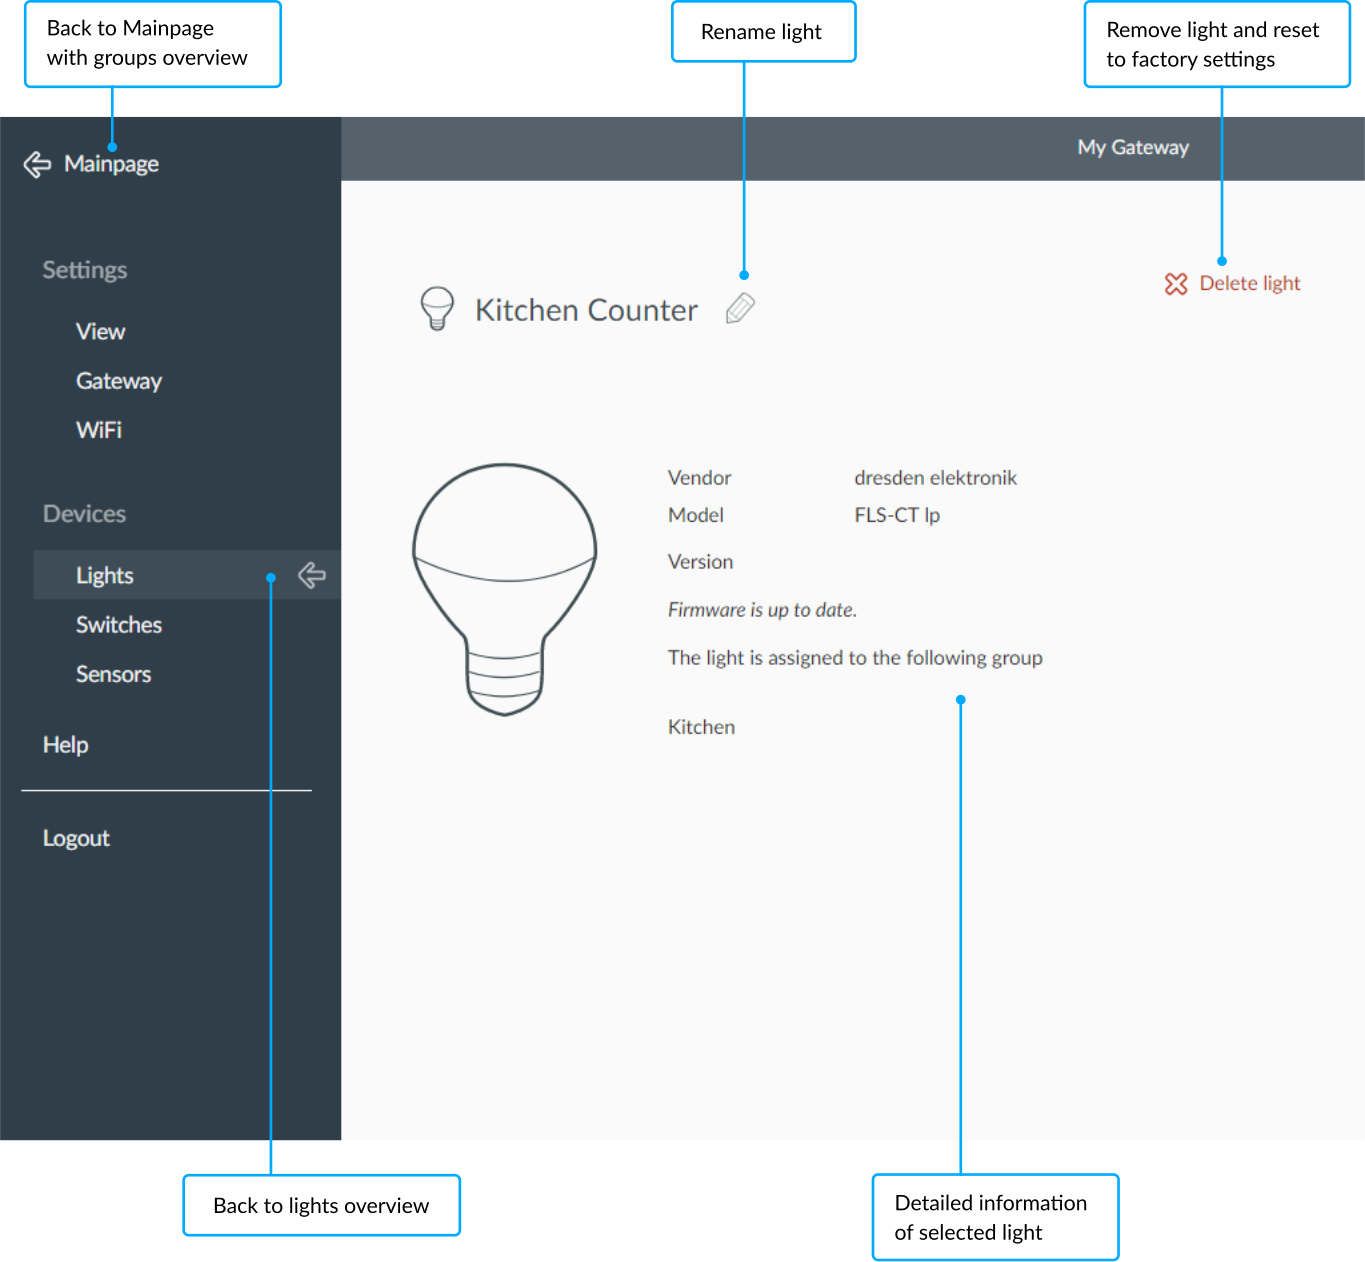
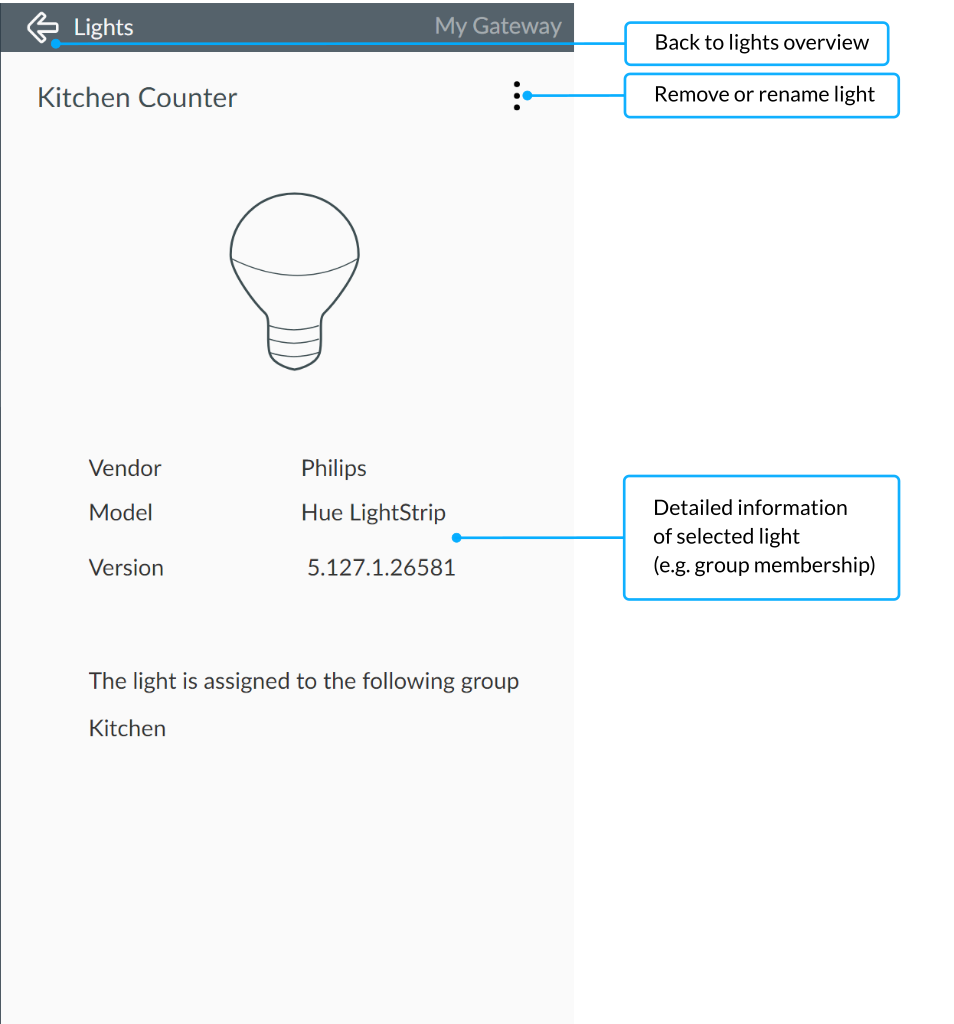
Rename, delete
When a light is deleted, it is reset to factory settings and removed from the gateway. All scenes and group memberships of the light will be lost.
Manage plugs
Menu > Devices > PlugsThis page provides an overview of all plugs which are connected to the gateway.
Plugs overview
Under Plugs
all plugs are listed with their names.
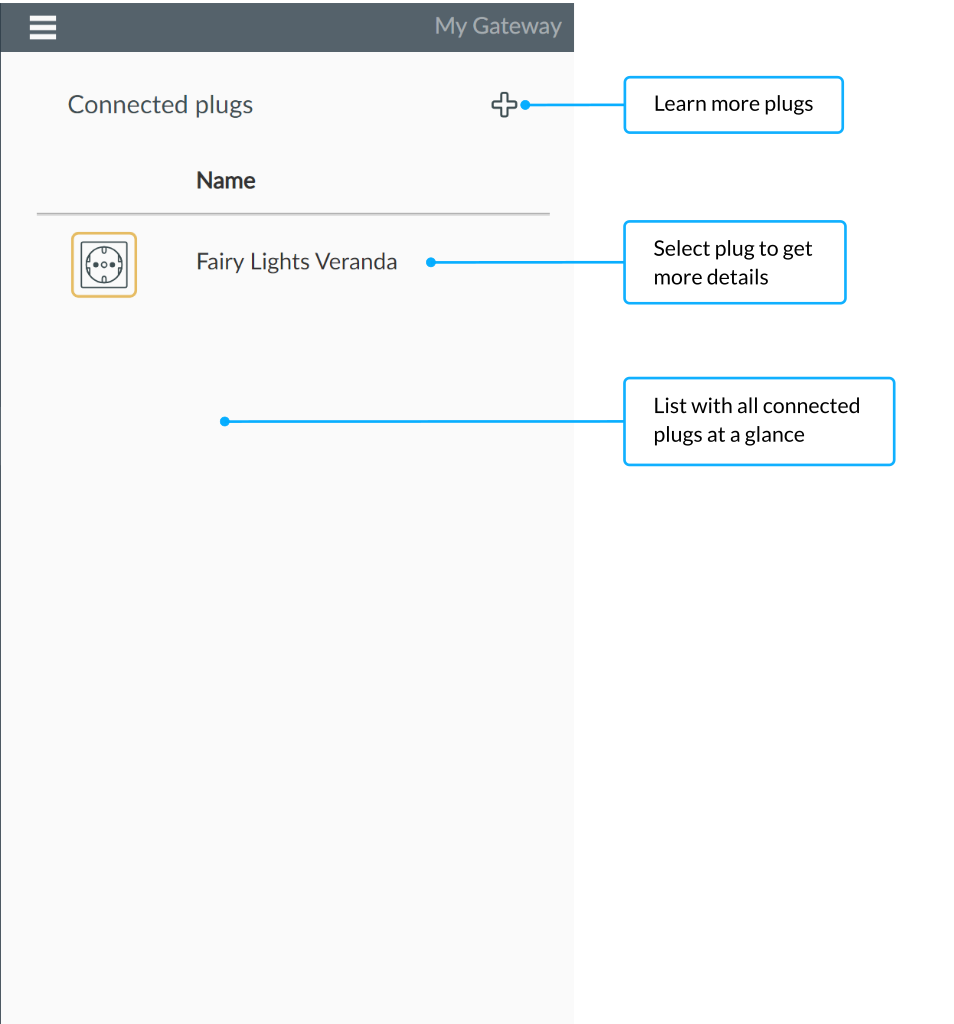
Plugs details
By selecting a certain plug via its name in the list, you get to its detail view.
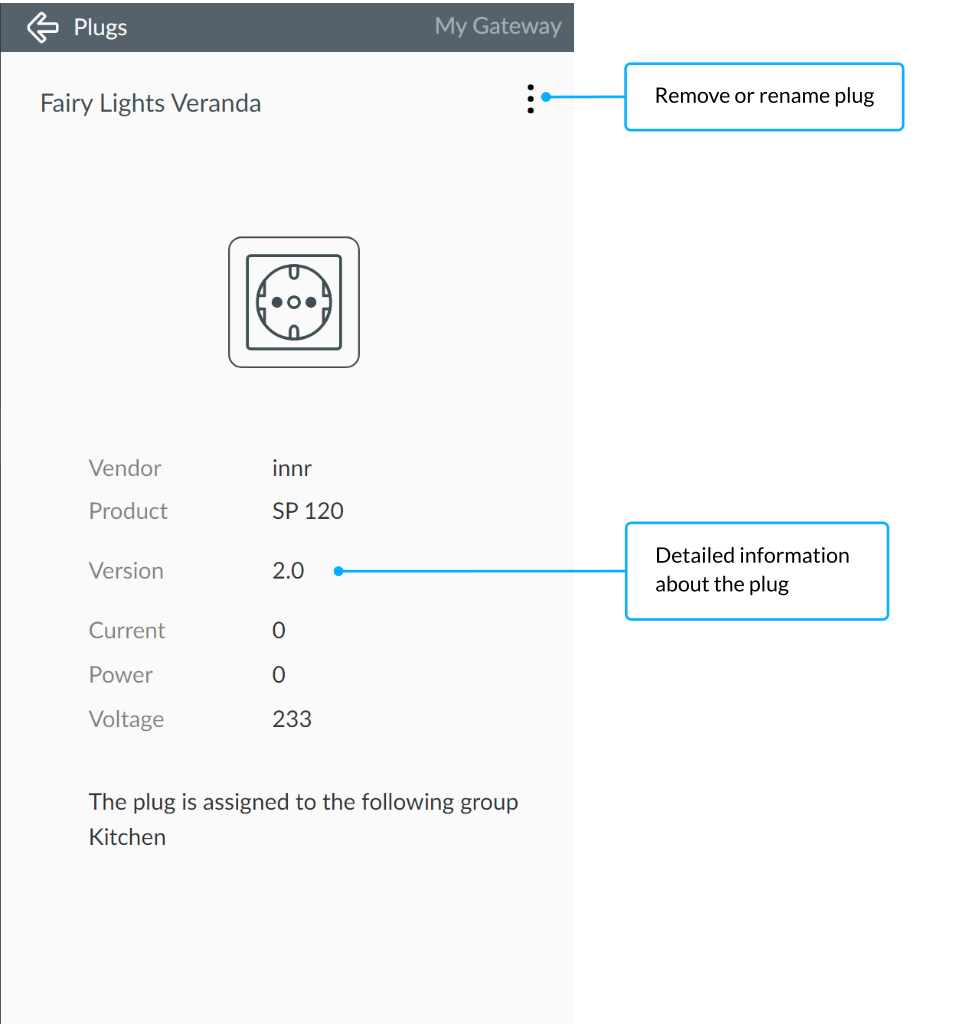
Rename, delete
After deleting a plug it must be reset to factory settings before it can be connected again to a gateway. Please refer to the manufacturer’s operating instructions.
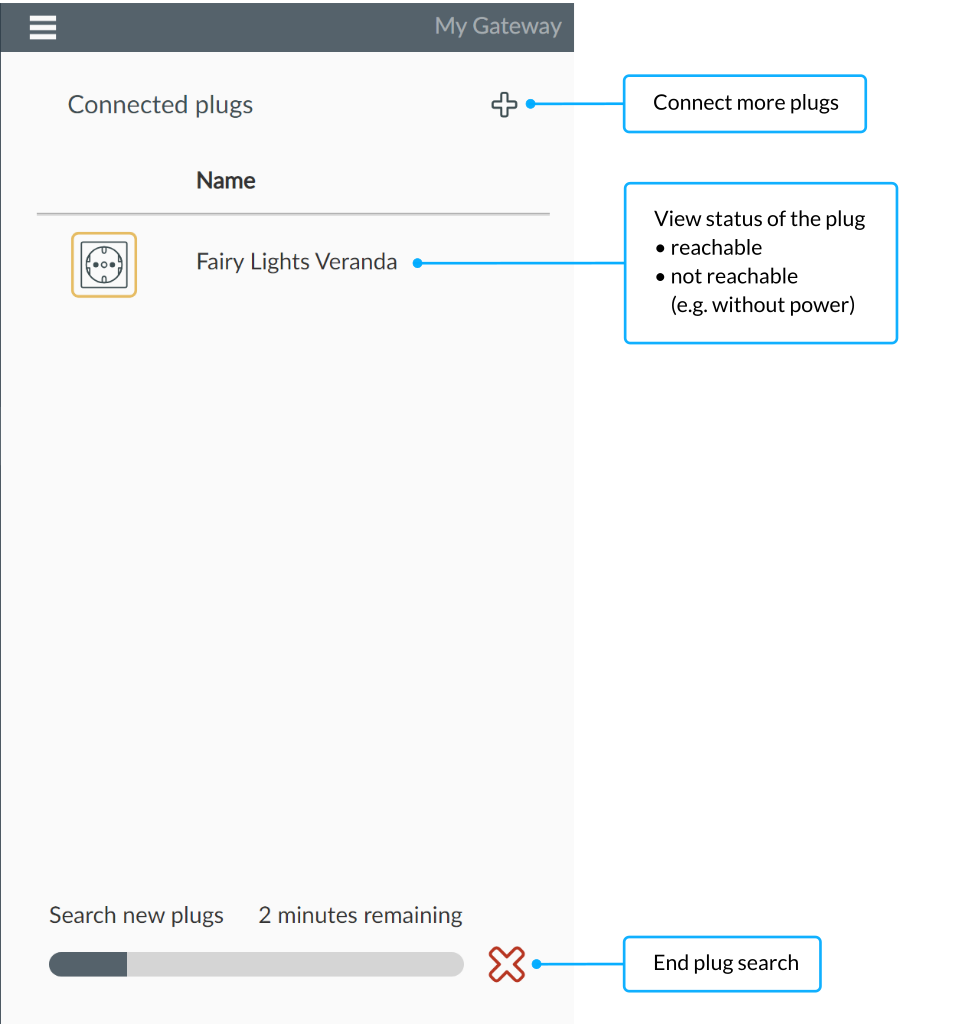
Add a new plug
To add a new plug, select . A dialog opens with a selection of devices. Then follow the steps of the instructions or refer to the manufacturer’s operating instructions.
Manage switches
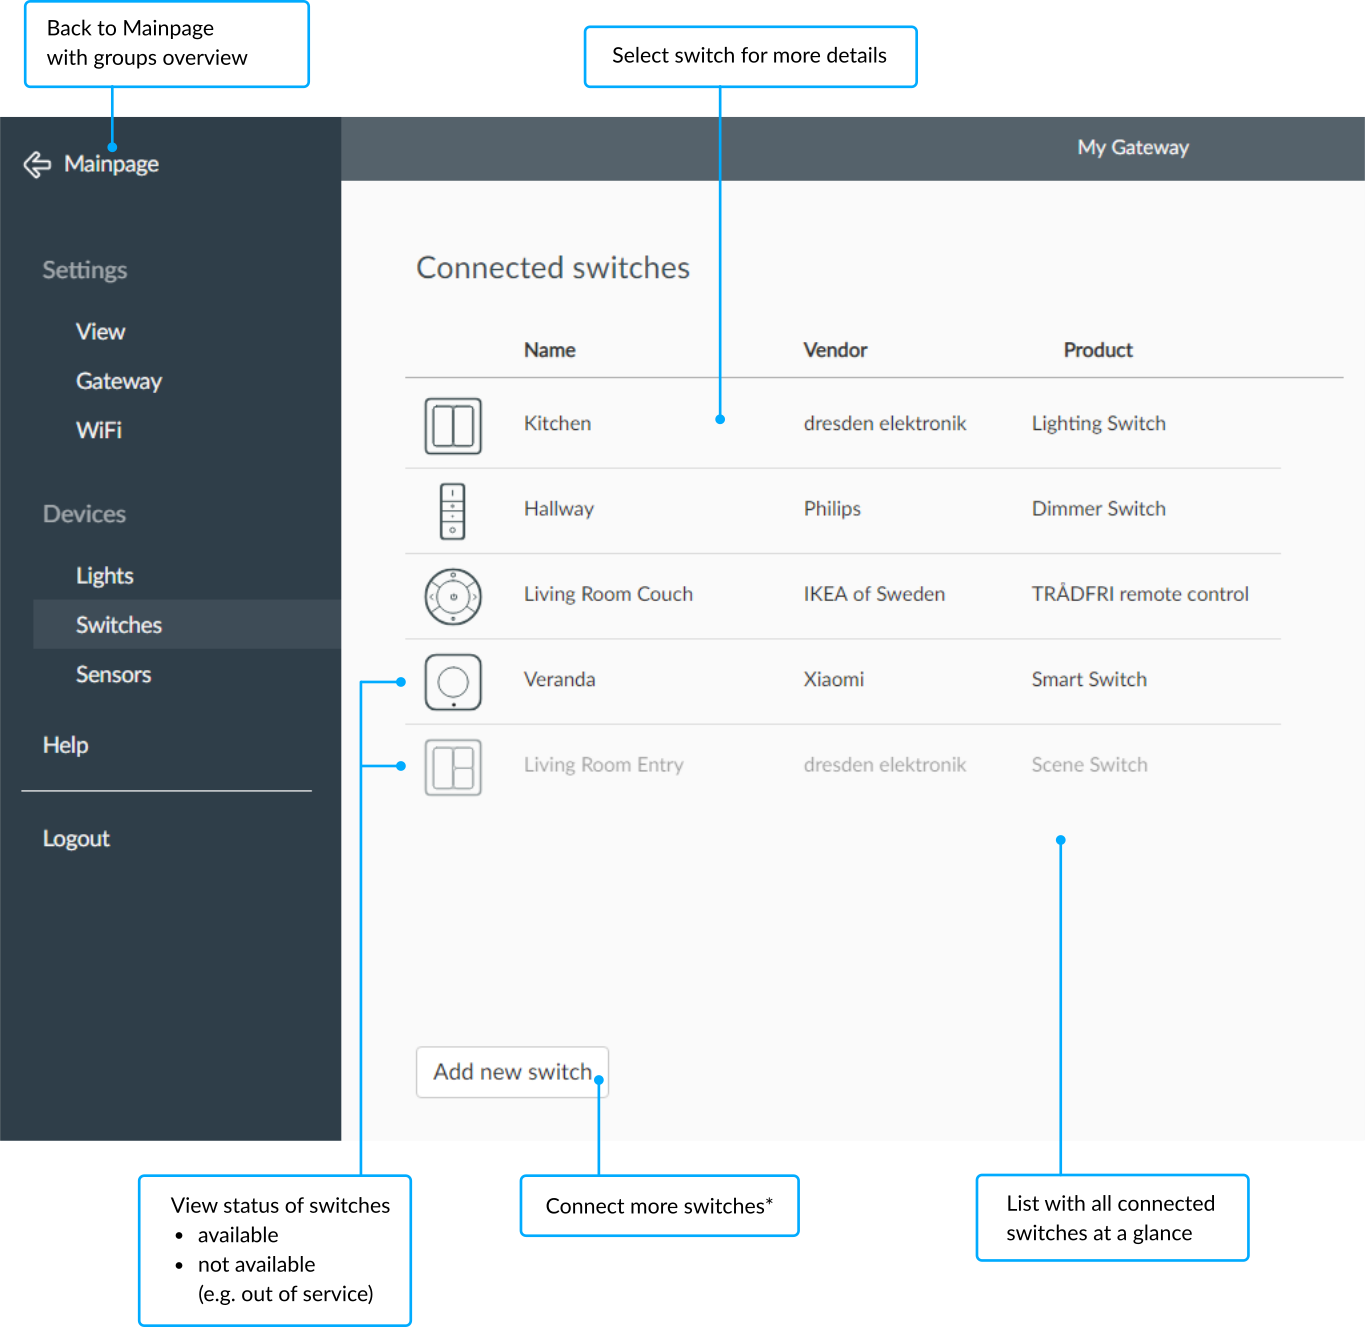
Menu > Devices > SwitchesThis page provides an overview of all switches which are connected to the gateway.
Switch overview
Under Switches
all wall switches and remote controls are
listed with name and manufacturer. Here you can see the status of each
individual device, for example if it is currently not available (if the
battery is empty).

Switch details
Selecting a switch by selecting the name in the list takes you to its detail page.
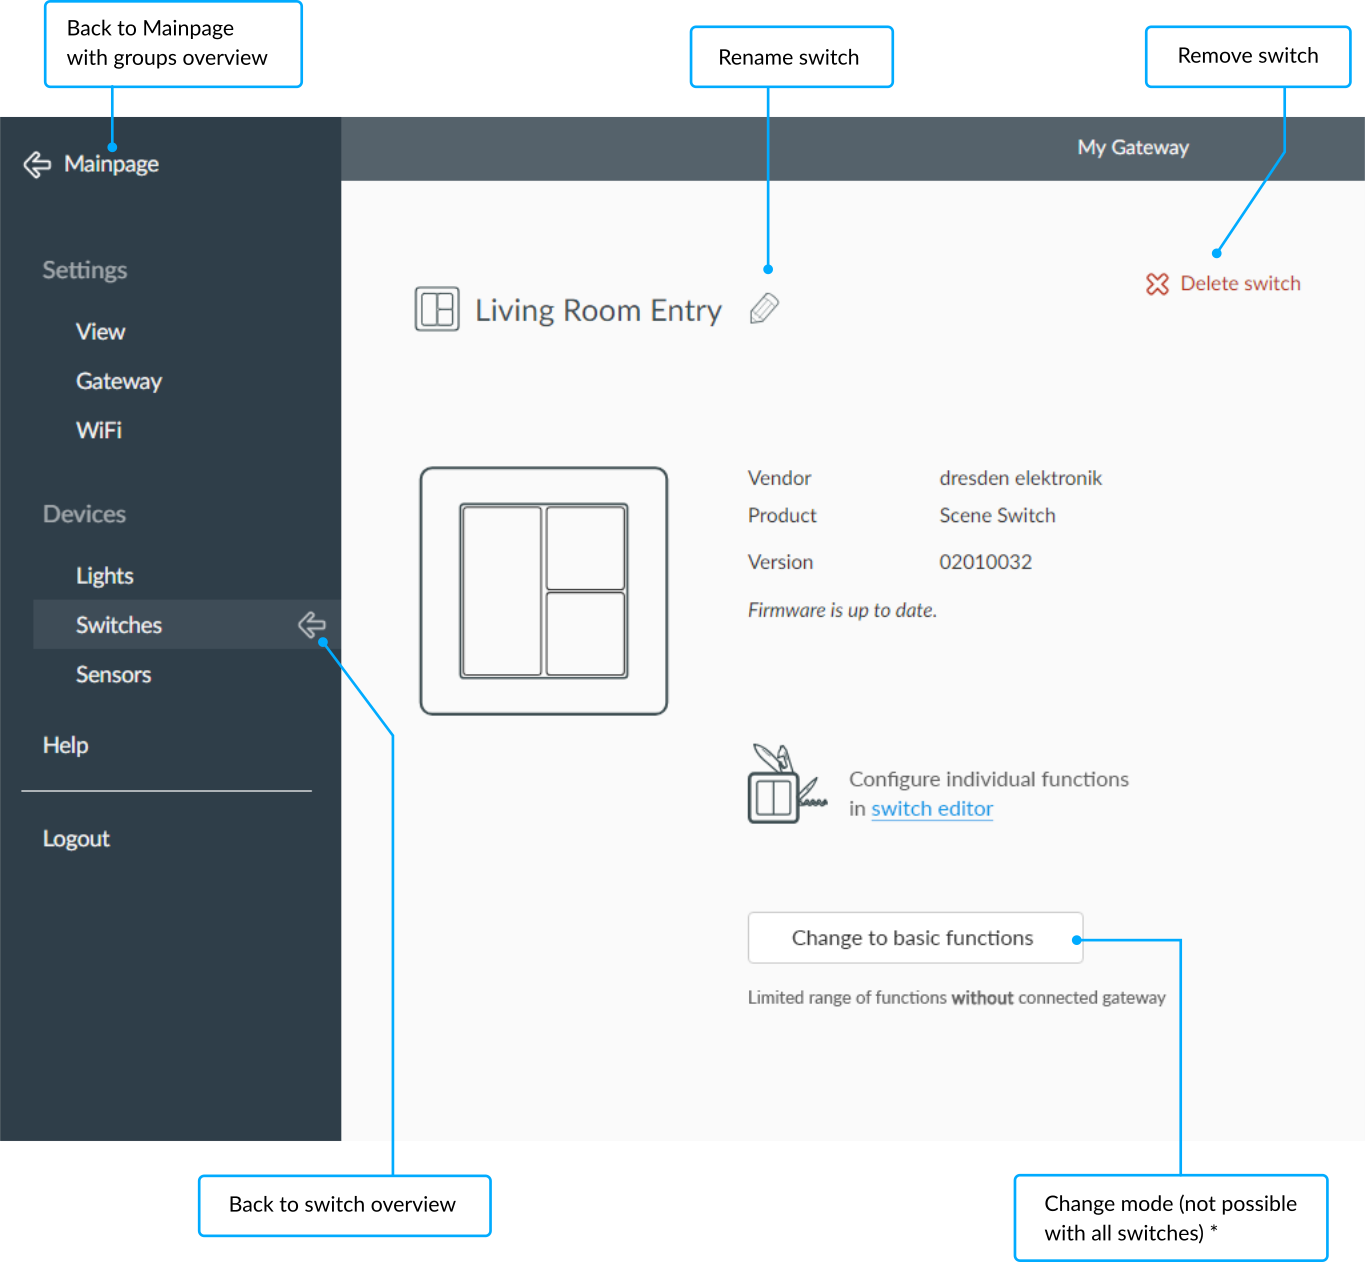
Rename, delete
After deleting a switch it must be reset to factory settings before it can be connected again to a gateway. Please refer to the manufacturer’s operating instructions.
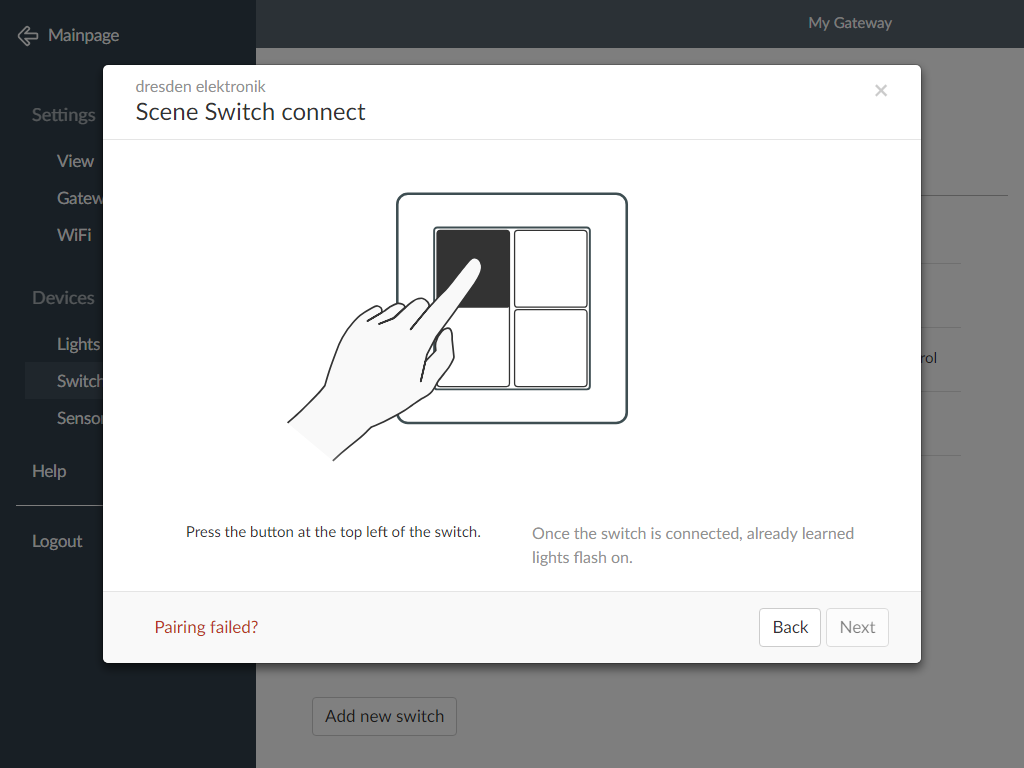
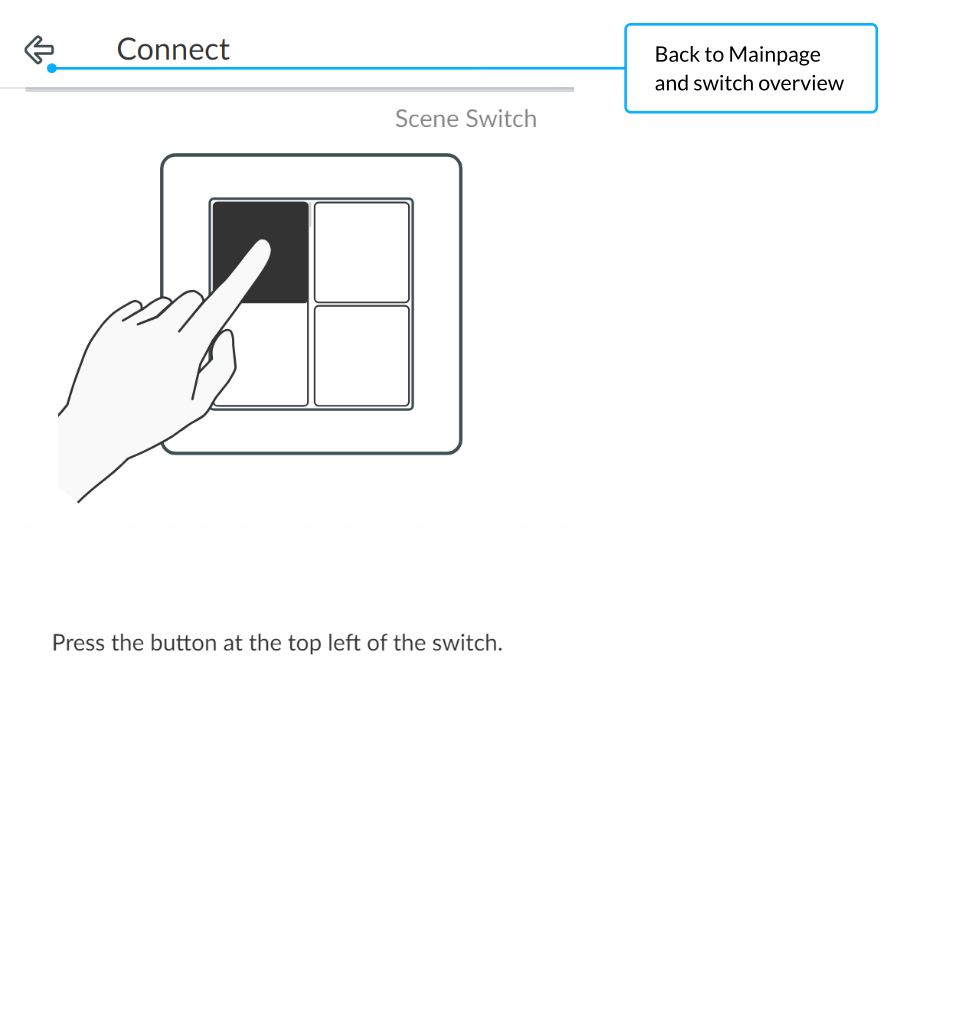
Add a new switch
Menu > Devices > SwitchesTo add a new switch, select . A dialog opens with a selection of devices. Follow the steps of the instructions or refer to the operating instructions of the manufacturer.
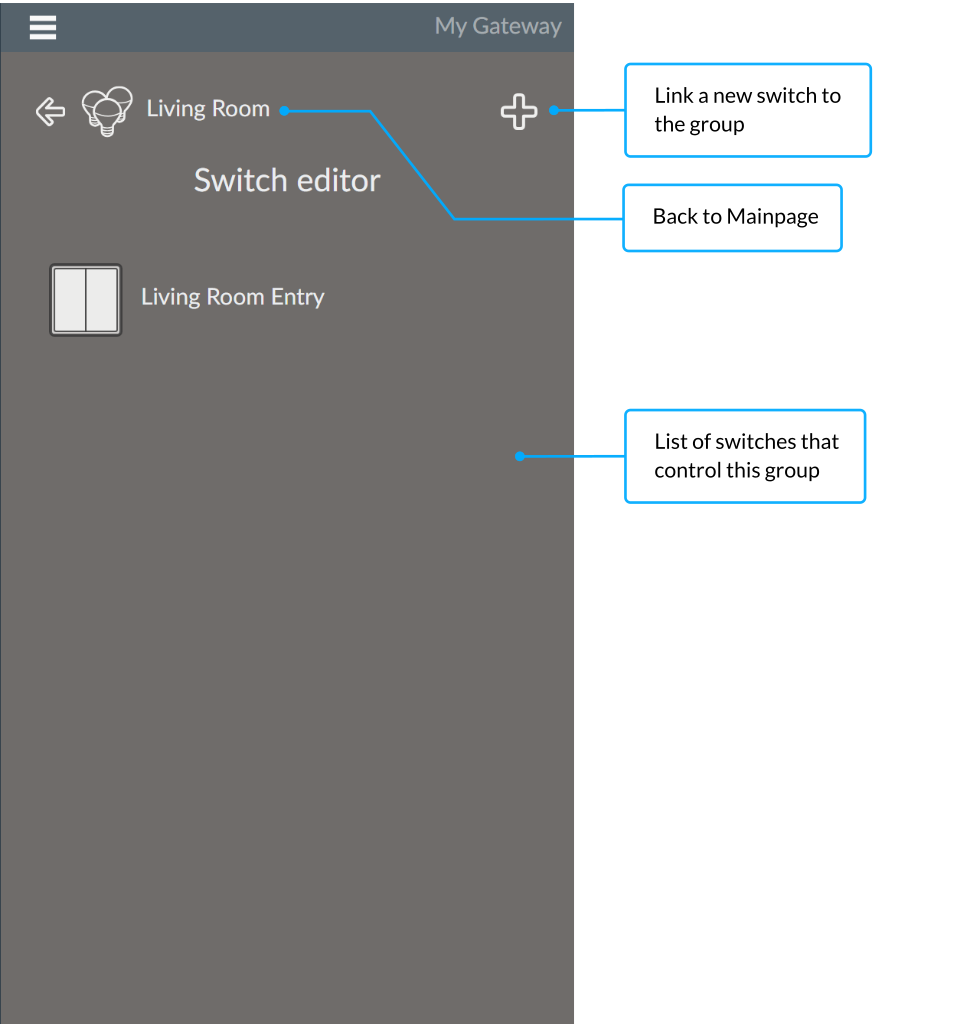
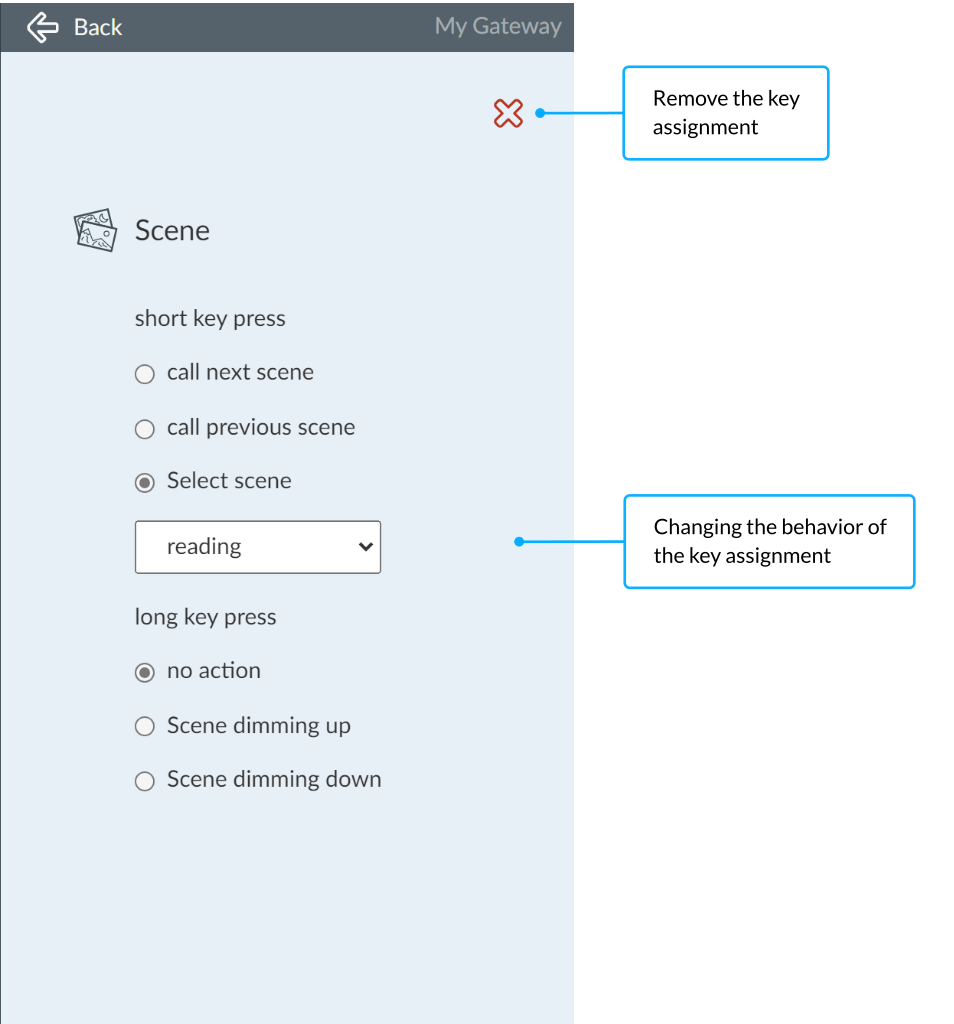
Switch editor
Dashboard > Room Details > Switches > Switch EditorSwitches can control any number of light groups, several switches can be assigned to each group.
Switch selection
First, a switch must be linked to the light group to be controlled.
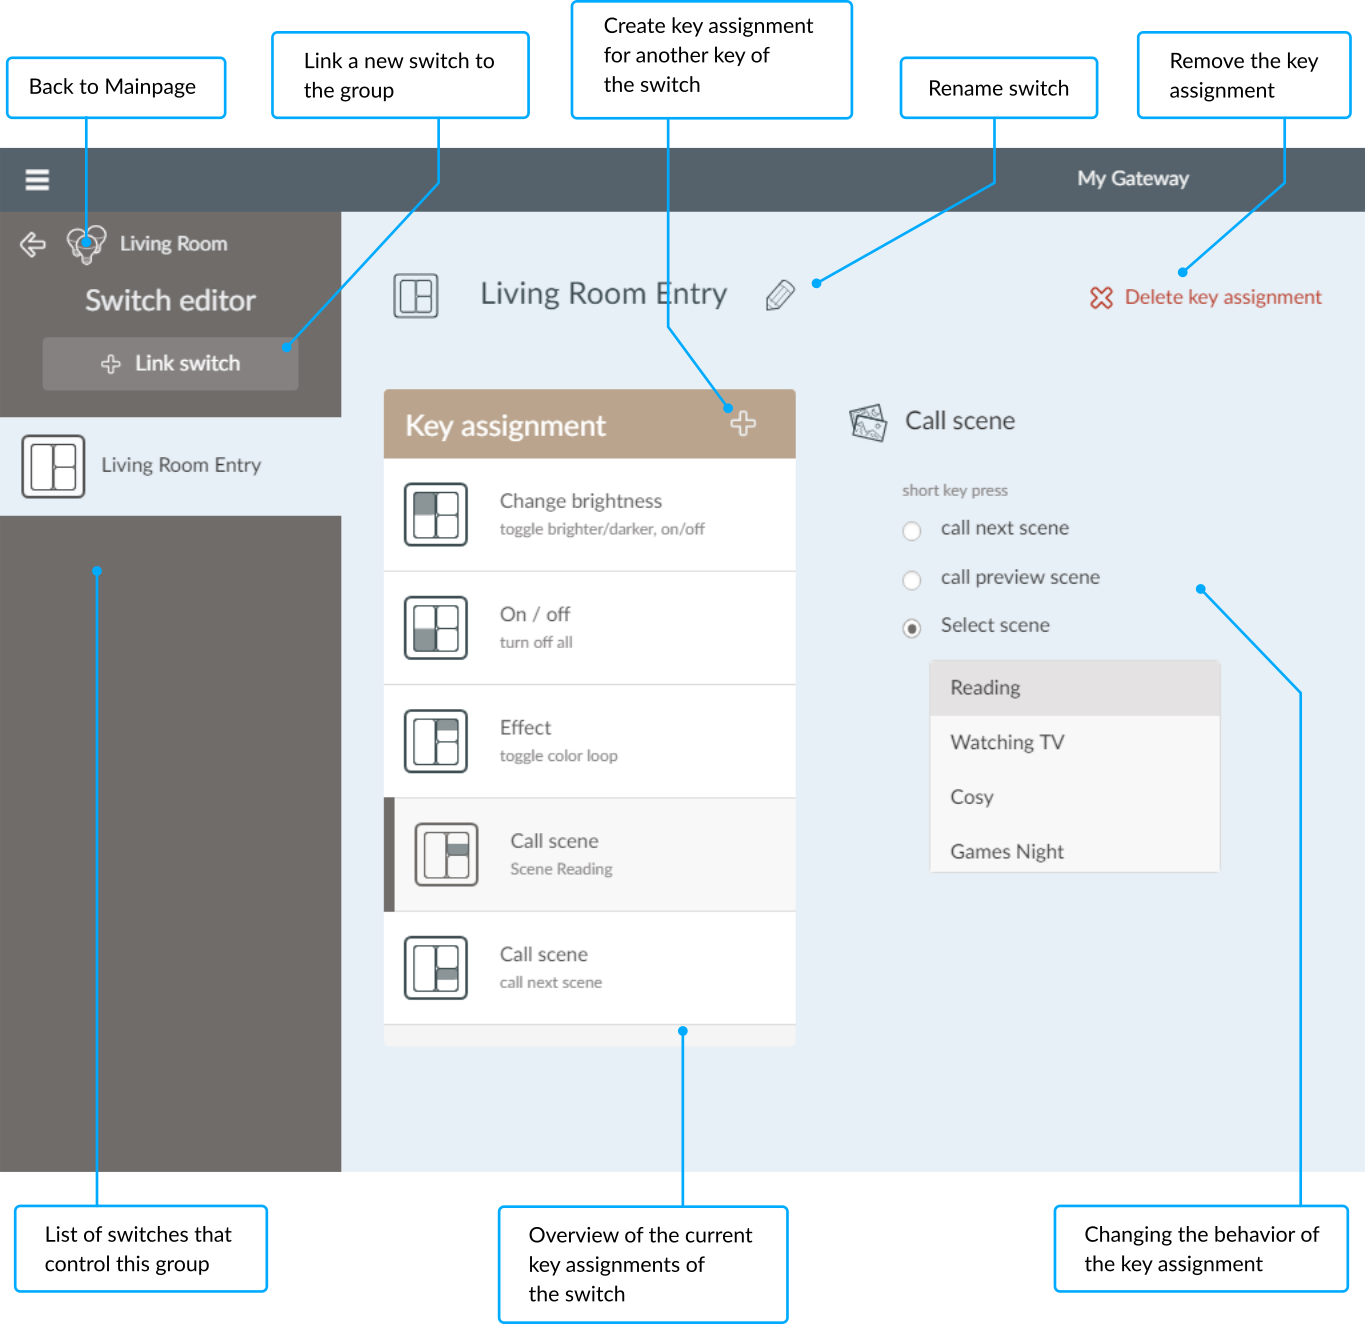
Overview
All assigned buttons are displayed for each configured switch.
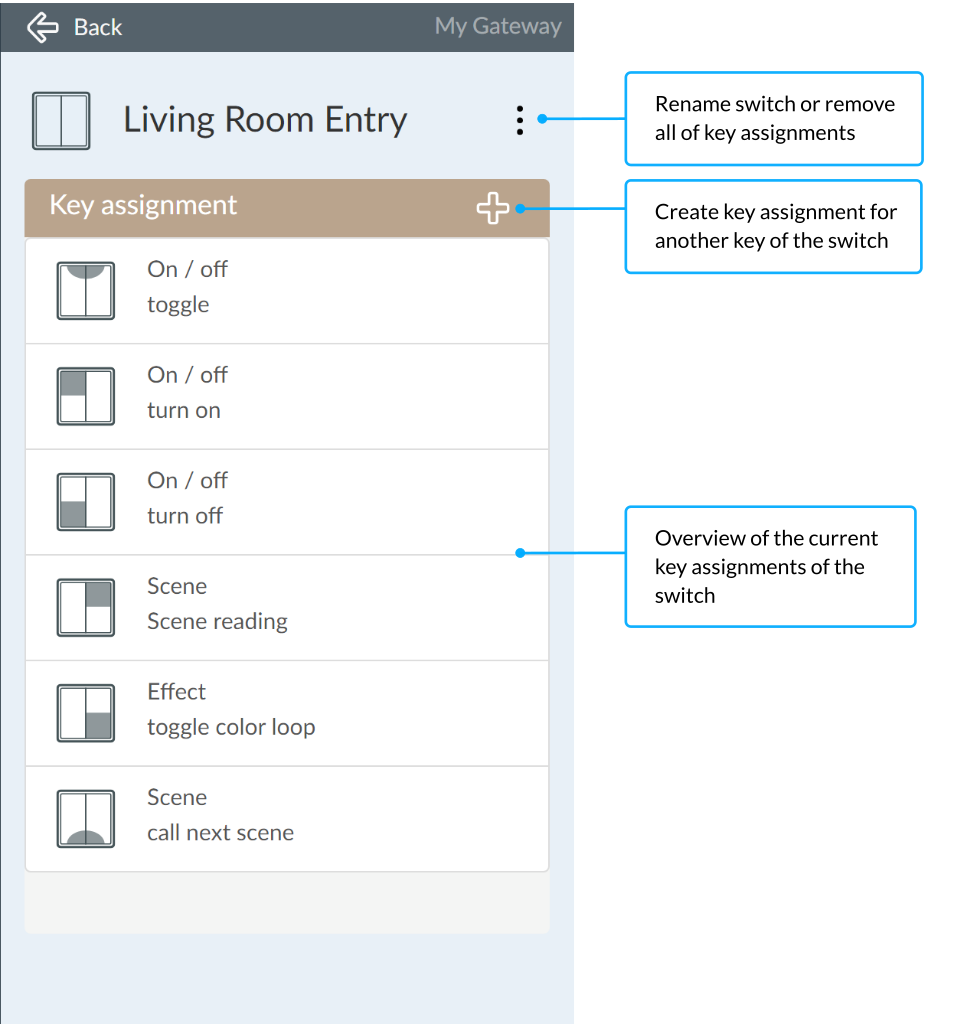
Depending on the function of the button assignment, it can be modified. For example, another scene can be selected for a scene button. If a button is to be assigned a completely different function, the old assignment must first be deleted and then the new assignment can be created.
Manage sensors
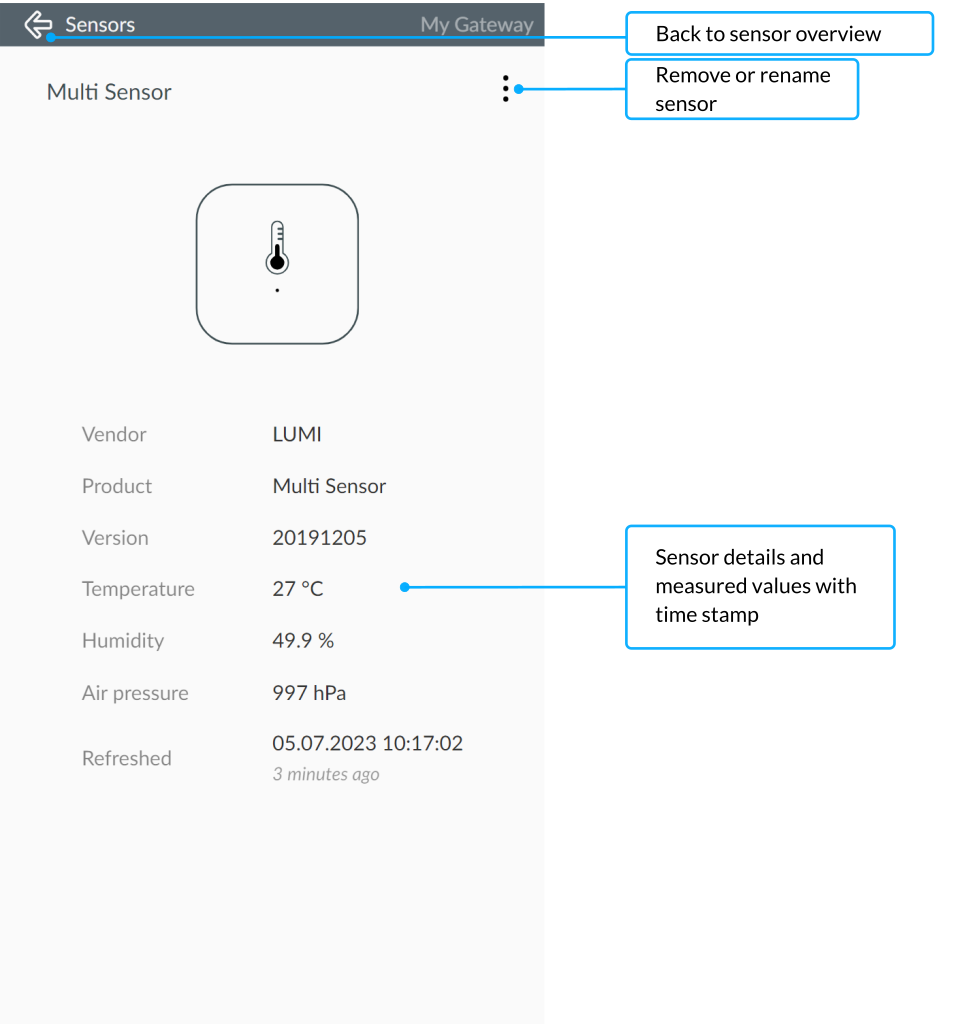
Menu > Devices > SensorsThis page provides an overview of all sensors which are connected to the gateway.
Sensor overview
Under Sensors
all sensors are listed with their names and
currently measured values, such as movement, brightness, temperature,
humidity, air pressure etc..
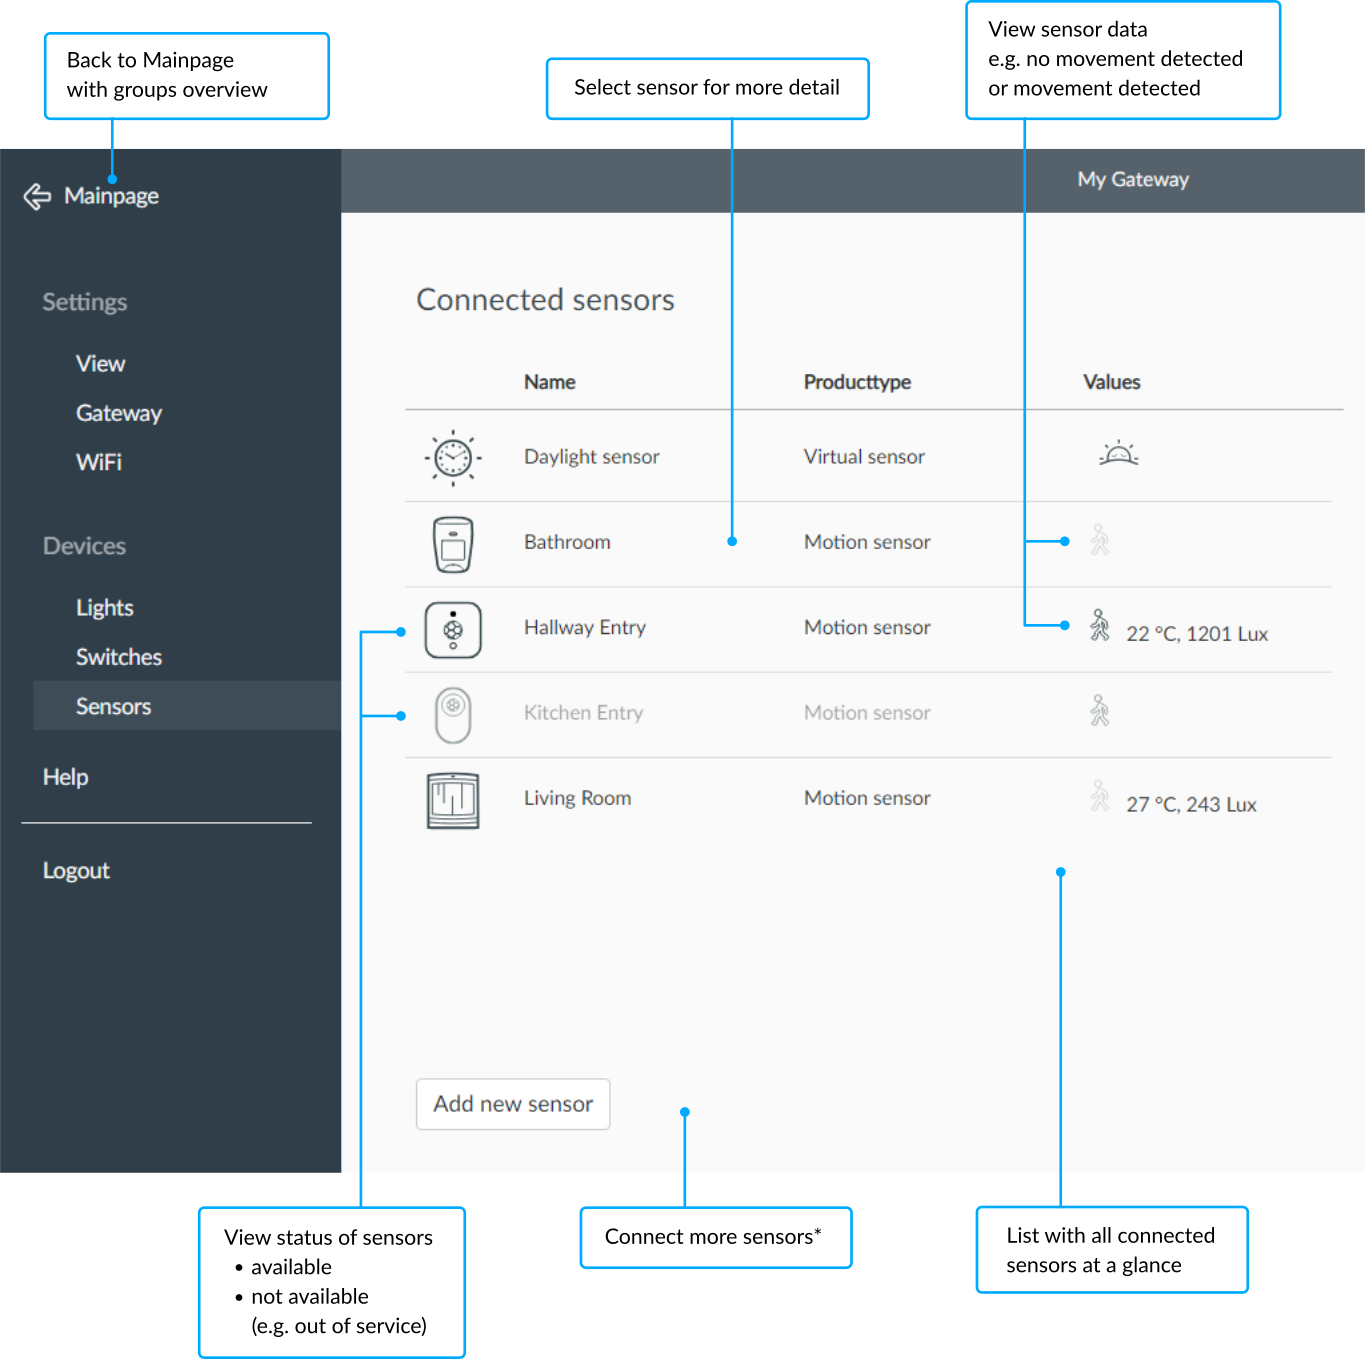
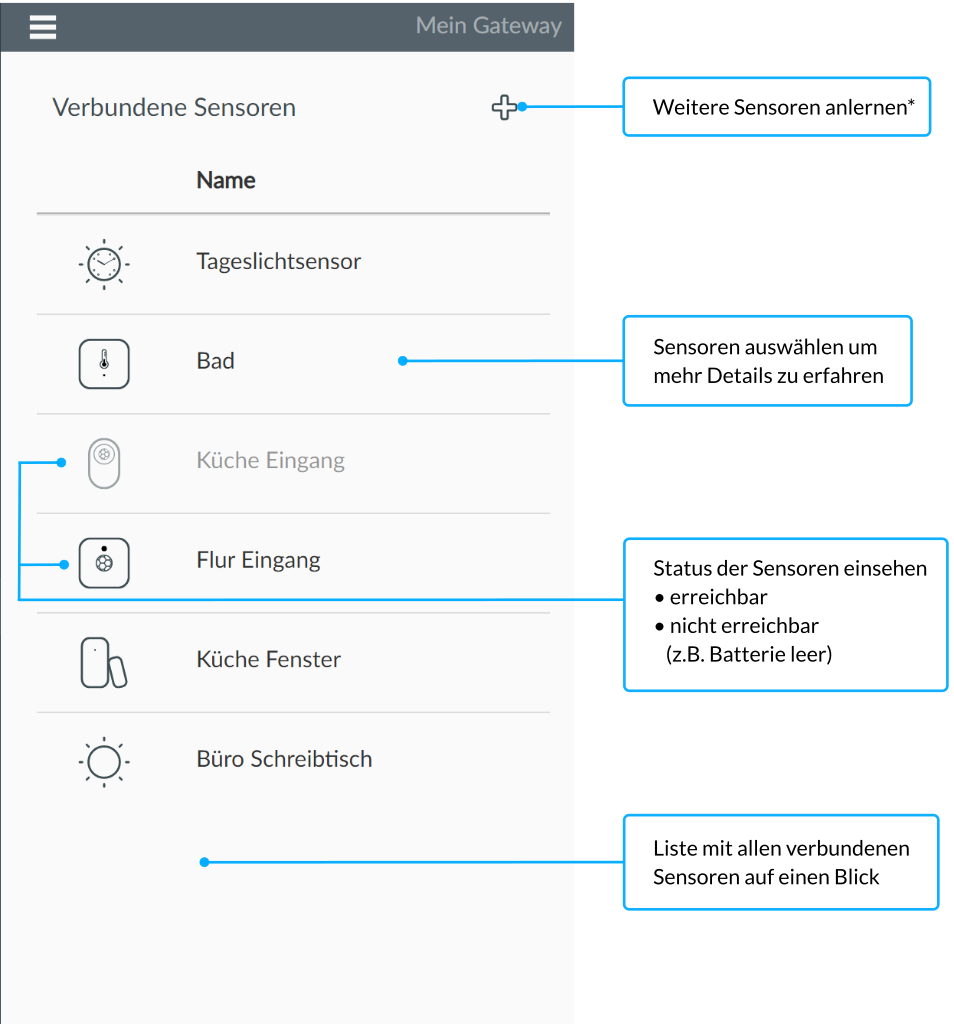
*Connecting a new sensor is described in section Add a new sensor.
The virtual daylight sensor is provided by the gateway and calculates sunrise, sunset and twilight phases using the position and time of the current location. This information can be used in automations.
Sensor details
By selecting a certain sensor via its name in the list, you get to its detail view.
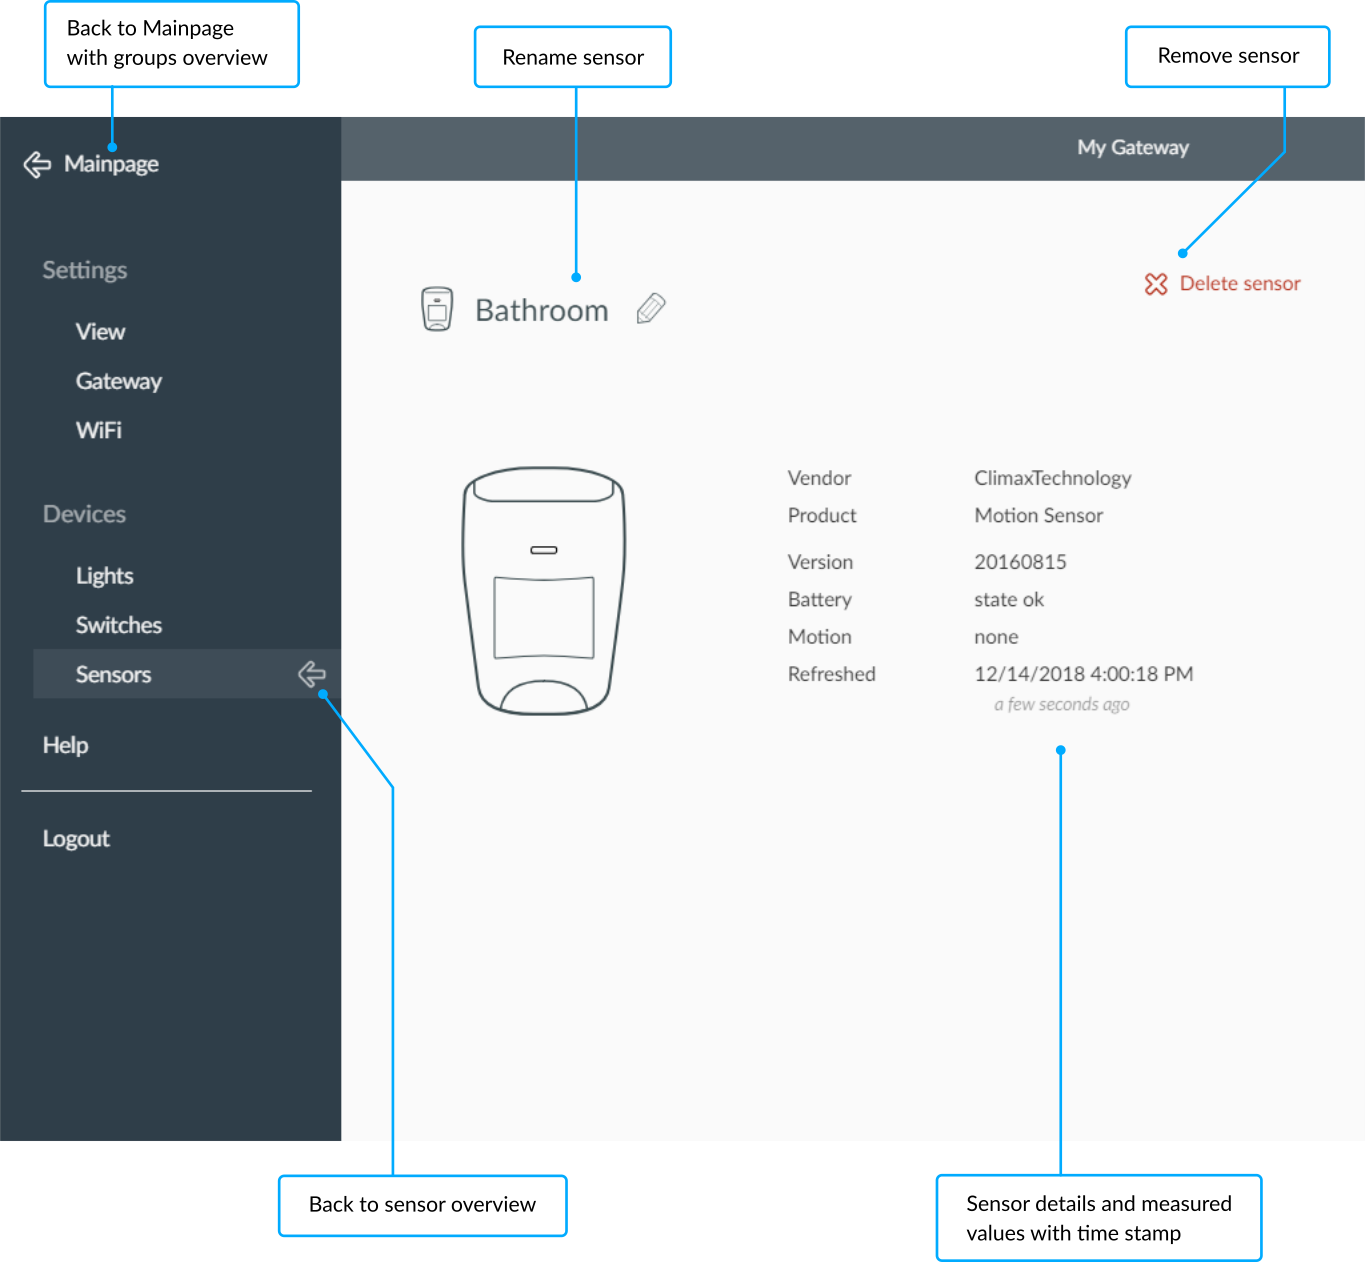
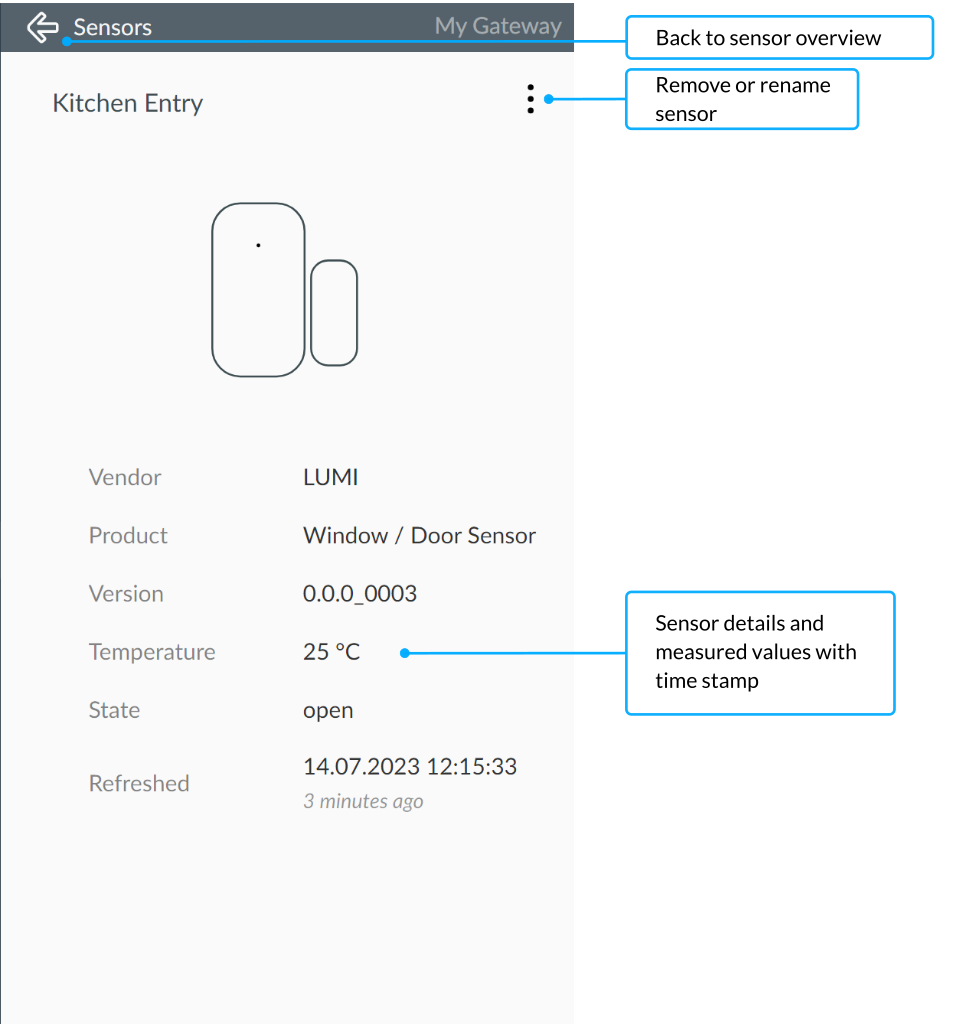
Rename, delete
After deleting a sensor it must be reset to factory settings before it can be connected again to a gateway. Please refer to the manufacturer’s operating instructions.
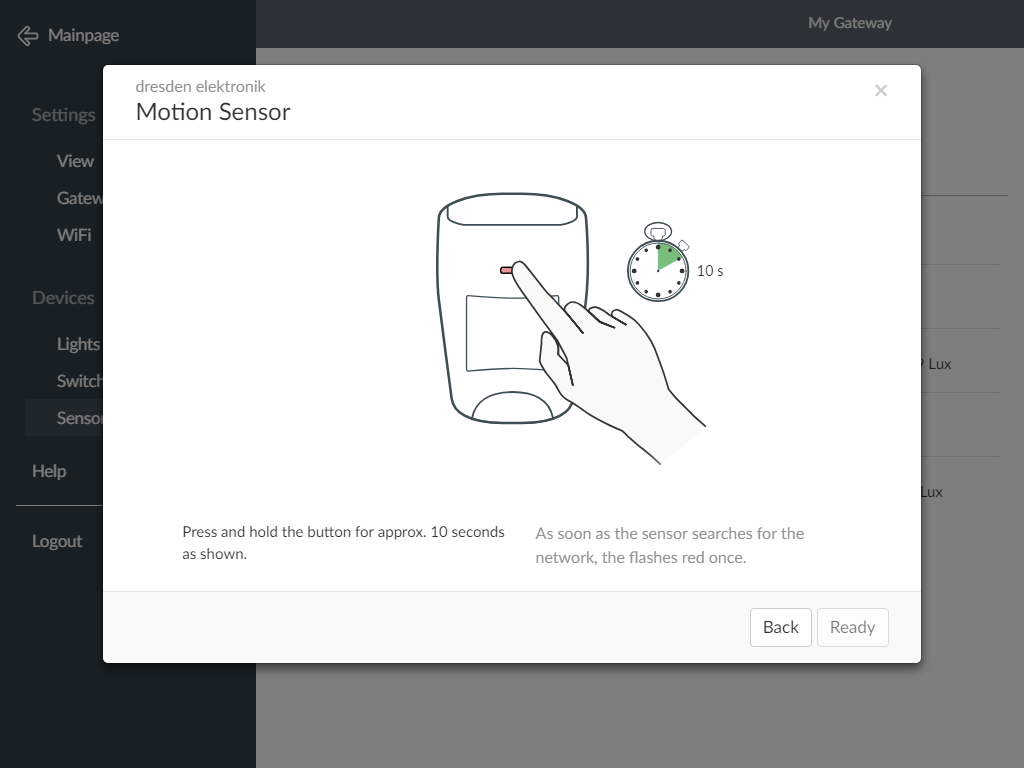
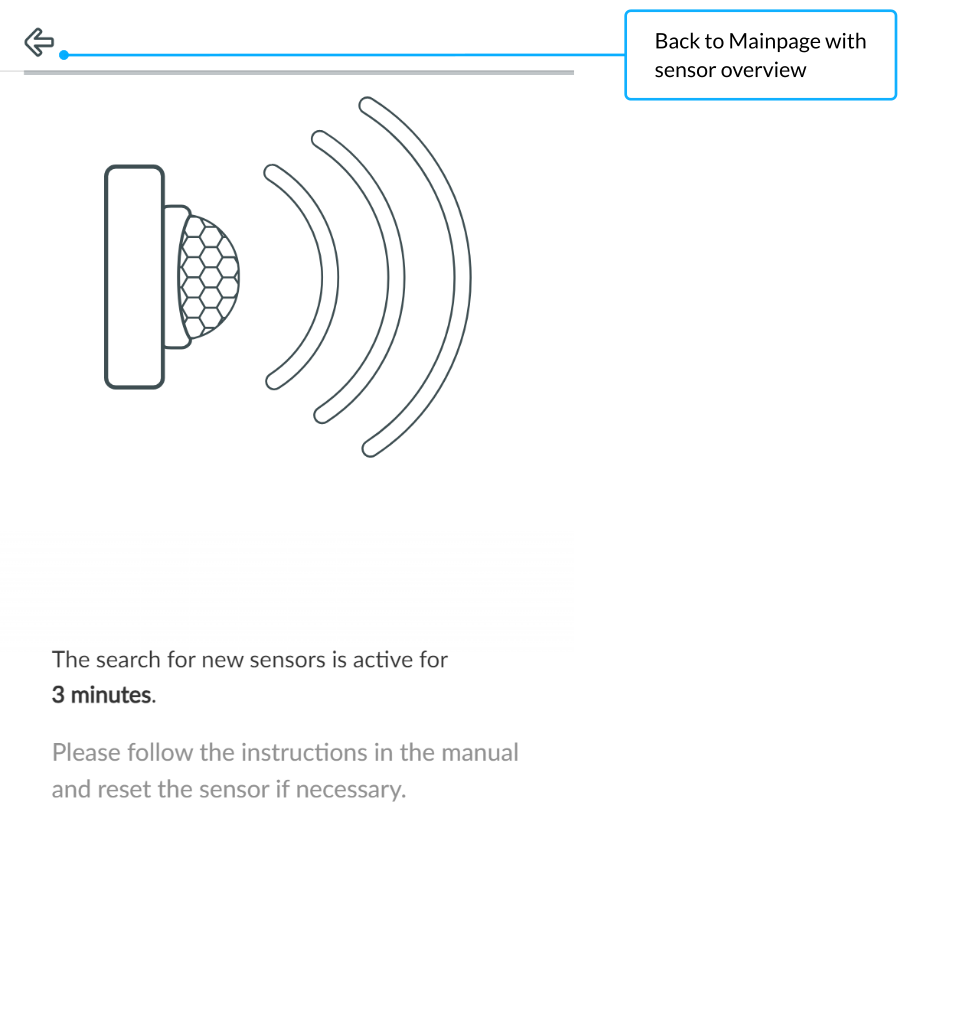
Add a new sensor
To add a new sensor, select . A dialog opens with a selection of devices. Then follow the steps of the instructions or refer to the manufacturer’s operating instructions.
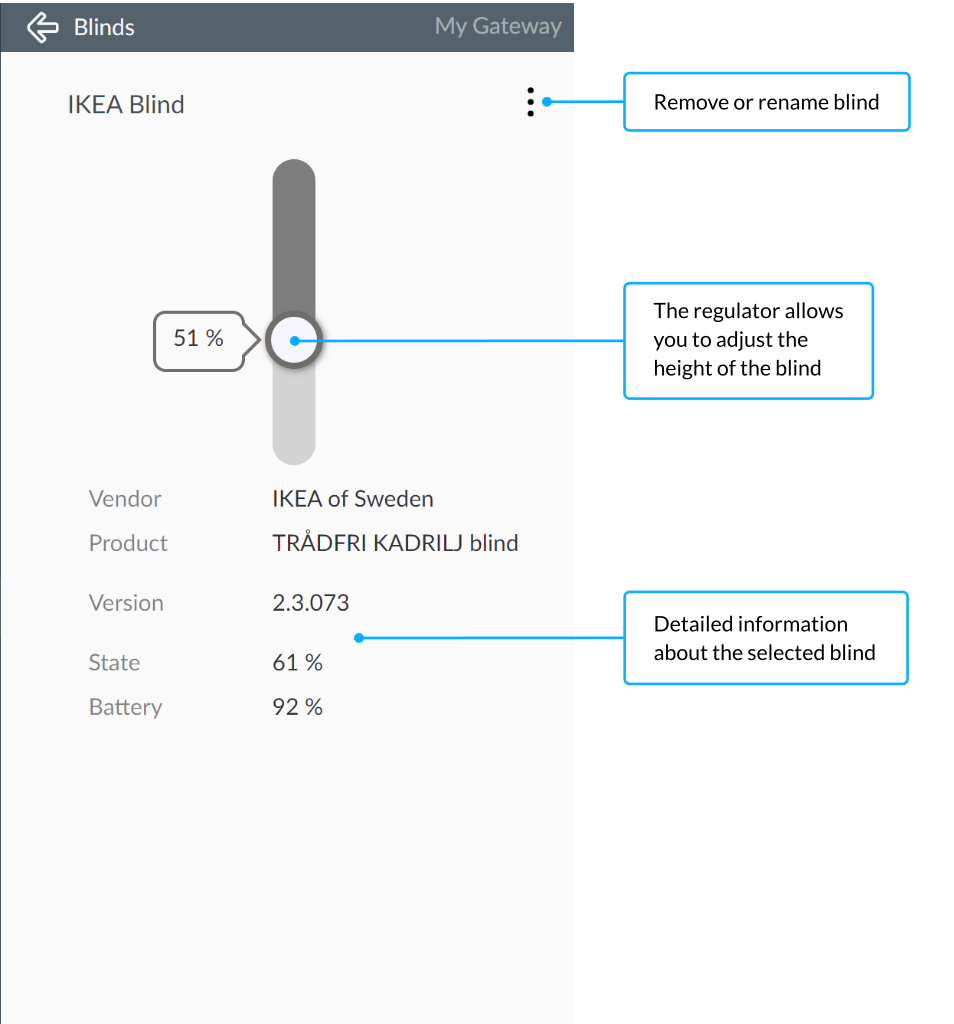
Manage blinds
Menu > Devices > BlindsThis page provides an overview of all blinds which are connected to the gateway.
Blinds overview
Under Blinds
all connected blinds are listed with their
names.
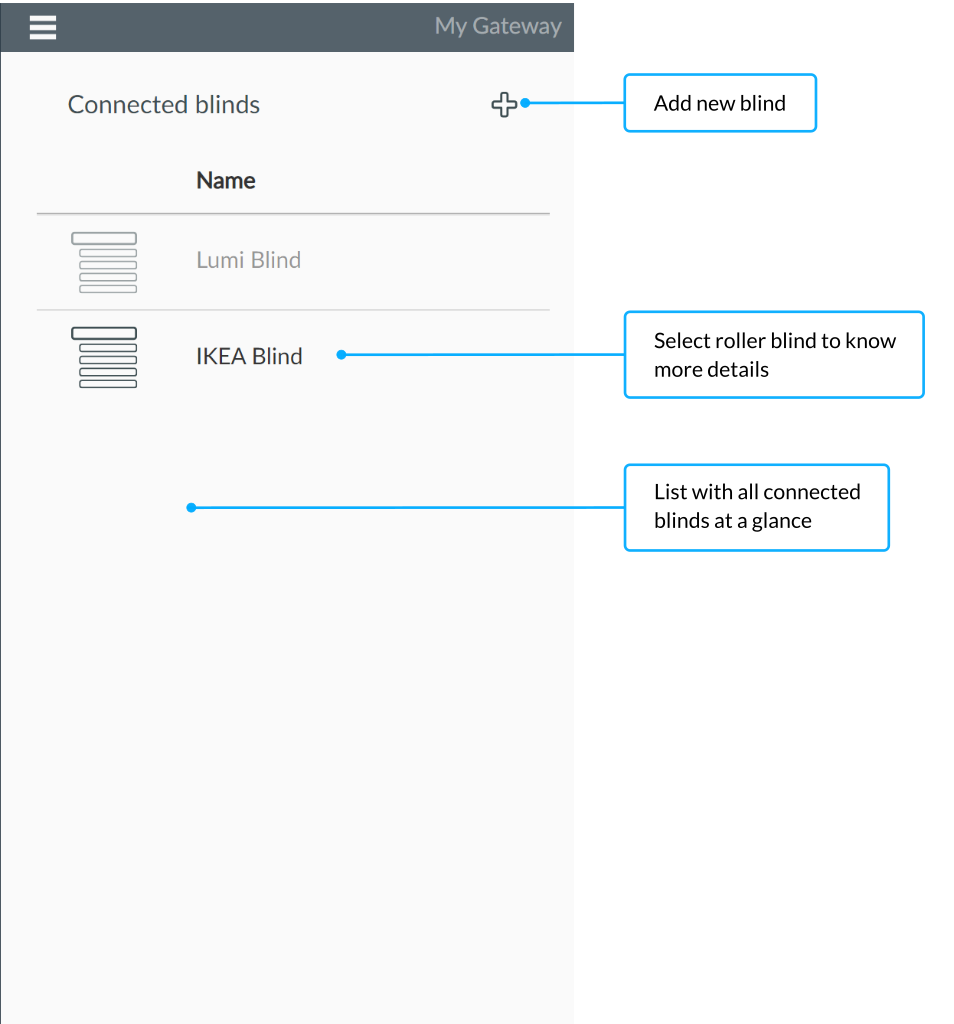
Blinds details
By selecting a certain blinds via its name in the list, you get to its detail view.
Rename, delete
After deleting a blinds it must be reset to factory settings before it can be connected again to a gateway. Please refer to the manufacturer’s operating instructions.
Add a new blinds
To add a new blinds, select . A dialog opens with a selection of devices. Then follow the steps of the instructions or refer to the manufacturer’s operating instructions.
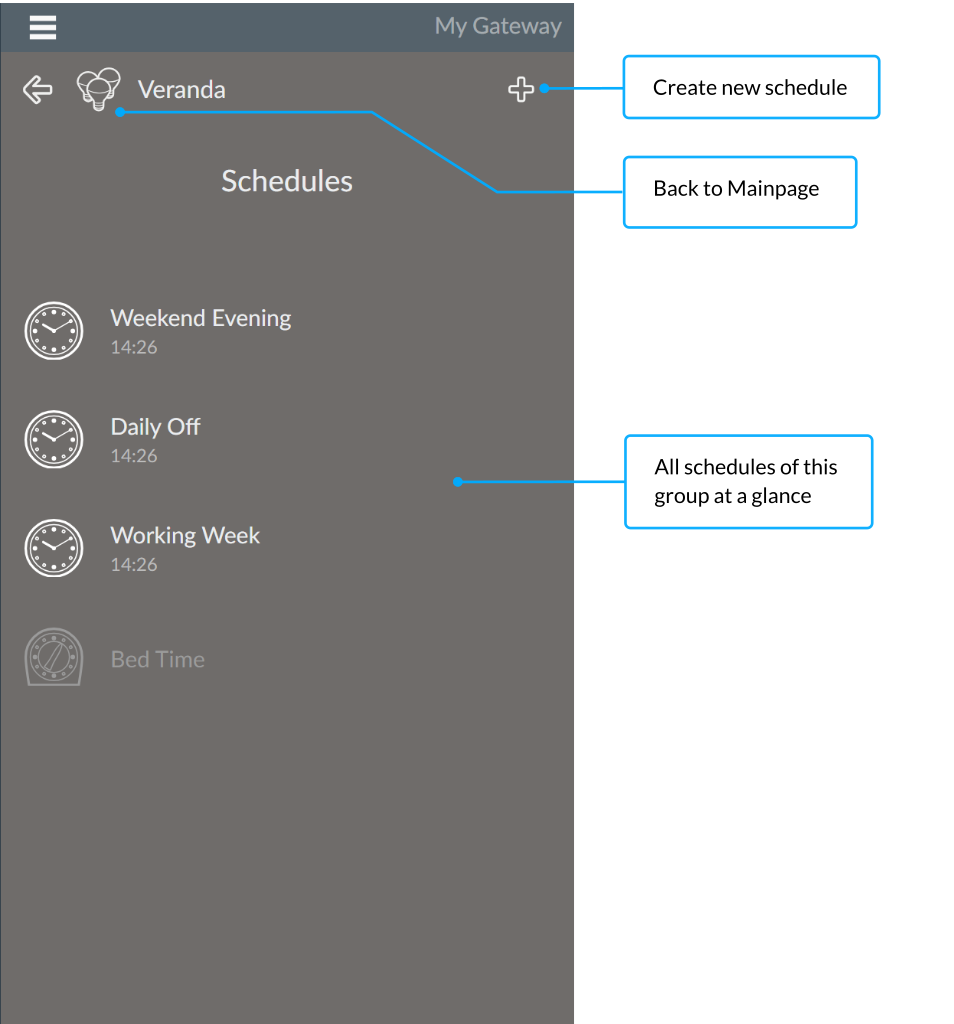
Schedules
Dashboard > Room Details > SchedulesTime control allows you to perform an action for a room at a specific
time, such as activating a scene or turning off the lights. There are
two options: Alarm
and Timer.
Alarm
An alarm performs the desired action regularly at the specified time on the selected weekdays.
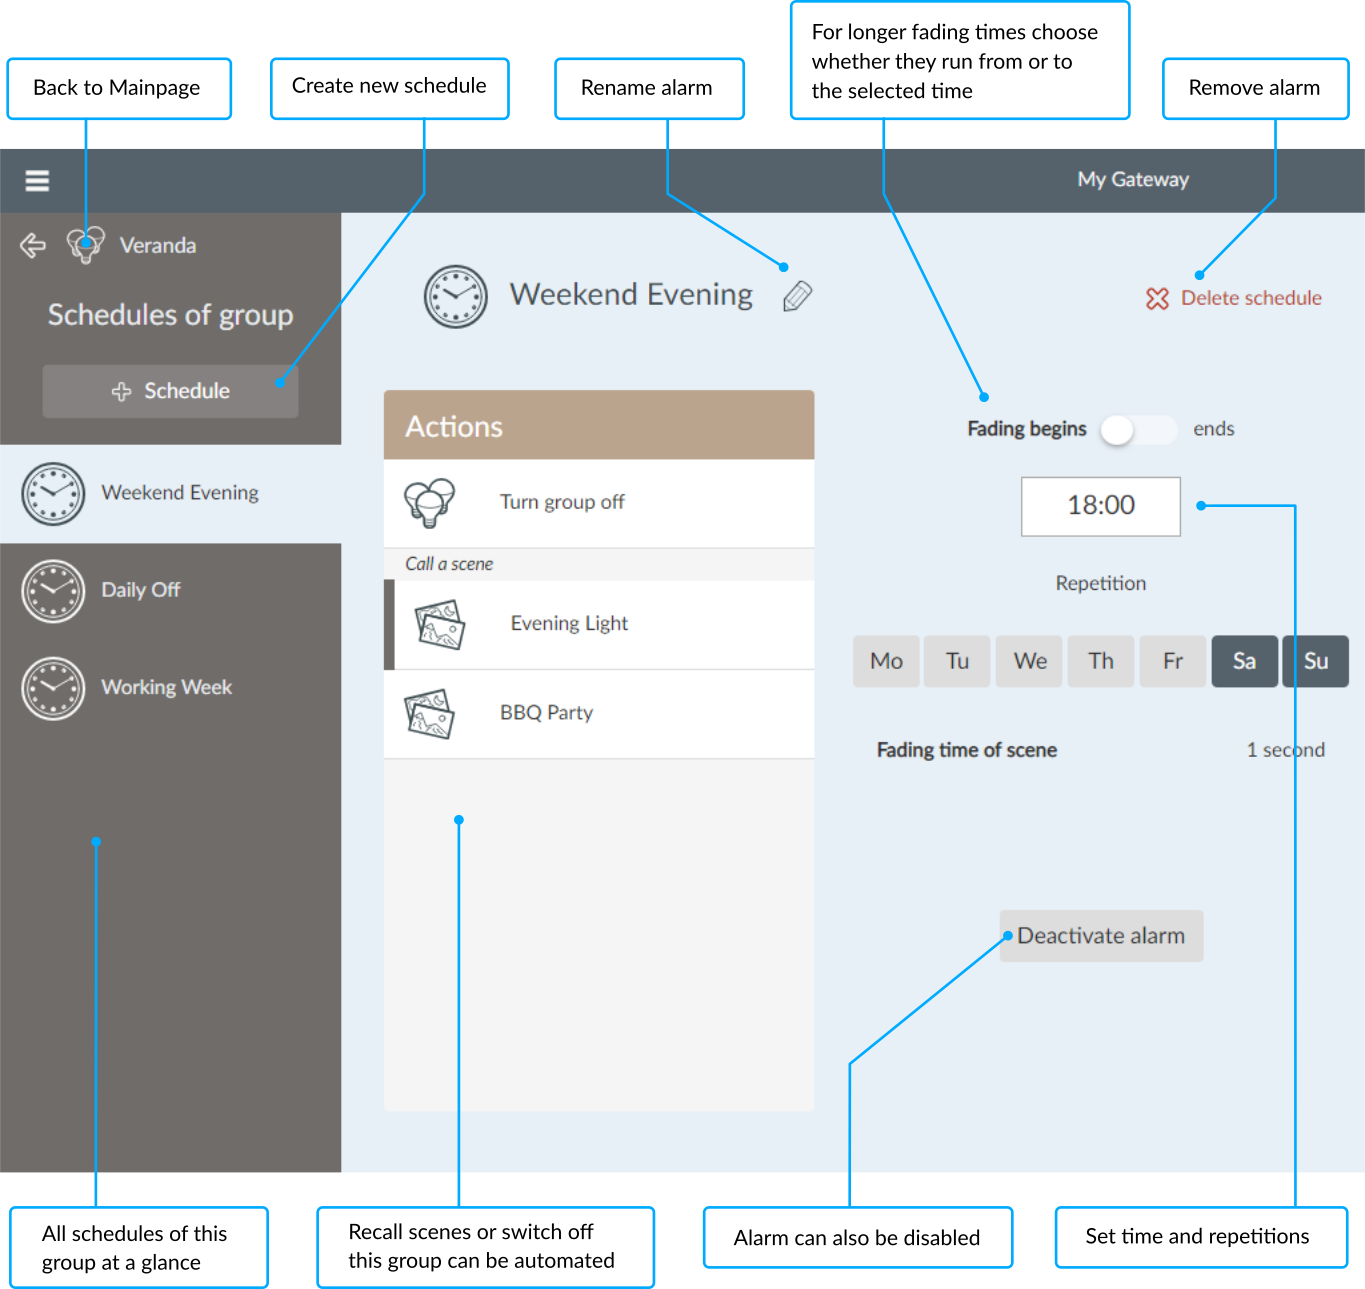
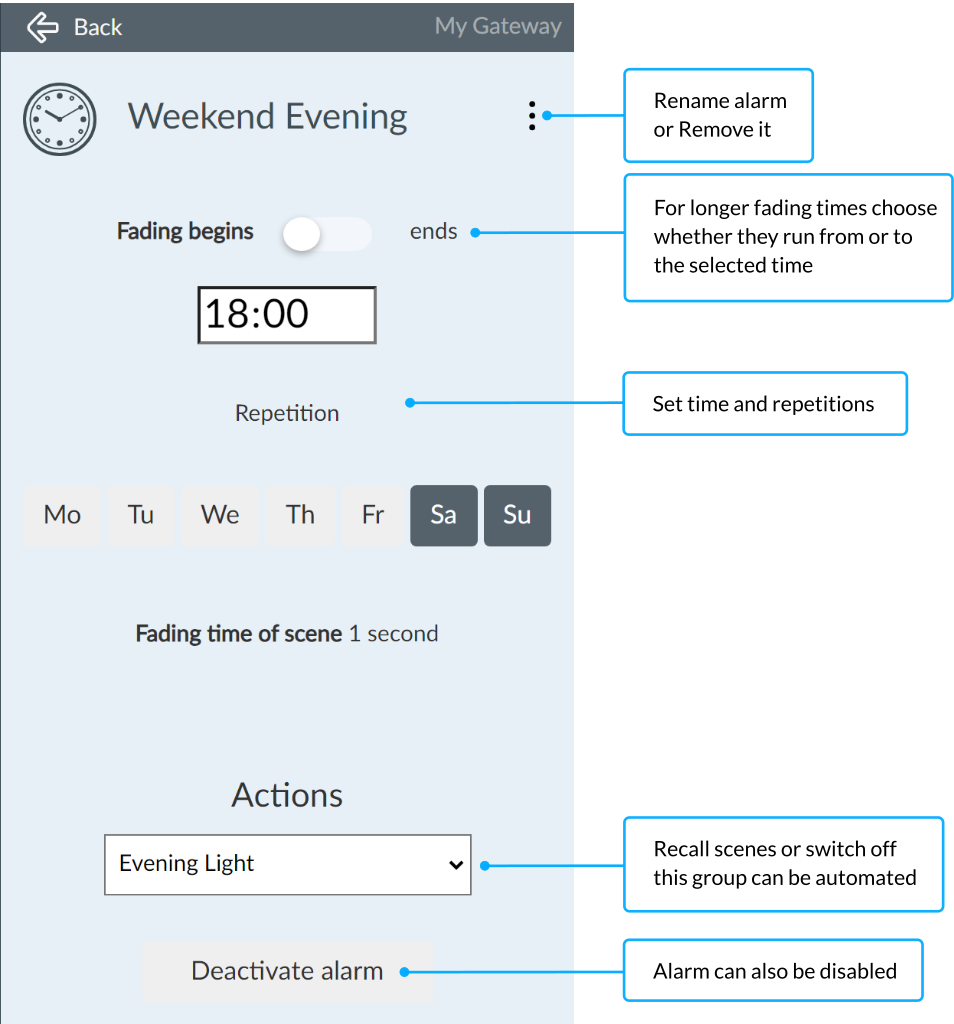
If lights have to switched on, a scene must be created in which each light in the group defines the desired state such as on/off, dimming value and color.
Since scenes can be configured with a long fading time of several minutes, you can select whether the scene is to start or finish at the specified time with Fading begins/ends.
Timer
A timer executes an action only once after the selected time has elapsed.
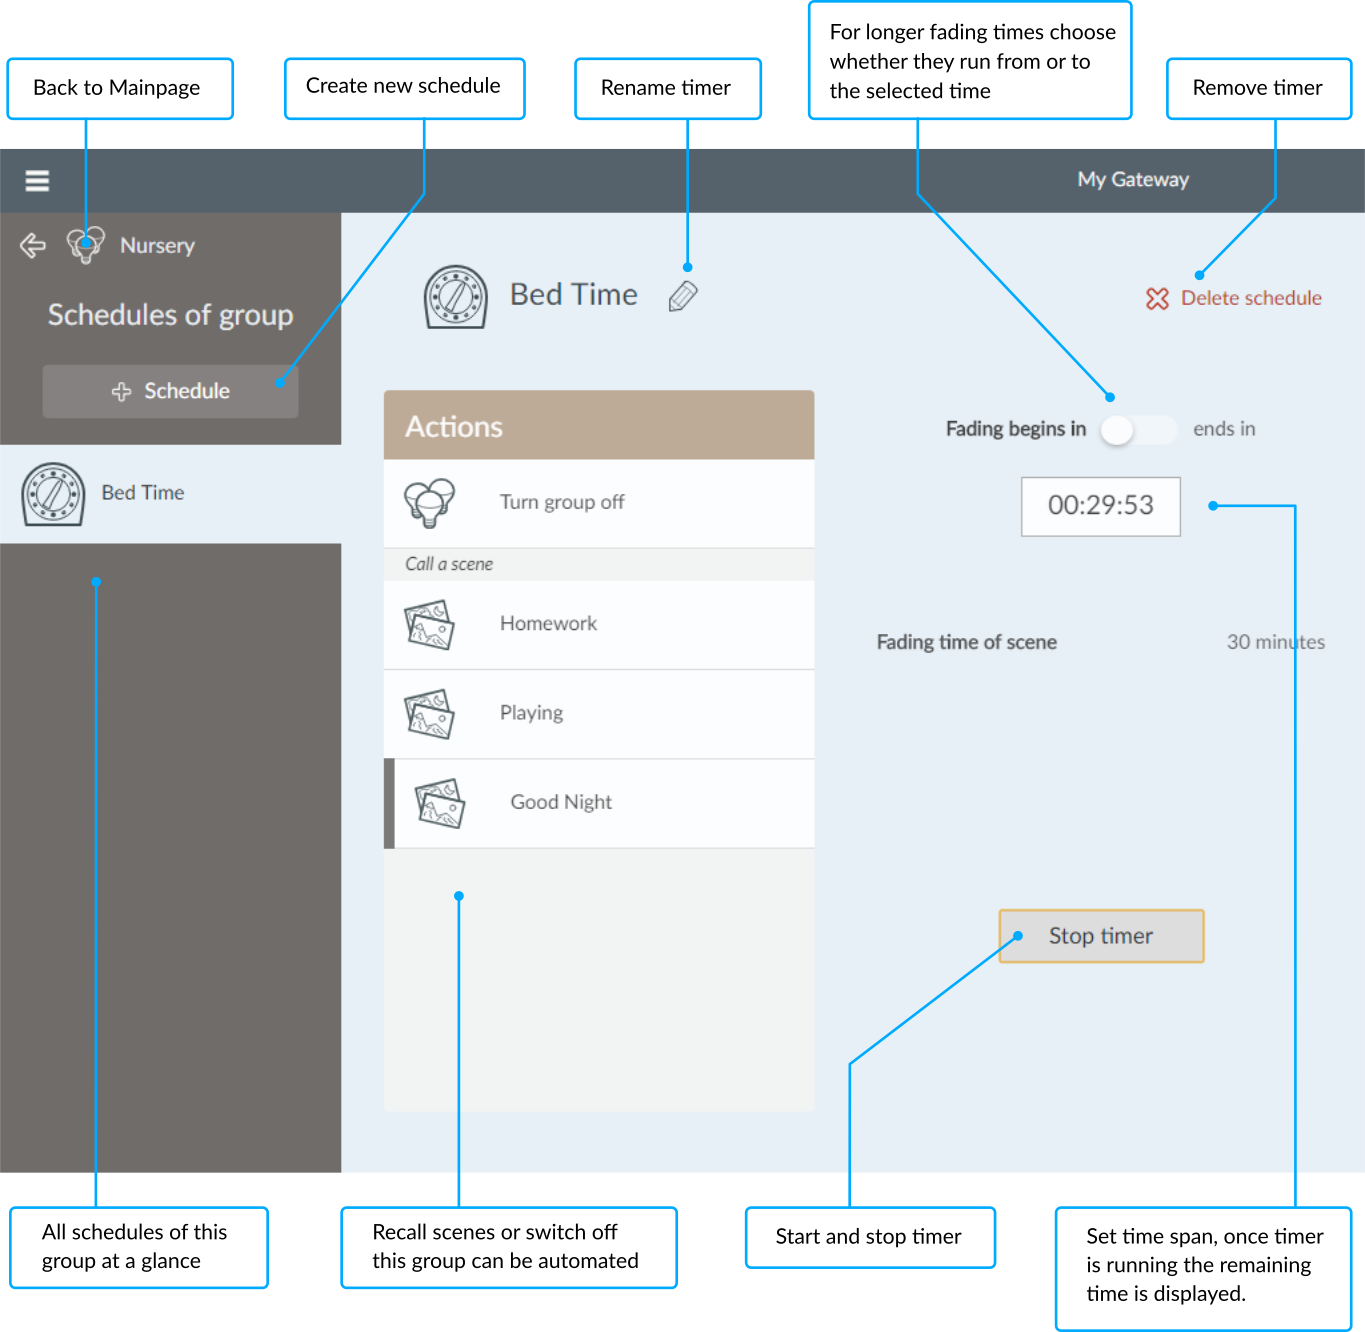
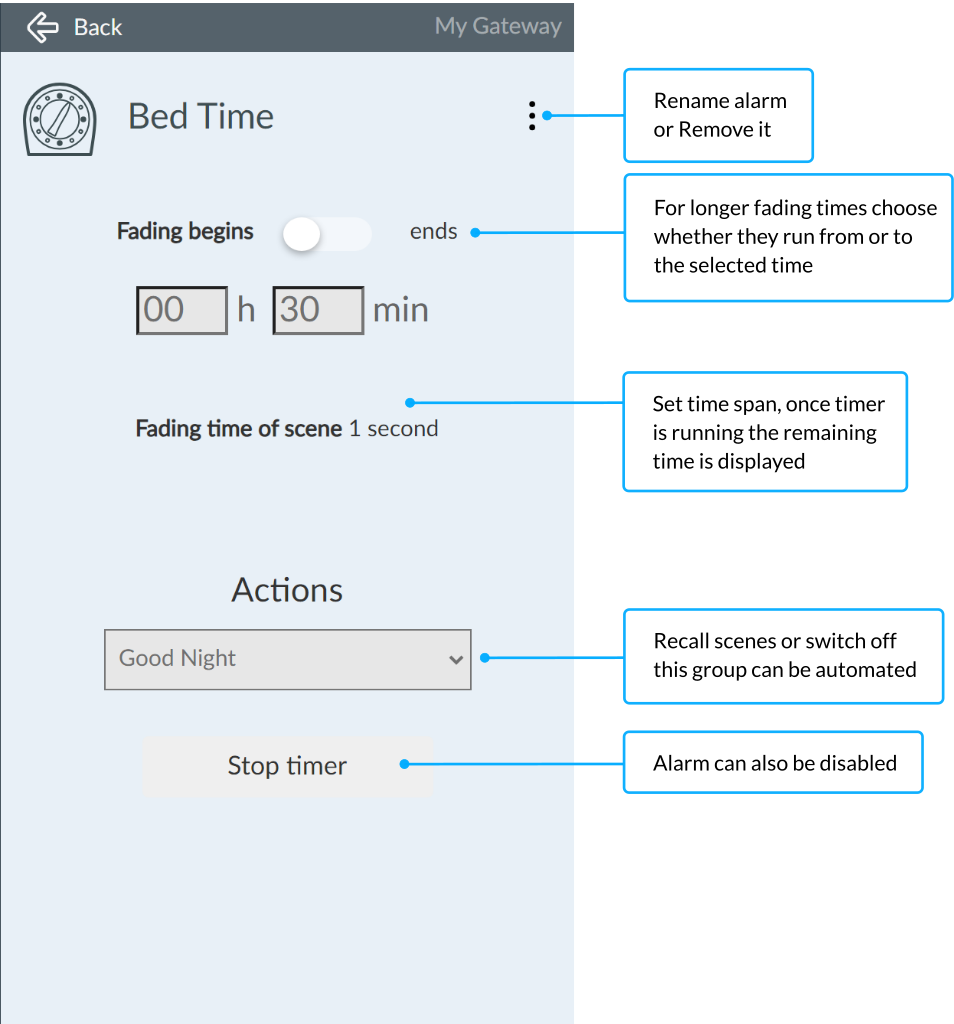
The actions Turn group off
and Call a scene
, as well as
settings of the fading time of scenes are configured identically as for
an Alarm
.
Settings
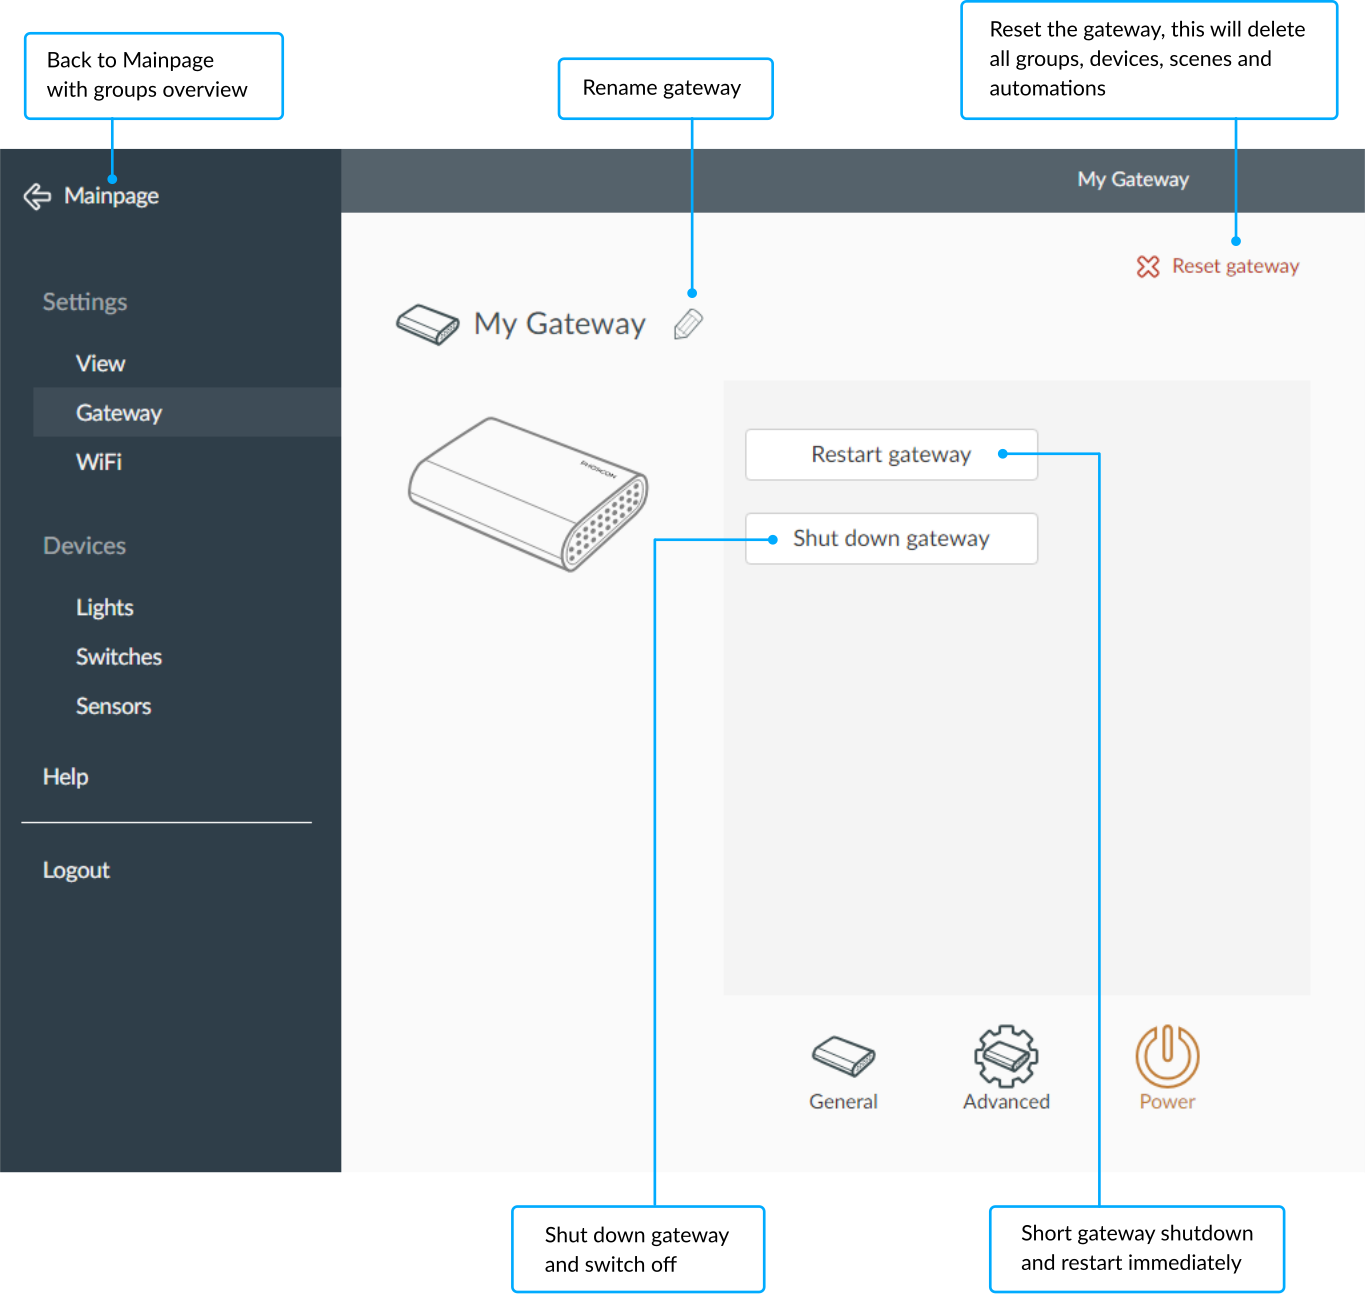
Gateway
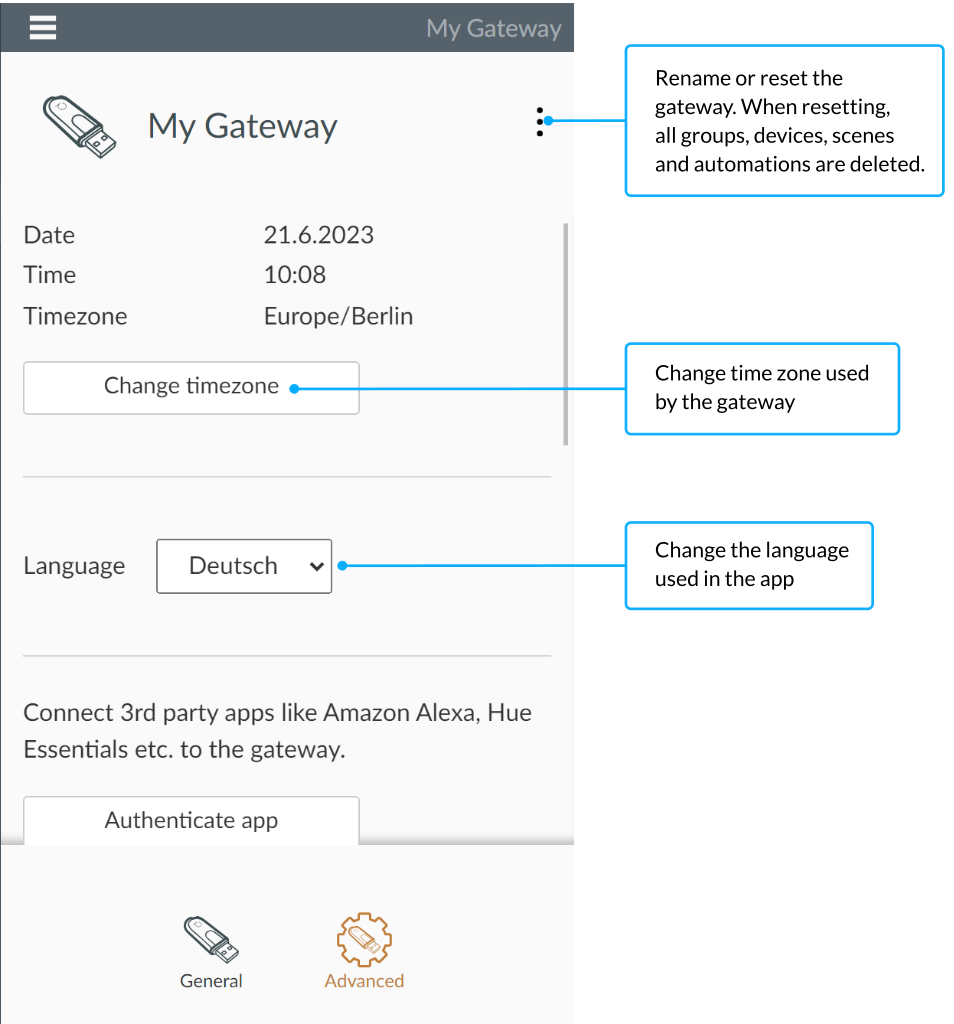
Menu > Settings > GatewayThe Gateway settings are divided into three subcategories: General, Advanced and Power.
General
Information on the current version and firmware can be found under
General
. Software updates will also be displayed here as soon as
they are available.
The gateway should only be reset in exceptional cases, as all settings for devices, groups, scenes and automations are deleted.
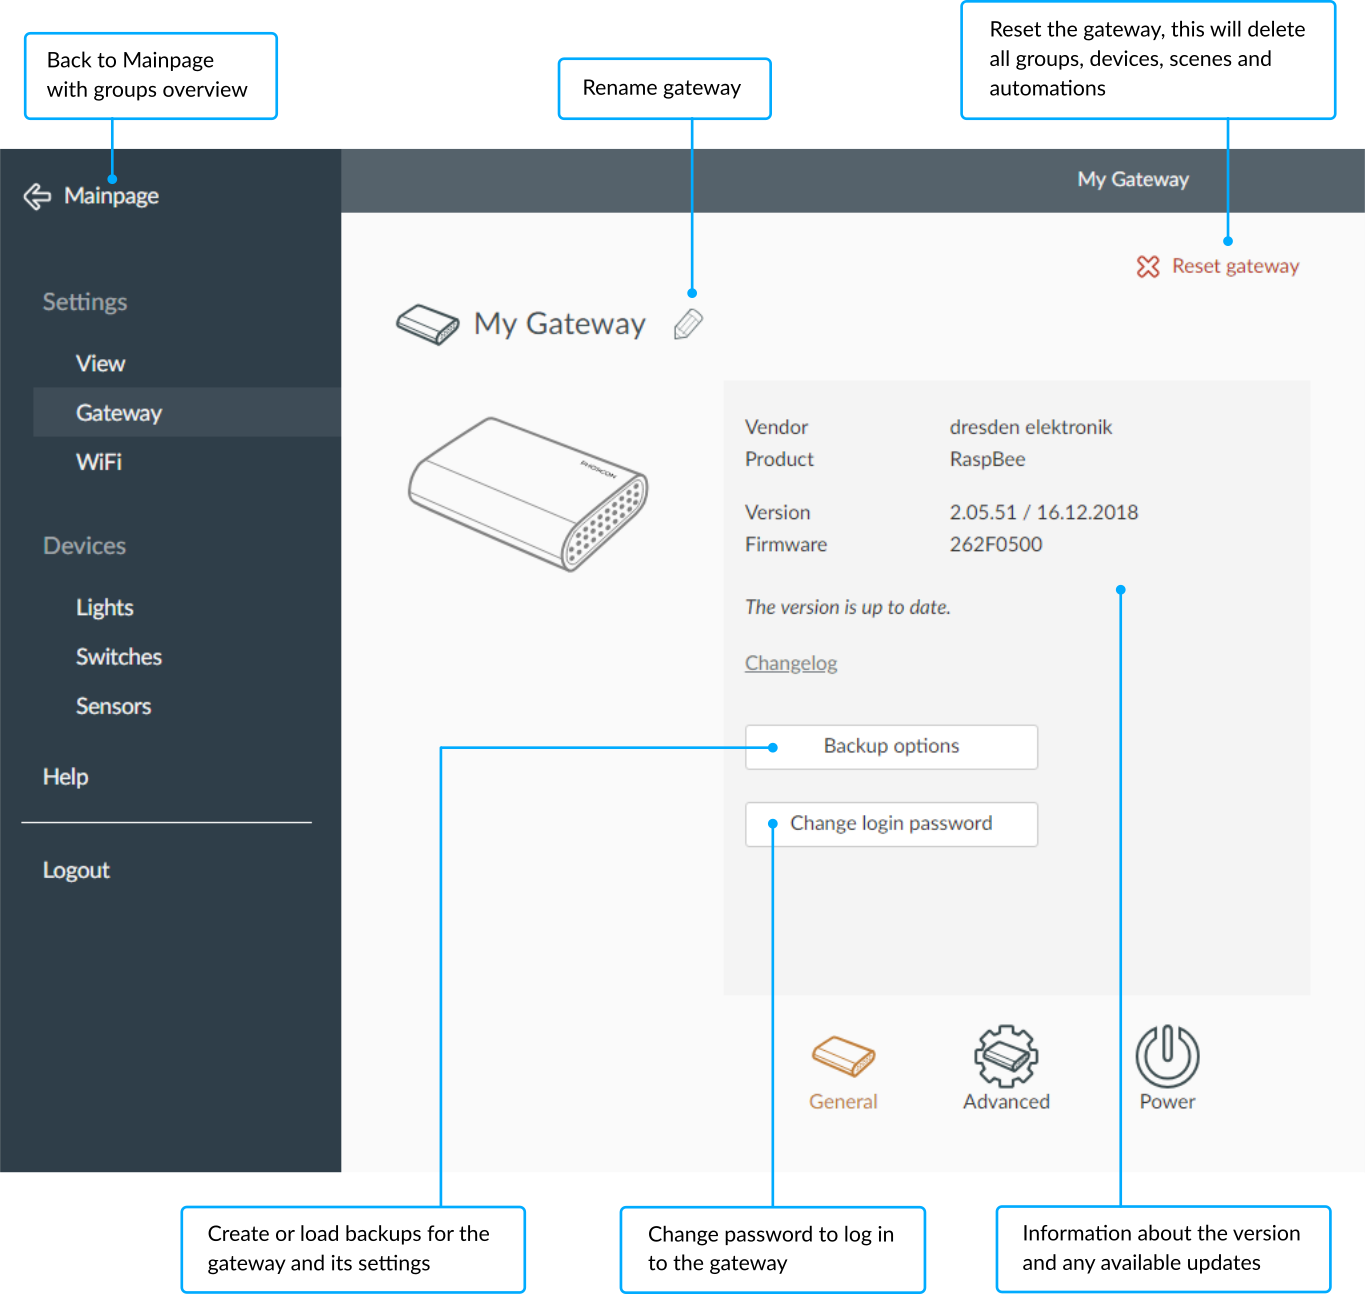
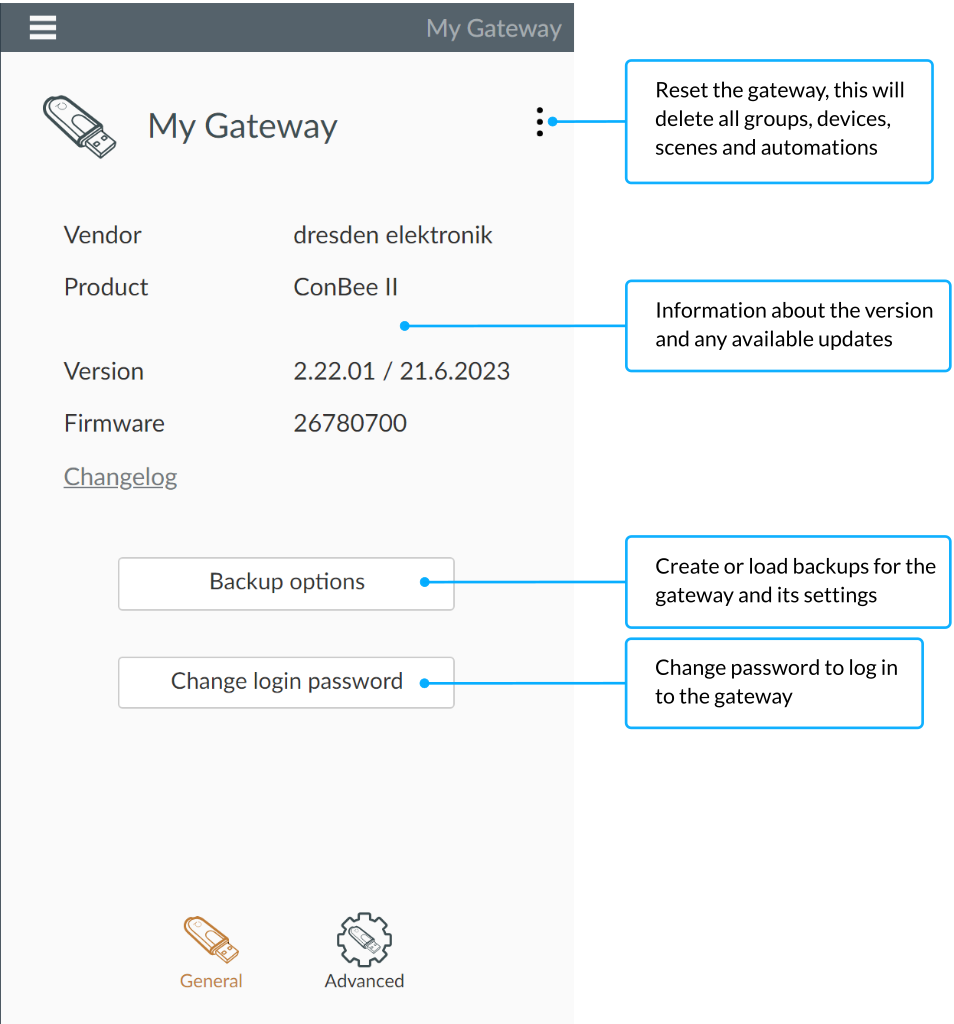
With the you can save all settings such as devices configuration, their names, groups, scenes and sensor controls in a file and restore them later if necessary.
It is recommended to create a backup before each update and after each completed configuration.
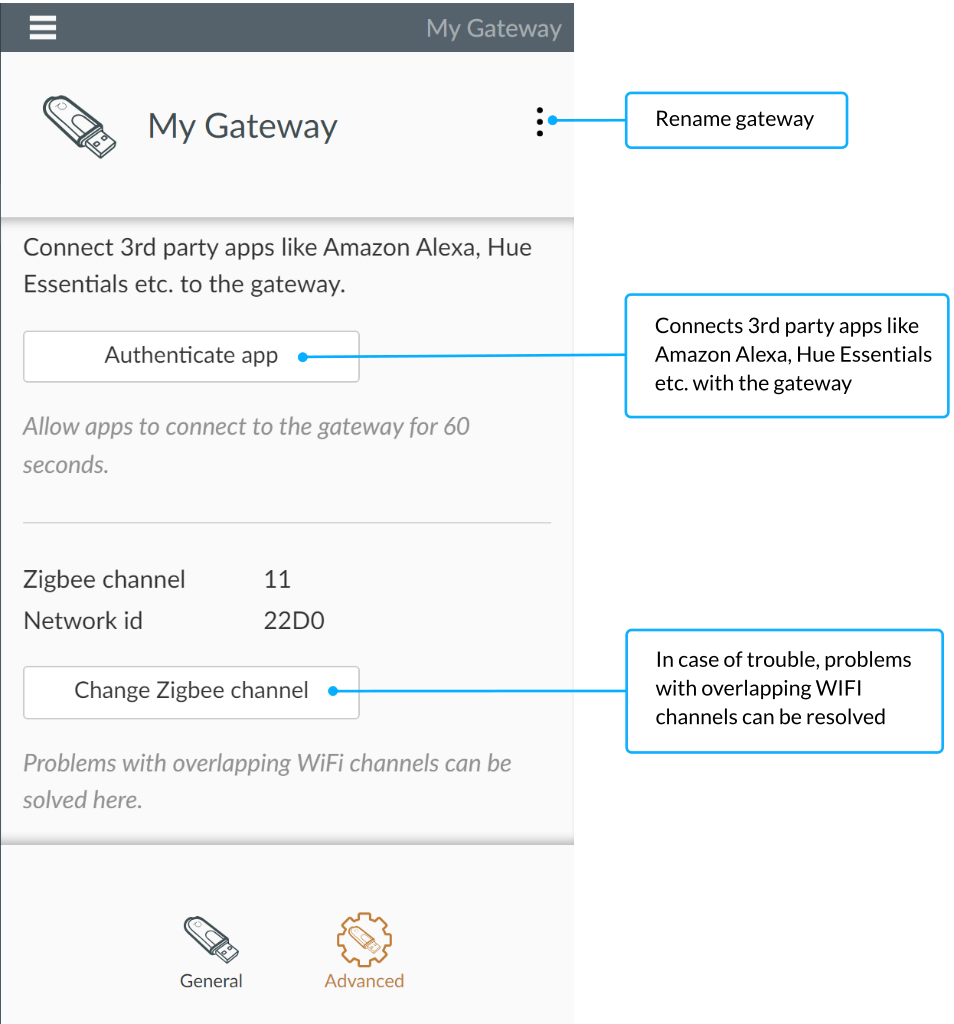
Advanced
With the gateway can be connected to other apps and home automation devices like Amazon Echo. If activated, the gateway must be connected within 60 seconds in the respective app. If necessary the gateway IP address must be entered.
To connect Amazon Alexa please say only Alexa: Discover
devices
.
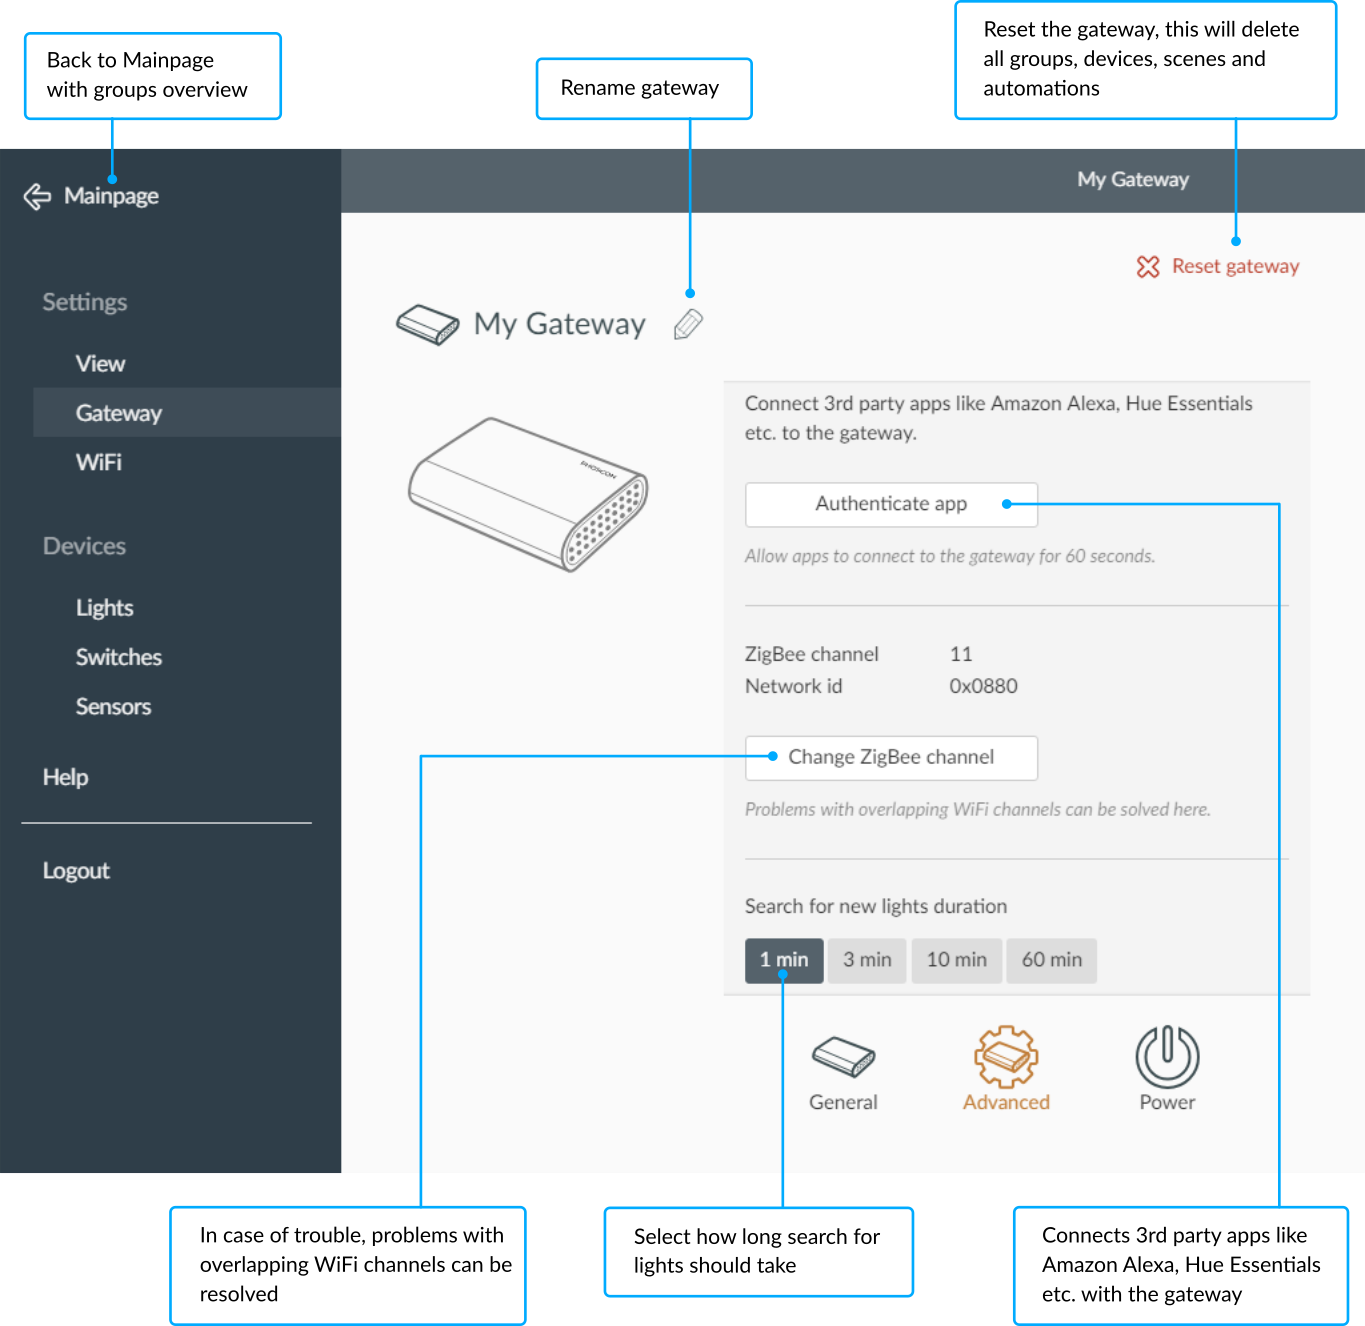
With potential problems with overlapping WiFi channels can be solved. This option should only be used in an emergency, all lights must be switched on.
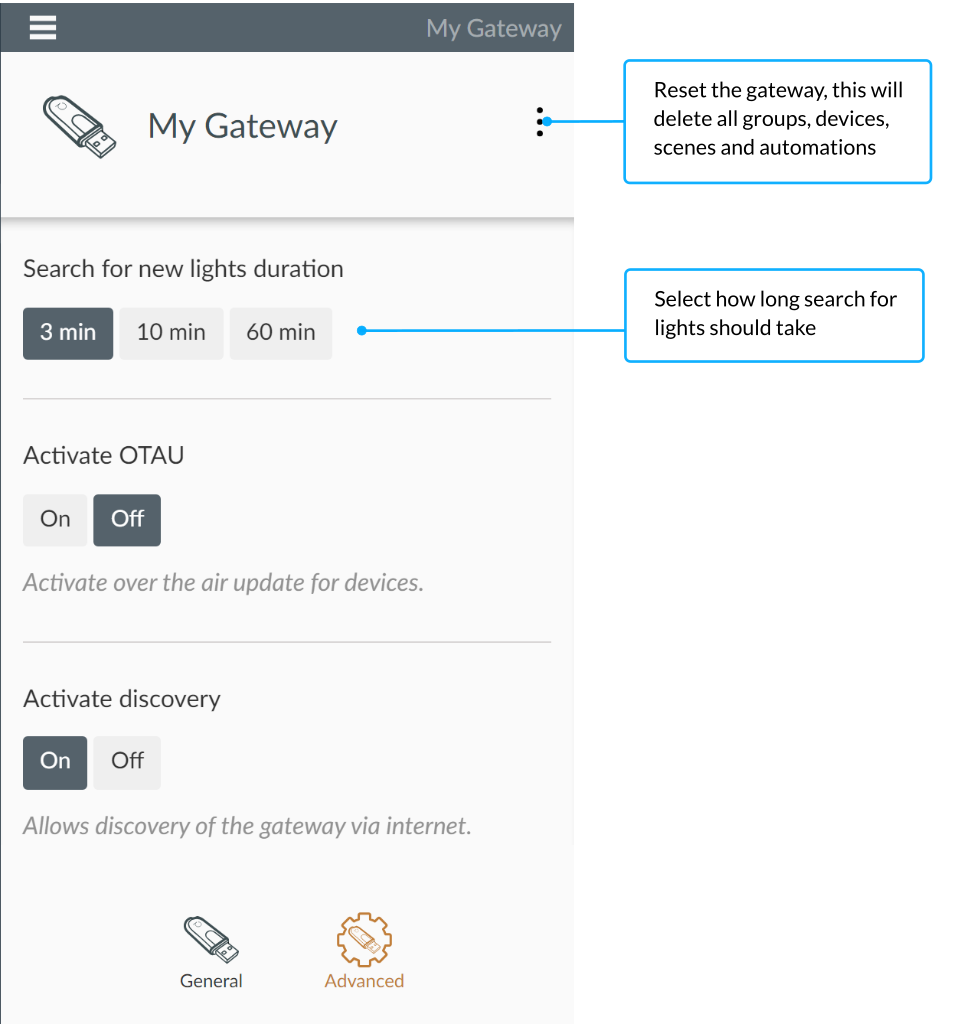
The duration of the light search can be increased to facilitate commissioning, especially in larger installations.
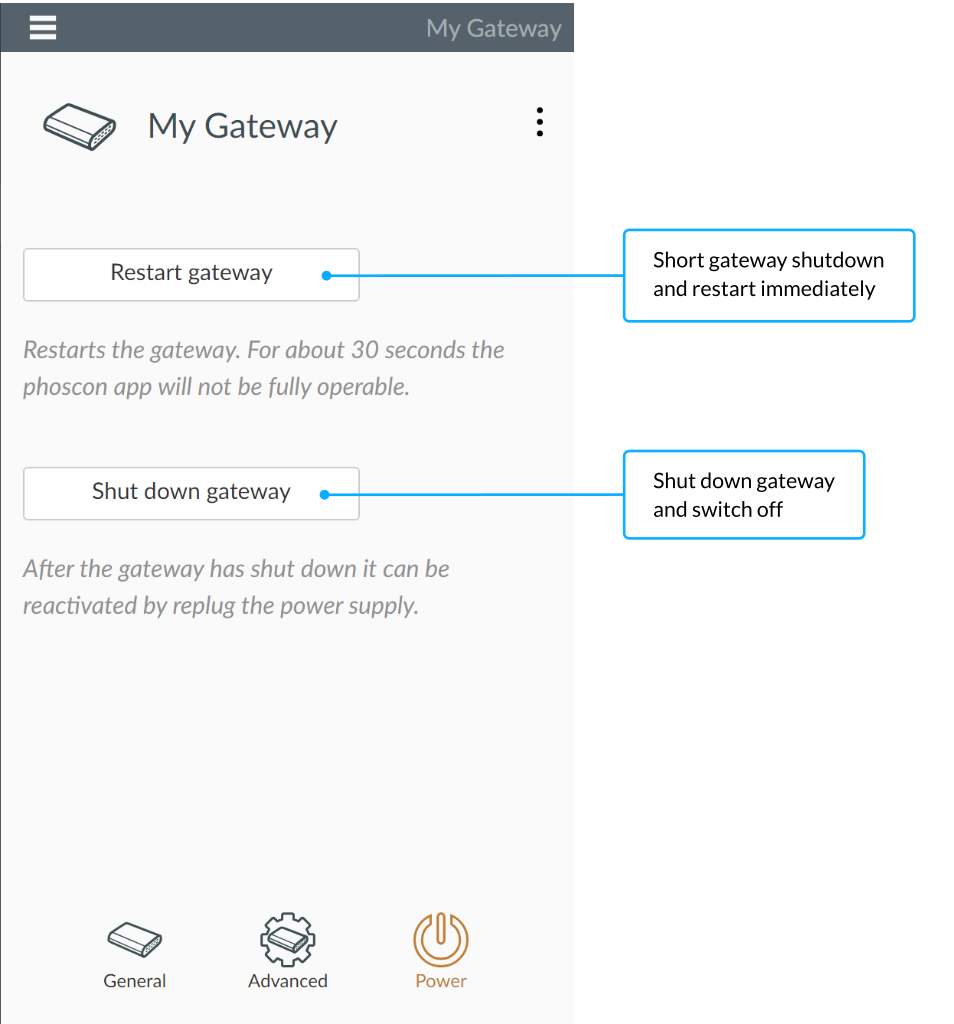
Restart, power-off
The gateway can be restarted or powered-off under Power
.
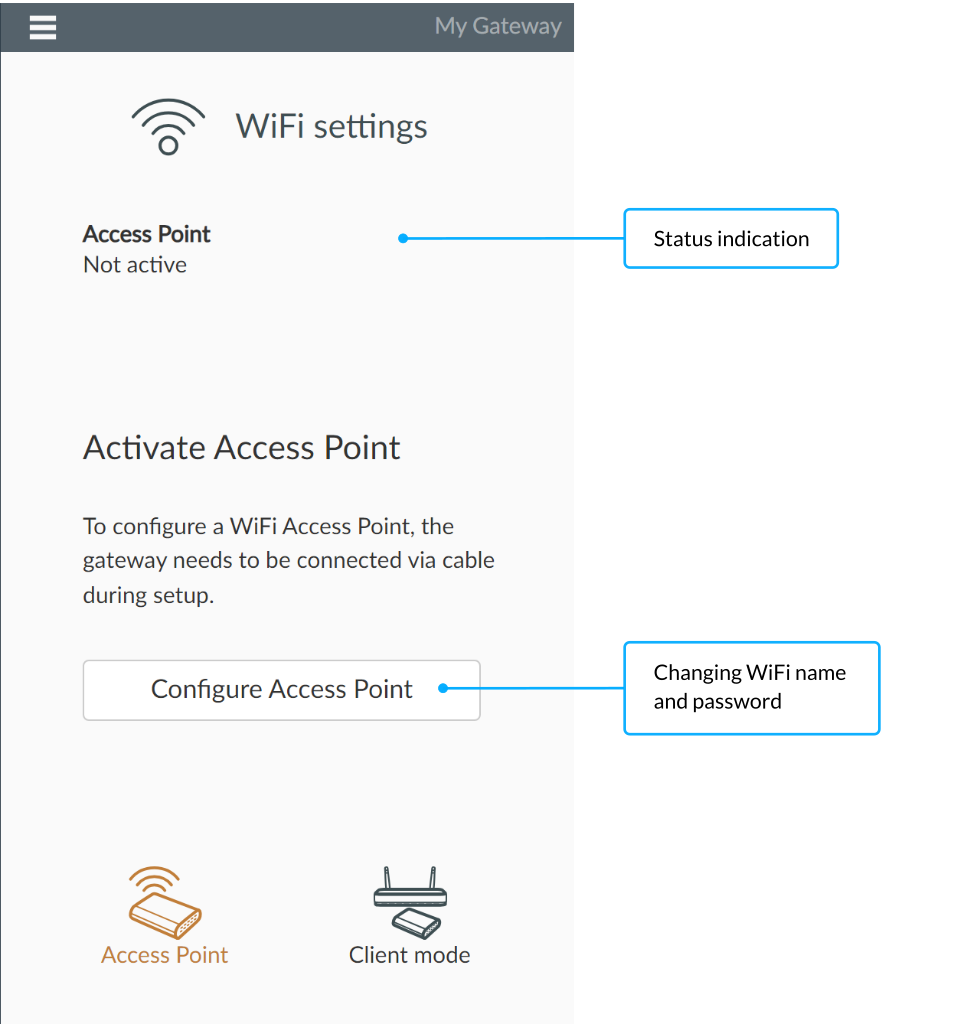
WiFi
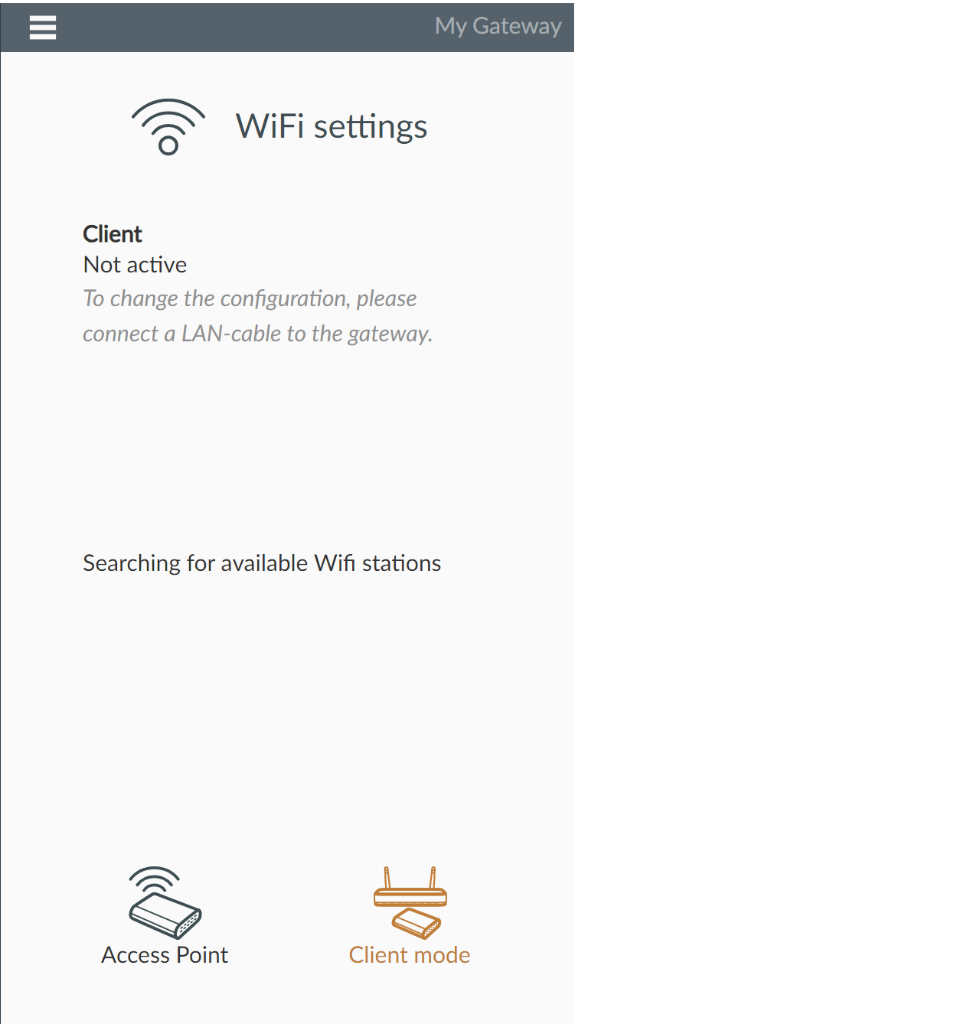
Menu > Settings > WiFiAccesspoint
The integrated Wi-Fi access point (hotspot) allows the gateway to operate independently. Mobile devices such as tablets and cell phones can be connected to the access point.
Note: To change the configuration, the gateway must be connected to a Wi-Fi router via a LAN cable.
After connecting to the Wi-Fi router, the Phoscon Smartphone App can connect to the gateway.
The gateway can be operated as an access point or as a client.
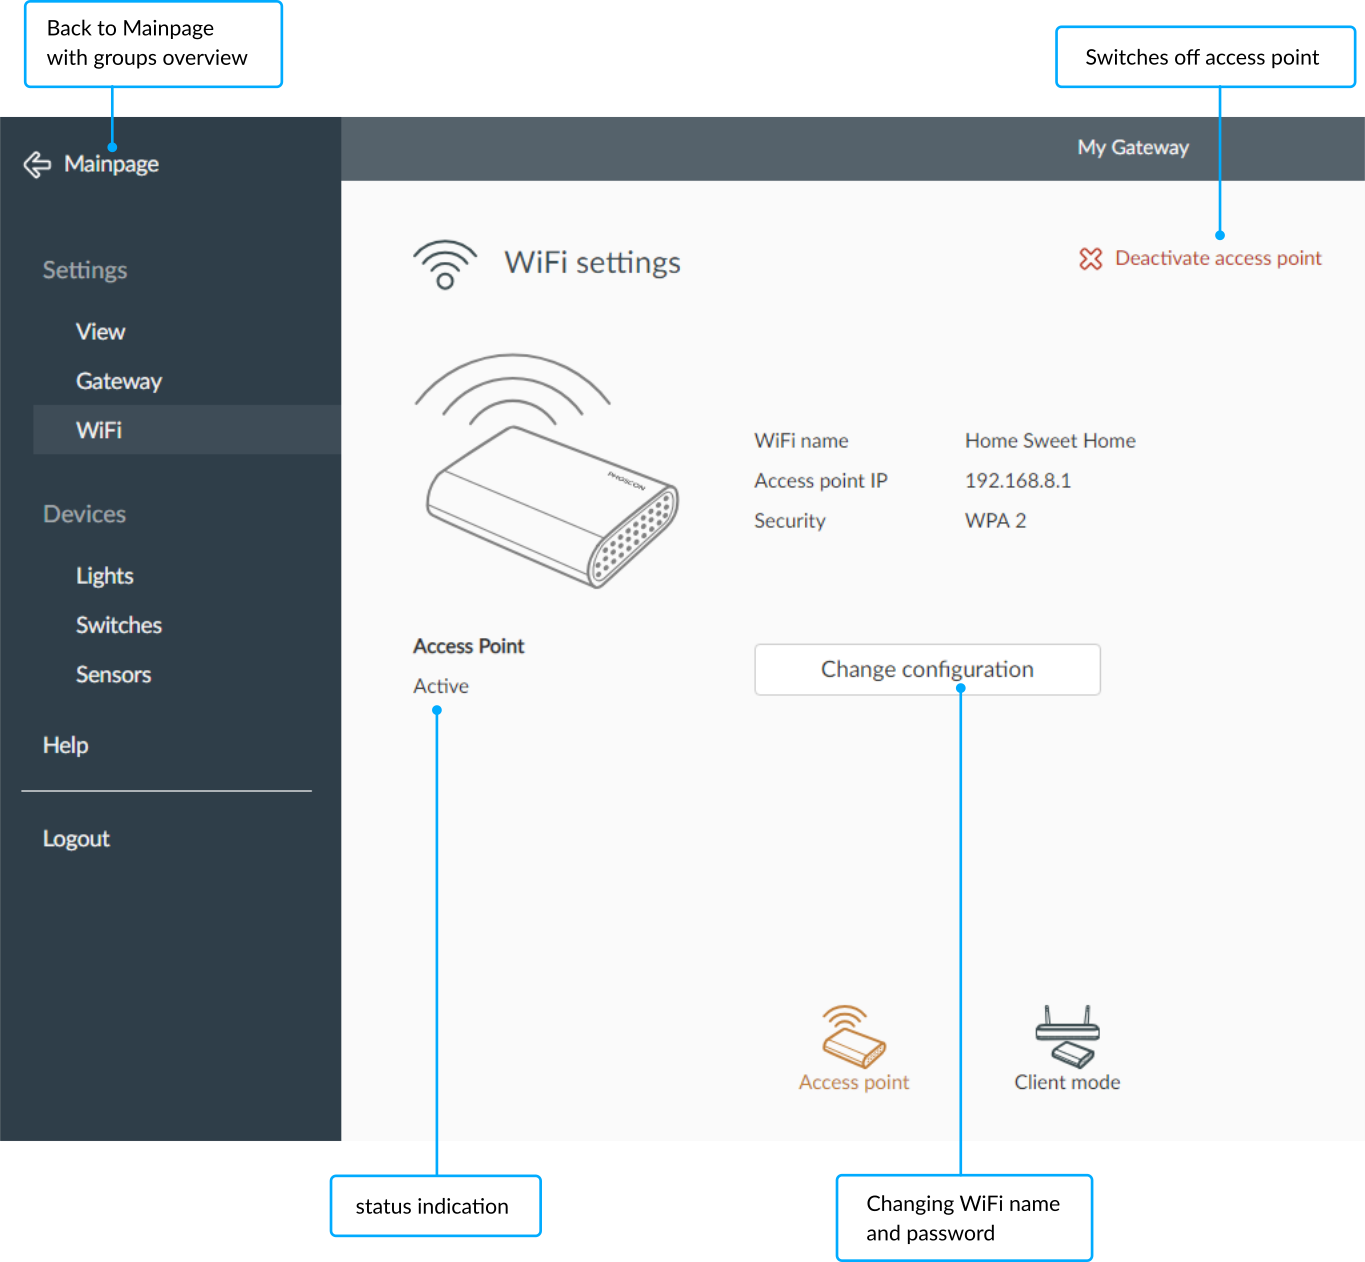
The WiFi name (ESSID) and the password can be configured for the
accesspoint. For the Phoscon Gateway
the preconfigured individual
WiFi password is located on the back of the gateway.
In client mode, the gateway can be connected to an existing Wi-Fi network.
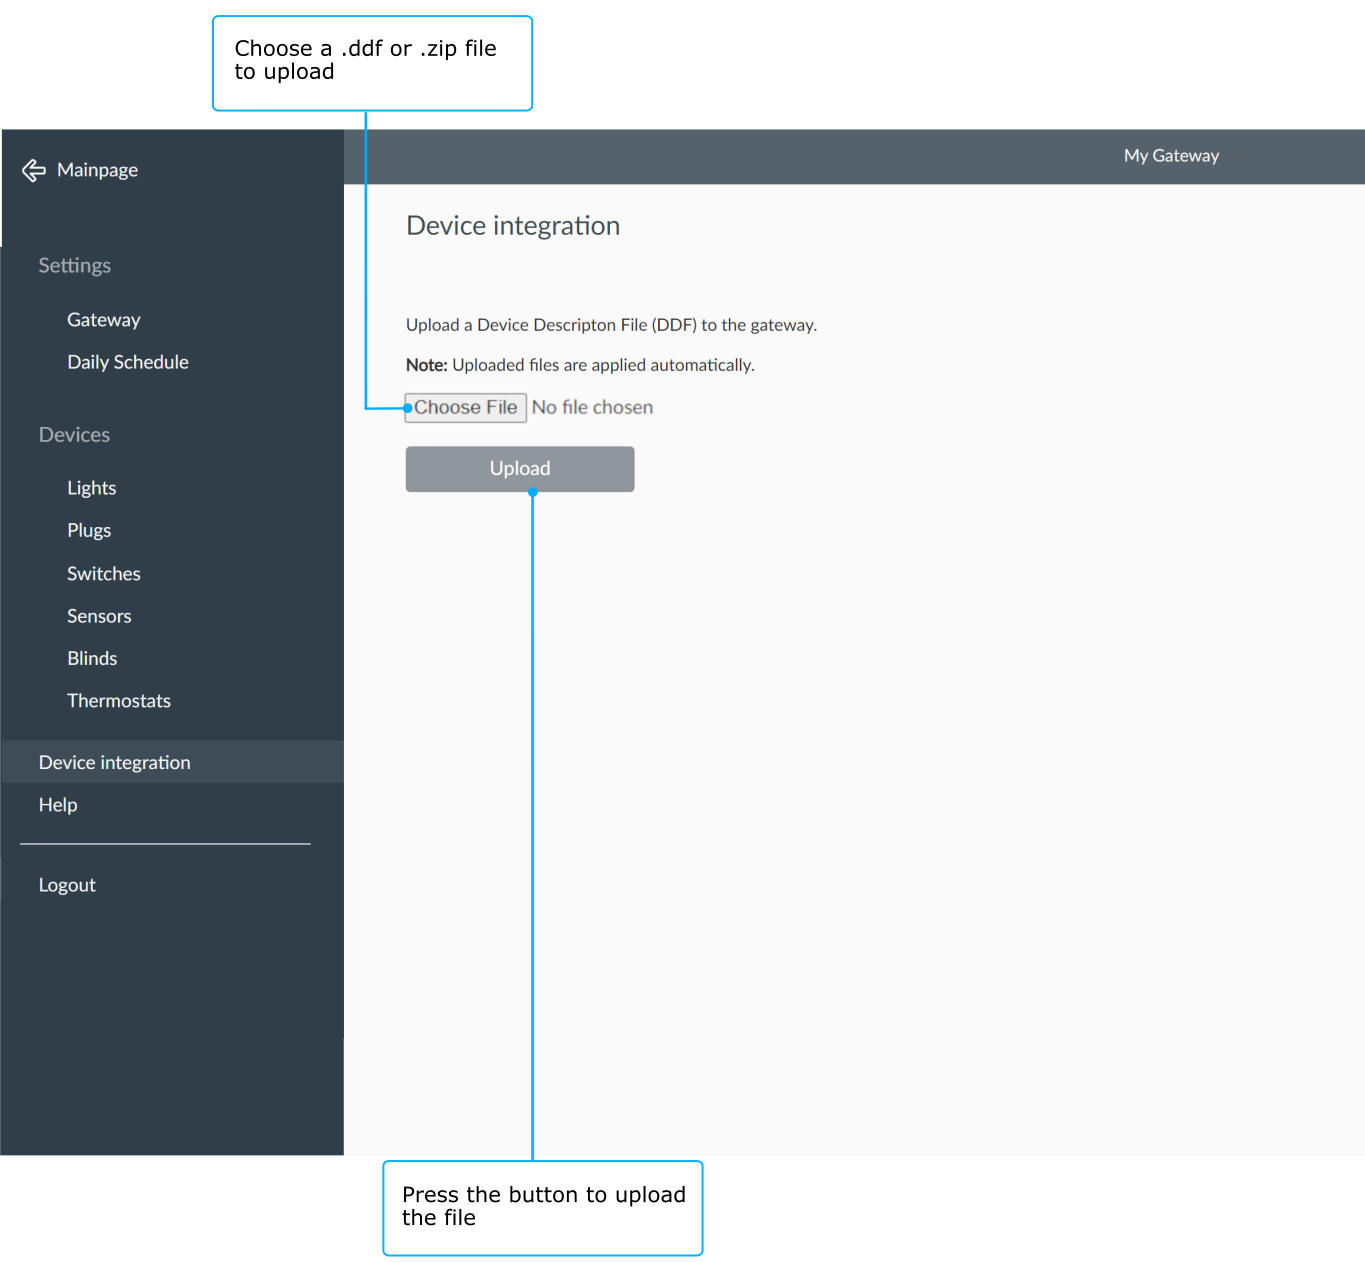
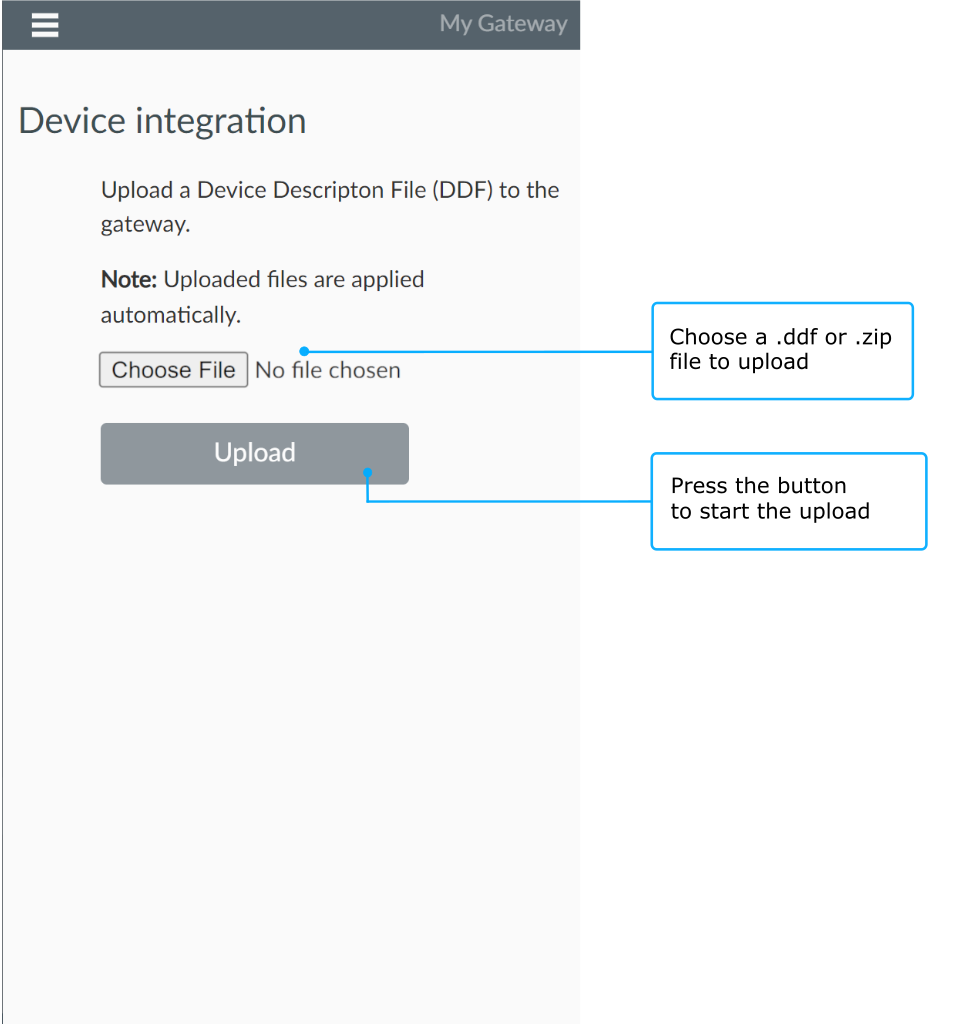
Device integration
Menu > Device integrationsThis function can be used to integrate devices that are not yet supported. The device description is done via so-called Device Description Files, DDF for short.
The technical documentation about DDFs is here available: https://dresden-elektronik.github.io/deconz-dev-doc/modules/ddf/
Where do I get DDFs?
DDFs can currently be obtained via the external community project deconz-toolbox.
Load DDF
A DDF can be selected via and then loaded via .
Troubleshooting
Light cannot be connected
If a light cannot be connected, it may have different causes. Resetting the light to factory settings should help.
Factory settings via reset sequence
Menu > Help > Reset lightsIn the Help
menu specific manufacturer instructions can be
found for IKEA Trådfri, OSRAM Lightify/Smart+ and dresden elektronik FLS
products describing how to reset to factory settings via an on/off
sequence.
Factory settings via remote control
Menu > Help > Reset lightsAlternatively to the reset sequence and for Philips Hue lights, the
reset to factory settings can be done with a Philips Hue dimmer, GIRA or
JUNG remote control. The instructions can also be found in the
Help
menu.
IKEA Trådfri and OSRAM Lightify/Smart+ lights
If the lights cannot be taught-in despite factory settings, please make sure that the lights have to be switched off for a short time (Powercycle) while the light search is running.