Technical support
We are here for you.
If you have technical questions about our products, our support team will be happy to help you.
FAQ
In the frequently asked questions you will quickly find answers and further links to commissioning and trouble shootings, as well as general information.
Phoscon App and deCONZ
Is my system up to date?
The installed software version can be viewed in the Phoscon App:
- Menu
- Settings
- Gateway
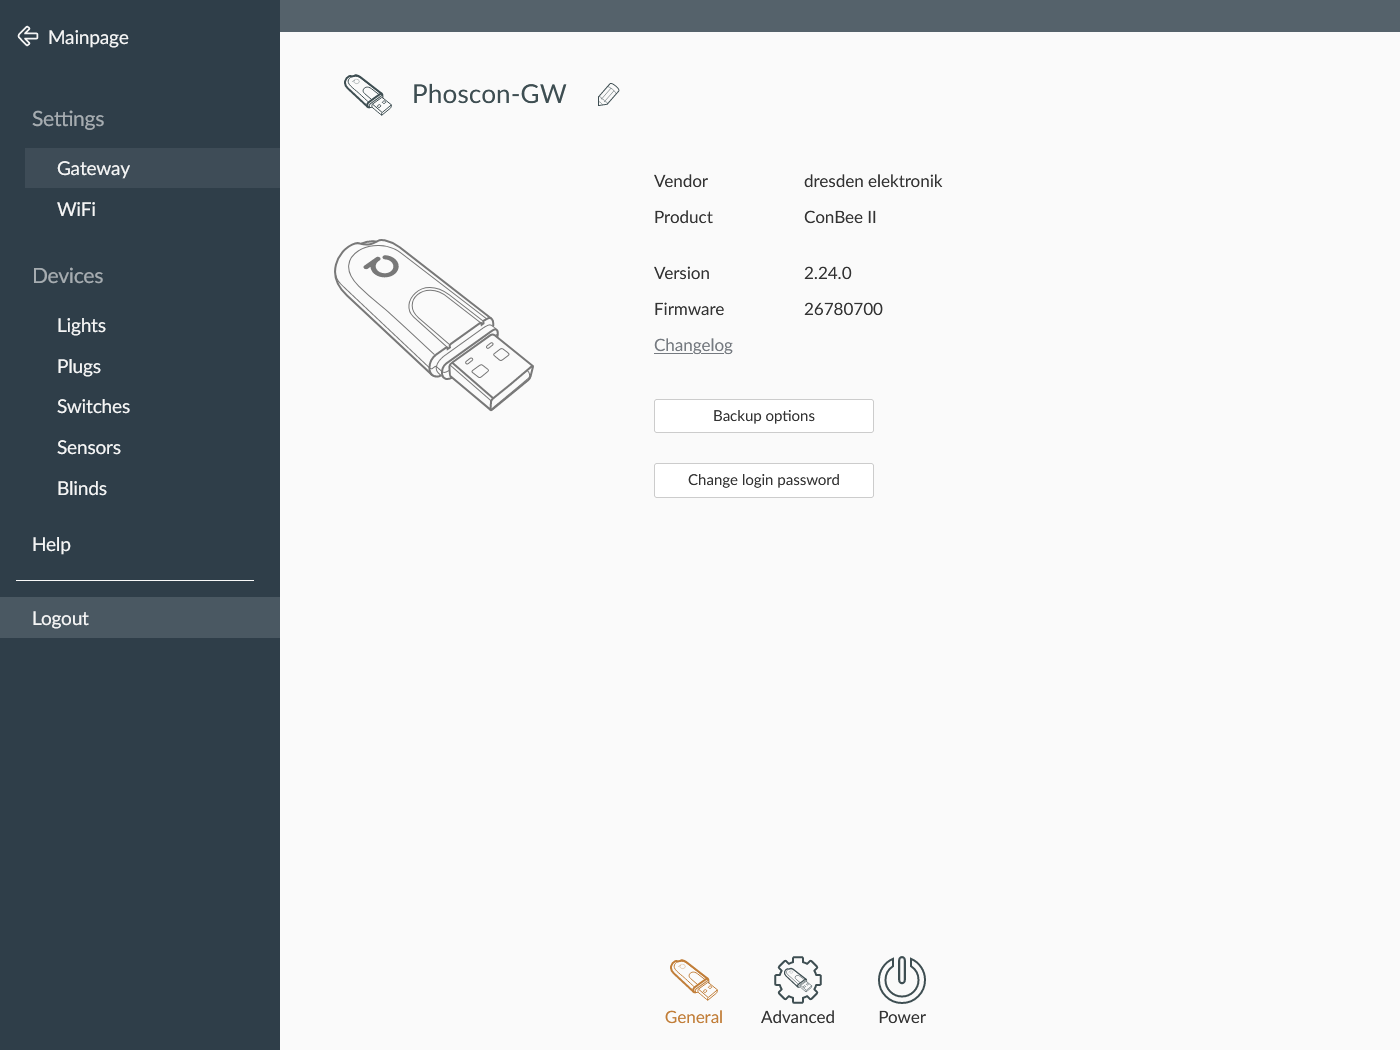
The latest available version is described in the changelog.
The installation and update process for the respective operating system is described on the corresponding product pages, for example the ConBee II installation. If an APT repository installation on Debian based distribution is not an option under Linux, a manual installation of the Debian package is also available.
The latest versions can be found in the stable download folder of the respective operating systems:
Besides that there is also the beta download folder. Beta versions are made available in shorter intervals, in which new functions can be tested or certain problems can be solved with specific bug fixes.
How can new features of the Phoscon App be used?
The Phoscon App can be opened locally or via the native smartphone app with the latest features.
- via the local IP address of the gateway or phoscon.de/app: the range of functions of the locally installed deCONZ and Phoscon App version is available.
- via the native Smartphone App: the latest range of functions is available.
Under certain circumstances it might be necessary to delete the app data in the browser cache to force an update. Alternatively, you can force the web page to reload using CTRL + F5 in your browser.
Can I use the Phoscon App with my smartphone?
The Phoscon App can be downloaded as a standalone smartphone app and also opened in the smartphone’s web browser. The range of functions is identical.
ConBee and RaspBee
How can the firmware of ConBee II, ConBee III or RaspBee II be updated?
The firmware must be updated manually via the command line as described in the wiki article Update deCONZ manually and Youtube-clip.
What is the range of ConBee, ConBee II, ConBee III and RaspBee?
The range in buildings is up to 30 m and in free field of sight up to 200 m. Due the power amplifier it is possible to bridge 2-3 rooms or floors depending on the building conditions.
Devices further away are connected through the Zigbee mesh network. In this network, all permanently powered Zigbee devices, such as lights and sockets, act as repeaters and can relay the signal.
The average range of IKEA, OSRAM and Philips Zigbee devices is approximately 5-7 m. With appropriate distribution, the mesh network can be spread over entire floors or the building.
What is the maximum number of devices that can be connected?
ConBee II and RaspBee II support up to 512 network participants in mixed networks - with lights and other devices.
FLS-M
No connection can be established using a USB-C cable.
It is necessary to check whether the USB-C cable is a data cable.
USB-A to USB-C adapter cables can often be purely power cables
for energy transfer, e.g., for charging a battery. These cables do not
support data transfer.
The colors of the classic LED strip light up reversed.
If the colors of the classic LED strip light up reversed, e.g., it lights up green instead of red, the connection in the LED strip is reversed. The error may be located directly on the connected LED strip.
There are two possible solutions:
- Arrange the connection cables in the correct order.
- Reconfigure the LED strip using the Config-Builder.
The SK6812 addressable strips light up in different colors.
If the LEDs of the connected SK6812 addressable LED strip light up in different colors, it must first be configured with a 4-channel sequence in the Config-Builder.
When connecting a 5V/DC addressable LED strip, the LEDs flicker randomly.
This phenomenon only occurs when using a 5V/DC addressable LED strip that is not connected to a 5V/DC power supply and is simultaneously connected to a PC or laptop via USB-C. This is due to random coupling of external interference signals, which the LED controller considers to be valid signals. This effect disappears as soon as the 5V/DC power supply is connected.
My FLS-M is stuck in a bootloop.
Behavior: The FLS-M keeps restarting or stops responding. Resetting to factory settings does not resolve the issue.
Solution: Power on the FLS-M in recovery mode (DIP 11000). In this mode, you can restore the factory settings (press the reset button for 10 seconds) or read/overwrite a corrupted configuration.Devices
Is my Zigbee device compatible?
The extensive, automatically generated compatibility list on the Phoscon website includes devices that can be accessed via the REST API and thus via the numerous home automation systems.
If the device you are looking for is not listed, it is worth checking out the GitHub Issues on the current integration status.
For home automation systems that do not use deCONZ and therefore do not use the REST API and the Phoscon app, separate compatibility lists apply, such as for Zigbee2MQTT.
How to reset the FLS-PP to factory settings?
The FLS-PP can be reset to factory settings using the following reset sequence:

- Switch the FLS-PP off and on again 4 times for 5 seconds each.
- When the light starts flashing, wait about 10 seconds for it to stop flashing.
-
Switch the FLS-PP off and on 2x for approx. 5 seconds each.
The light is reset to factory settings when it flashes briefly.
The following YouTube video shows the reset sequence.
How to reset a Philips Hue light to factory settings?(Also applies to most lights from other manufacturers)
The simplest method is to reset it using the Philips Hue Dimmer Switch remote control.
- Start search for lights in the Phoscon App
- Turn the Philips Hue light off/on once
- Hold the remote control close to the light and press and hold the the two outer buttons for about 10 seconds until the light illuminates.
- The light should now be paired within 1 minute by the Phoscon App
Alternative: If the light is still paired to the Philips Hue Bridge, it can also be deleted in the Philips Hue App. Afterwards the light resets to factory settings and can be paired by the Phoscon app.
How does a FLS-PP behave when switched off and on again?
If an RGB/W LED-Stripe is connected, the last set color will be restored. If the brightness was less than 80 %, it will be set to 30 %.
Otherwise the last set value is restored again. The last setting must have existed at least 20 seconds before switching off in order to be recalled.
How can Friends of Hue switches be paired to the network?
Note
A list of all compatible Friends of Hue switches can be found at Compatibility list →
-
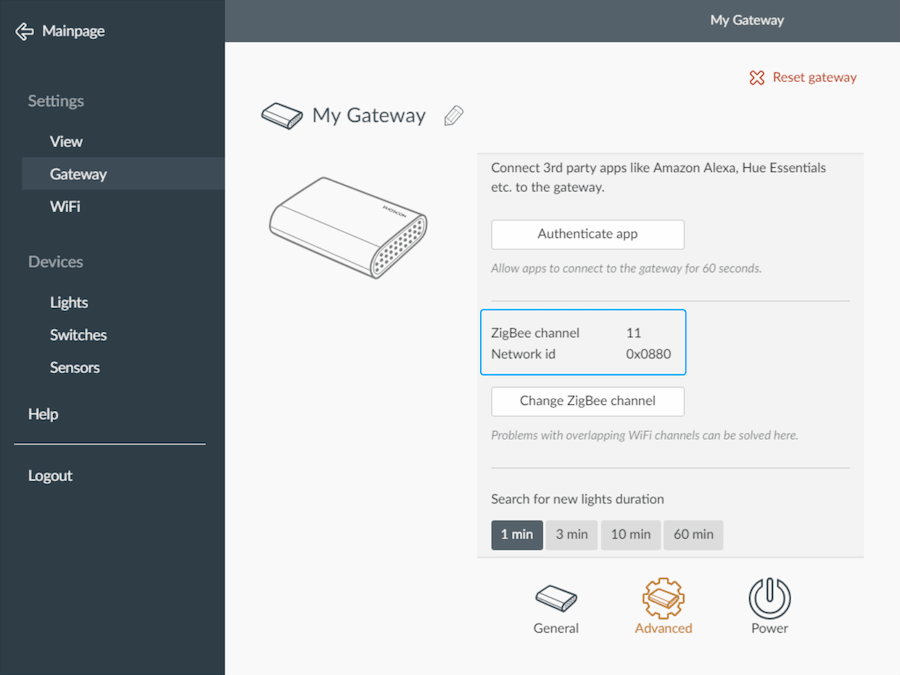
Check the current Zigbee channel of the gateway in the Phoscon App.
- Menu
- Settings
- Gateway
- Advanced
-
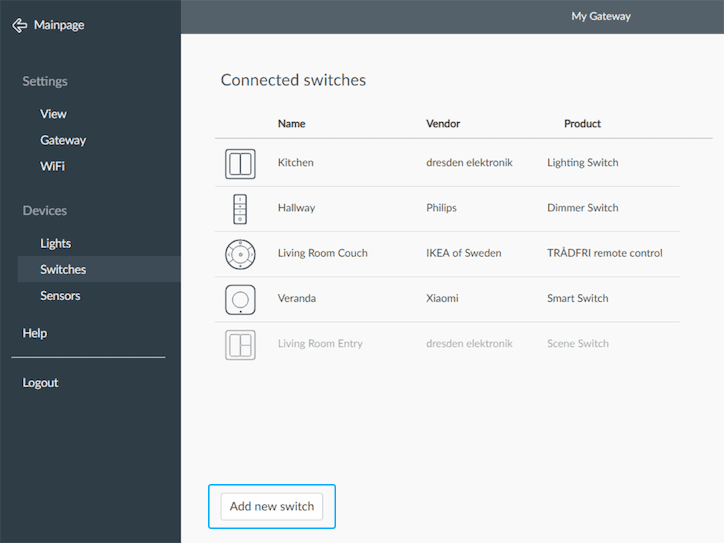
Go to the switch overview page.
- Menu
- Devices
- Switches
-
Select than
-
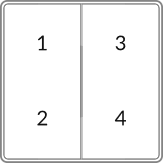
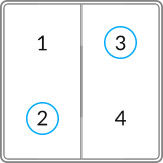
Press the button matching the Zigbee channel on the switch for 10 seconds.
- Zigbee channel 15 → button 1
- Zigbee channel 20 → button 2
- Zigbee channel 11 → button 3
- Zigbee channel 25 → button 4
-
Important: Complete commissioning by briefly pressing buttons 2 and 3 simultaneously.
-
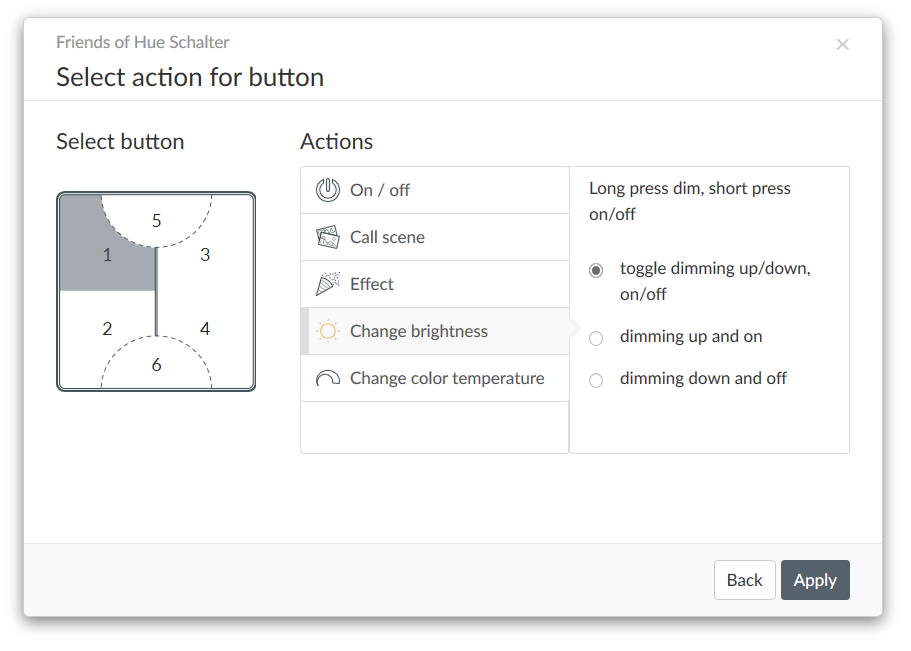
Once the switch has been paired to the network, it can be easily configured via the switch editor of the Phoscon App. Phoscon App documentation →
How to update LEDVANCE devices?
The following steps describe the OTA update of LEDVANCE devices. In this example the smart plug is updated.
Note
This guide requires the deCONZ GUI with at least version 2.5.71. The headless deCONZ version is not supported yet.
-
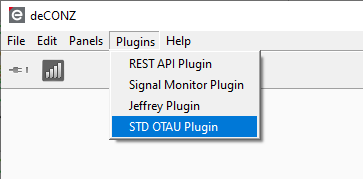
Select the standard OTAU plugin via the menu bar in deCONZ.
- Menu
- Plugins
- STD OTAU Plugin
-
Switch to the STD OTAU Plugin tab.

-
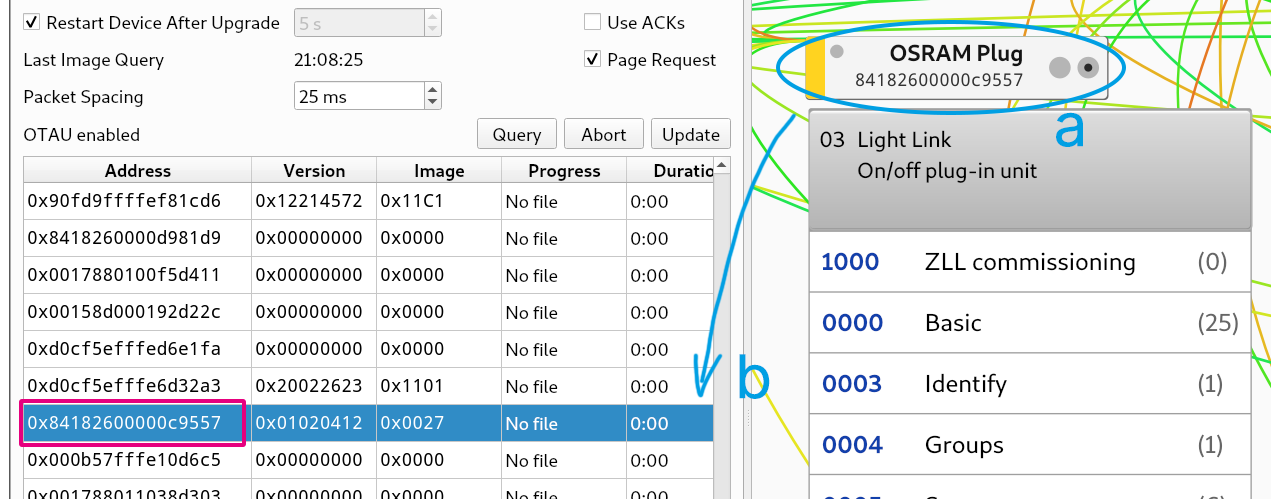
Select the device in the list.
-
Check the MAC address of the device that is to be updated.
-
Select the appropriate device from the list using the MAC address.
-
-
Download the OTAU file.
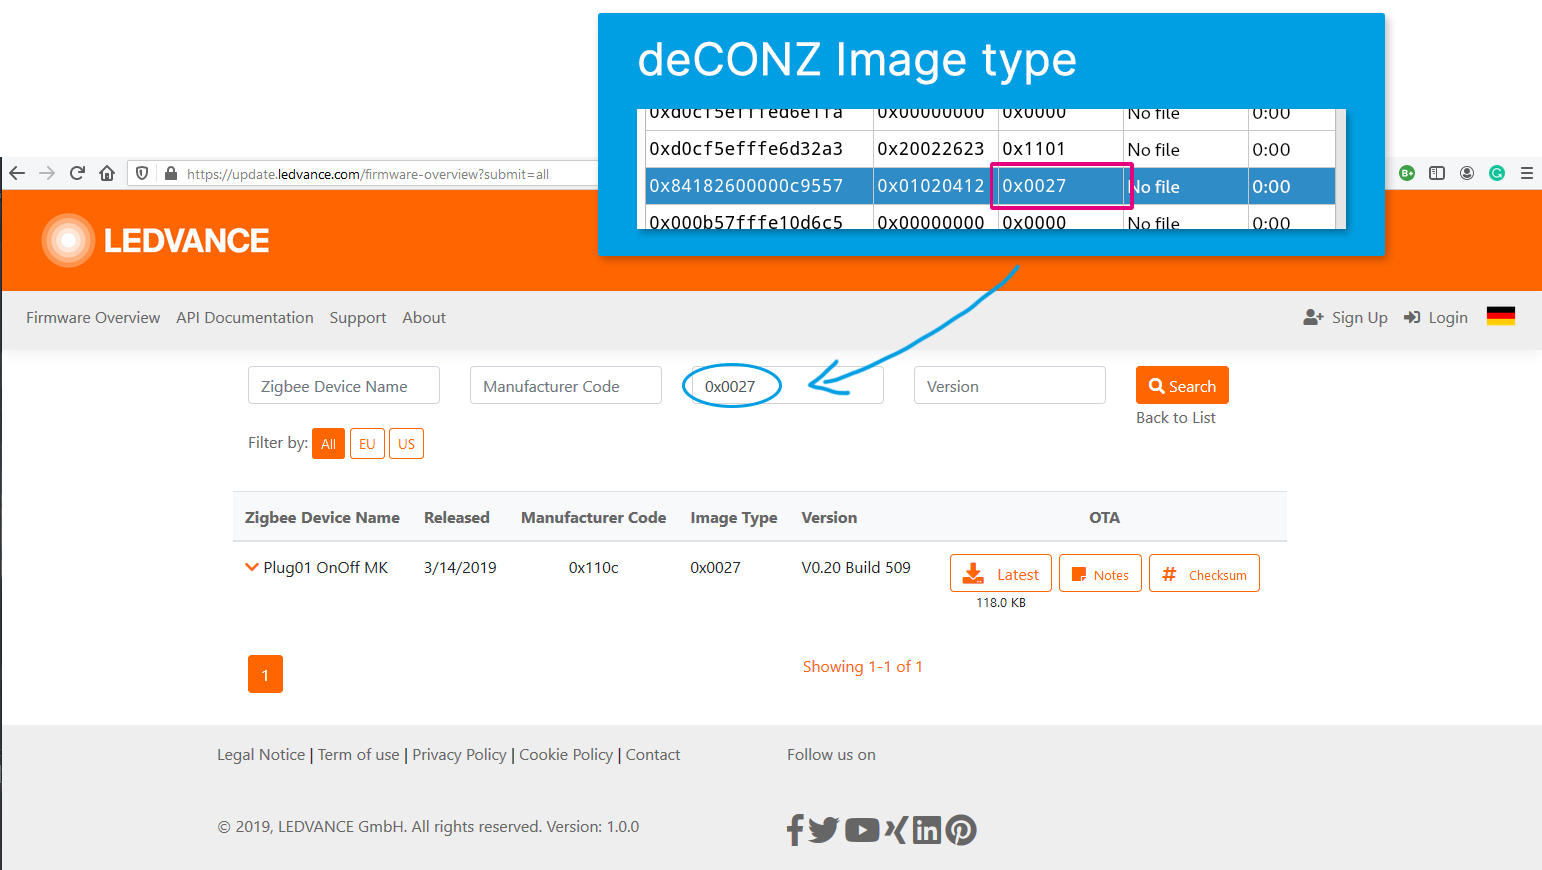
Remember the image type and enter it in the corresponding field on the LEDVANCE page. Download the OTAU file via the button
Latest
. -
Run the OTA update.
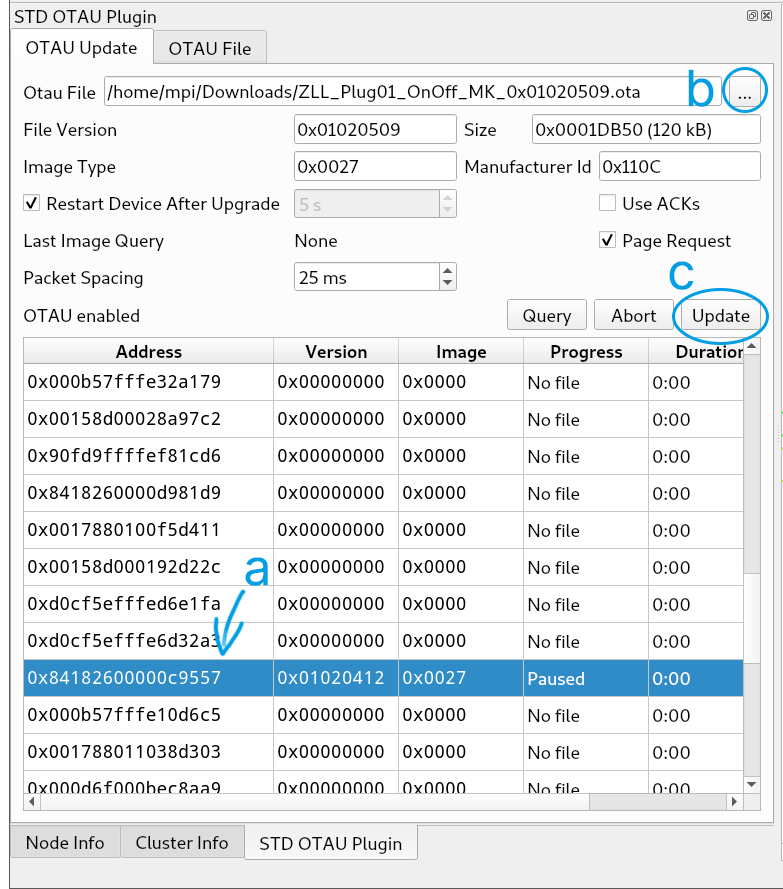
- Select the device entry in the list.
- Select the OTAU file.
-
Start the OTAU via
Update
button.
The process can take up to 5–10 minutes. After completion, the device will restart itself.

How can devices from dresden elektronik be updated?
Connected devices from dresden elektronik can be updated wirelessly via deCONZ. This process is done manually.
The necessary firmware files are product specific and must be stored on the deCONZ system.
-
Open deCONZ and under
Plugins
open theOTA Update
menu. - Mark the device to be updated in the list.
-
Open the previously saved
OTAU File
and start the process with theUpdate
button.
The start of the update process can sometimes take a long time, since the devices only ask for updates at regular intervals. This can be forced by power cycling the device to speed up the process start.
The entire update process can take 10 to 30 minutes. During this time, the device to be updated must not be switched off. After a successful update, the device restarts itself.
Troubleshooting
IKEA TRÅDFRI lights cannot be paired.
To be able to pair an IKEA TRÅDFRI light, it must be set to factory settings. The following steps and the timing of the reset sequence must be strictly followed.
- Start search for lights in the Phoscon App
- Switch light off/on 6 times quickly (reset sequence)
- The light flickers briefly, then switch it off/on once again
- The light should now be paired within 1 minute by the Phoscon App
In this Youtube video the execution of the reset sequence is shown.
Troubleshooting for ConBee II with Linux
The following steps guide you to check and fix problems of a deCONZ installation and the ConBee II. We recommend to follow the steps one after the other.
-
Check USB connection and mitigate USB 3.0 problems.
The ConBee II should preferably be connected to a USB 2.0 socket with an USB extension cable. Connection problems may occur if the ConBee II is attached directly to the USB port or is located near USB 3.0 devices such as external hard drives or memory sticks.
-
Check that the communication between ConBee II and deCONZ works.
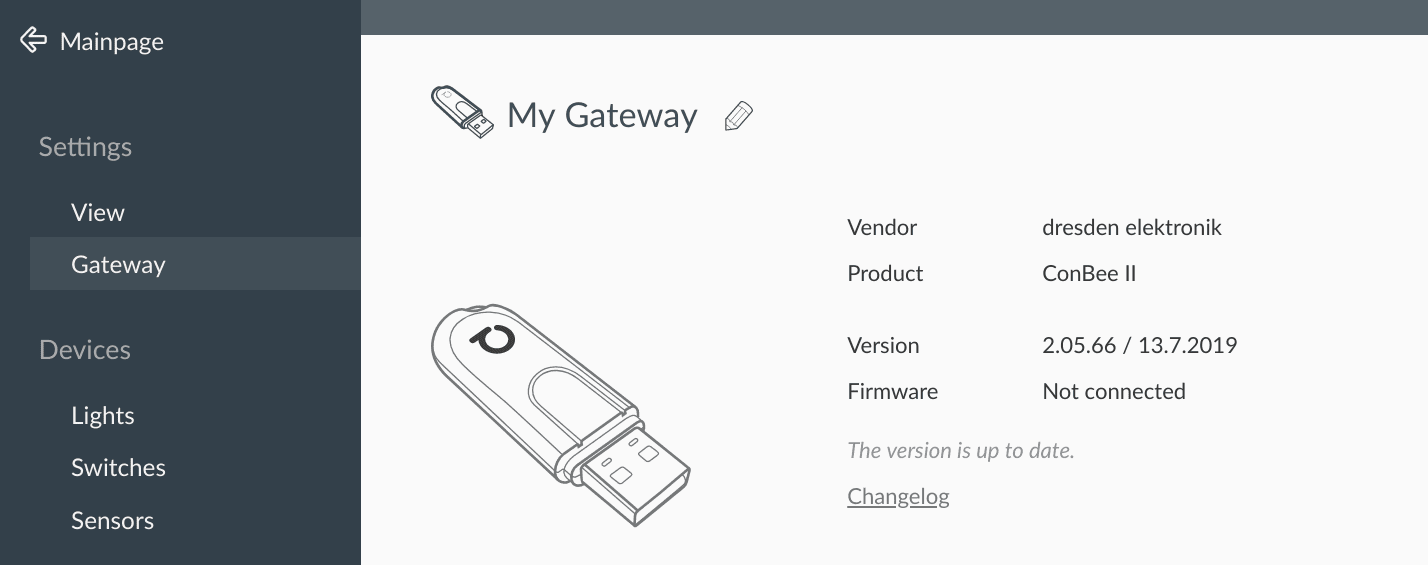
If the Phoscon App in the Gateway Settings displays
not connected
instead of the current firmware version, it’s an indication that the communication between deCONZ and ConBee II could not be established. In this case the next steps should be performed to re-establish the connection. -
Check that the current deCONZ version is installed.
This ensures that already fixed problems of earlier versions do not occur. To install the latest version, all steps must be performed at https://phoscon.de/conbee2/install for the platform used.
-
Check that a connected ConBee II is registered in the system.
$ lsusb
Bus 002 Device 001: ID 1d6b:0003 Linux Foundation 3.0 root hub
Bus 001 Device 006: ID 8087:0a2b Intel Corp.
Bus 001 Device 078: ID 1cf1:0030 Dresden Elektronik
If the ConBee II has been registered in the system, the manufacturer and product code 1cf1:0030 will be shown for dresden elektronik and the ConBee II.
If the ConBee II does not appear in the list and deCONZ is running in a virtual machine or a docker container, the USB device needs to be added to the virtual environment.
In the case of Docker, this happens automatically when the container is started according to the installation instructions: https://phoscon.de/en/conbee2/install#docker
-
Check that the serial interface is available.
$ ls -l /dev/ttyACM*
crw-rw---- 1 root dialout 166, 0 27. Jun 11:39 /dev/ttyACM0
Depending on whether other USB devices are used, the device file of the ConBee II is created with a consecutive number as /dev/ttyACM0 or /dev/ttyACM1.
Important: In order to have read and write access to the device, the user must be in the
dialoutgroup as described in the installation instructions. -
Check that the ConBee II firmware is installed and up to date.
Note: If a previous update has failed, the firmware will be reinstalled.
- Close deCONZ if it’s running
- Unplug the ConBee II and wait 10 seconds
- Connect the ConBee II again and wait 10 seconds
-
Install the latest firmware
sudo GCFFlasher_internal -d /dev/ttyACM0 -t 60 \
-f /usr/share/deCONZ/firmware/deCONZ_ConBeeII_0x26490700.bin.GCF
The FLS-PP does not work with Philips Hue Bridge Pro (V3)
Error: The FLS-PP can no longer be controlled after it has been paired with a Philips Hue Bridge Pro (V3). Only switching on and off is possible. A connected RGB LED strip glows static green.
Solution: The firmware update version 201000F8 (Download) for the FLS-PP ballast fixes this error. This means that the color control works perfectly again and allows users to adjust the lighting as usual. Click here for instructions in the FAQ section for the firmware update.
The FLS-CT does not work with Philips Hue Bridge Pro (V3)
Error: The FLS-CT can no longer be controlled after it has been paired with a Philips Hue Bridge Pro (V3). Only switching on and off is possible. A connected CCT LED strip lights up statically white.
Solution: The firmware update version 201000F8 (Download) for the FLS-CT ballast fixes this error. This means that the color temperature control works properly again and allows users to adjust the lighting as usual. Click here for instructions in the FAQ section for the firmware update.
Community
Lots of discussion about deCONZ in connection with other home automation systems as well as suggestions for new ideas also takes place in the community.
-
Forum →
Phoscon community forum for questions and topics related to Zigbee
-
deCONZ
Github Wiki →
Interesting facts about deCONZ
-
deCONZ Discord Chat
→
Community and developer exchange about deCONZ, device integration, home automation systems and much more
-
deCONZ
Github REST-API Issues →
Developer questions about the open REST-API deCONZ and device integrations
- Phoscon Youtube channel →
- Phoscon Mastodon channel →
- Phoscon Bluesky channel →
Contact
I have one more question… The answer was not yet there?
Our support
will be happy to help you.

support@dresden-elektronik.de
